

Apple enabled TRIM support in OS X Lion 10.7 but there’s a catch; Apple only allows TRIM to work when using an Apple sanctioned SSD. If you switch to a non-Apple SSD or upgrade your hard drive to an SSD, TRIM support does not get enabled by default. In fact, Lion offers no simple switch to press to enable TRIM. Thankfully there are a set of terminal commands that may be copied and pasted over to turn TRIM support on for any SSD in the OS X Lion operating system. This how to guide walks through the process of enabling TRIM support with any SSD in the OS X Lion environment.
Our guide is based off the instructions digital_dreamer published on the insanelymac forums this summer when Lion was released and later revised by Grant Pannell. Note that if you update the system software, you will need to reapply this patch to enable TRIM again.
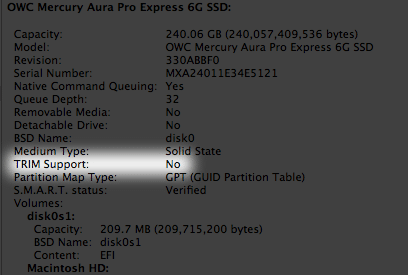
Using this guide, we enabled TRIM on the OWC Aura Express Pro 6G 240GB SSD we previously reviewed. As you can see below, TRIM was disabled.
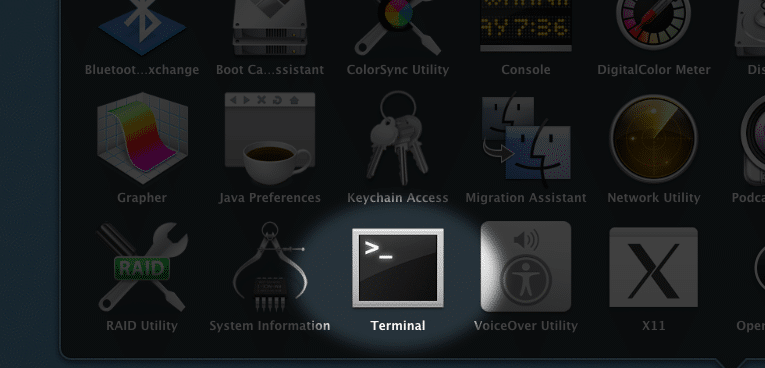
The guide breaks the process down into three steps, all performed via copying and pasting the code snippets through the terminal window. To launch a terminal window, open the Utilities folder inside the Applications folder and select terminal.
The first step makes a backup of the original IOAHCIBlockStorage file called IOAHCIBlockStorage.original. You will be prompted to enter in your system password when using the “sudo” command, since you are modifying system files. Copy and paste the code into the terminal window, a successful or uneventful response is a new blank terminal line.
sudo cp /System/Library/Extensions/IOAHCIFamily.kext/Contents/PlugIns/IOAHCIBlockStorage.kext/Contents/MacOS/IOAHCIBlockStorage /System/Library/Extensions/IOAHCIFamily.kext/Contents/PlugIns/IOAHCIBlockStorage.kext/Contents/MacOS/IOAHCIBlockStorage.original
Next the code patches the IOAHCIBlockStorage file, removing the requirements that the SSD be made by Apple. Copy and paste this code just like the previous command, this step should complete in very little time (seconds or less than a second).
sudo perl -pi -e ‘s|(\x52\x6F\x74\x61\x74\x69\x6F\x6E\x61\x6C\x00{1,20})[^\x00]{9}(\x00{1,20}\x51)|$1\x00\x00\x00\x00\x00\x00\x00\x00\x00$2|sg’ /System/Library/Extensions/IOAHCIFamily.kext/Contents/PlugIns/IOAHCIBlockStorage.kext/Contents/MacOS/IOAHCIBlockStorage
The last step loads the newly patched file into the kernel. On a few systems this particular command takes a bit to complete. Expect to see the terminal window wait for 10-15 seconds before a new line appears.
sudo kextcache -system-prelinked-kernel
sudo kextcache -system-caches
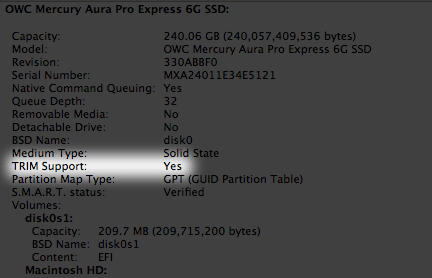
Now reboot your system and verify that TRIM is enabled through the System Information on the Serial-ATA device listing. As you can see on the system we performed this modification on, TRIM support is now enabled.
If you want to disable TRIM or completely reverse any changes performed with this guide, two options are available.
The first reverses the changes.
sudo perl -pi -e ‘s|(\x52\x6F\x74\x61\x74\x69\x6F\x6E\x61\x6C\x00).{9}(\x00\x51)|$1\x41\x50\x50\x4C\x45\x20\x53\x53\x44$2|sg’ /System/Library/Extensions/IOAHCIFamily.kext/Contents/PlugIns/IOAHCIBlockStorage.kext/Contents/MacOS/IOAHCIBlockStorage
sudo kextcache -system-prelinked-kernel
sudo kextcache -system-caches
The second utilizes the backup file created and restores it over the modified one.
sudo cp /System/Library/Extensions/IOAHCIFamily.kext/Contents/PlugIns/IOAHCIBlockStorage.kext/Contents/MacOS/IOAHCIBlockStorage.original /System/Library/Extensions/IOAHCIFamily.kext/Contents/PlugIns/IOAHCIBlockStorage.kext/Contents/MacOS/IOAHCIBlockStorage
Overall the process to enable TRIM on an OSX Lion system is rather painless, with the only requirement being that a SSD that supports TRIM is installed. If you happened to update your notebook or desktop to an SSD, enabling TRIM is a must for the best long term sustained performance.


 Amazon