

I needed something compact for apartment life and to retire my aging thrown together server which has served me well for many years, but on its last leg. I picked up some used parts off Reddit and my parts bin that I keep in my apartment, the goal pretty much is file storage for the time being, Plex eventually, but I’m also migrating my data from my old server to my new one which was just completed (per here).
Overall goal is long-term file storage, some media entertainment in the coming future, and just to have a larger destination I can throw my files. I wouldn’t say it’s a backup destination, more like the place I work on all my files from; it’s where everything will live.
The physical build
This build log is for my new server to replace my thrown together i7 920 “server” that is not aging well.
Parts list:
- Motherboard: Supermicro MBD-X10SDV-4C-TLN2F-O: Intel Xeon D 1521 Mini ITX board
- With Supermicro active heatsink (installed in place of passive heatsink)
- RAM: x2 16GB DDR4 Samsung DDR4 ECC
- Boot Device: Crucial P1 1TB NVMe M.2 SSD
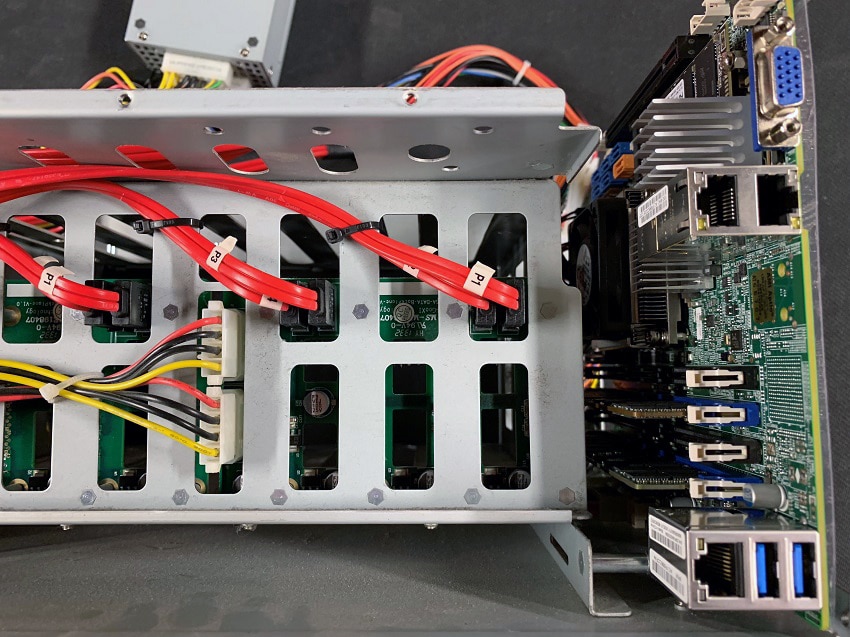
- PCIe Device: Dell H310 (based on LSI 9211-8i) flashed to IT firmware version 20
- Hard drives: x8 Seagate Barracuda Compute 4TB drives
- Fans: Replaced stock case fans with Noctua NF-F12 iPPC 3000 PWM (Noctua Industrial application fans for high airflow and static pressure). Added Noctua NF-A4x20 PWM 40mm fan for H310 heatsink.
- Power supply: SeaSonic SS-300M1U 300W + ATX-Flex bracket
- Case: U-NAS NSC 800 server case
My build requirements are somewhat simple; the form factor for the device needs to be compact and able to be in plain sight while not drawing too much attention to itself. I wanted 8 or more hard drive bays, but requiring a small form factor and wanting the ability to hot swap a hard drive this is one of the best solutions. Off the shelf solutions such as Synology or QNAP did not have the customizability that I wanted, such as being able to run ESXi and in turn be able to utilize FreeNAS for ZFS.
Most of the components were purchased second hand, the motherboard, fans, and boot device were all purchased new, while everything else was used in some aspect but in good condition.
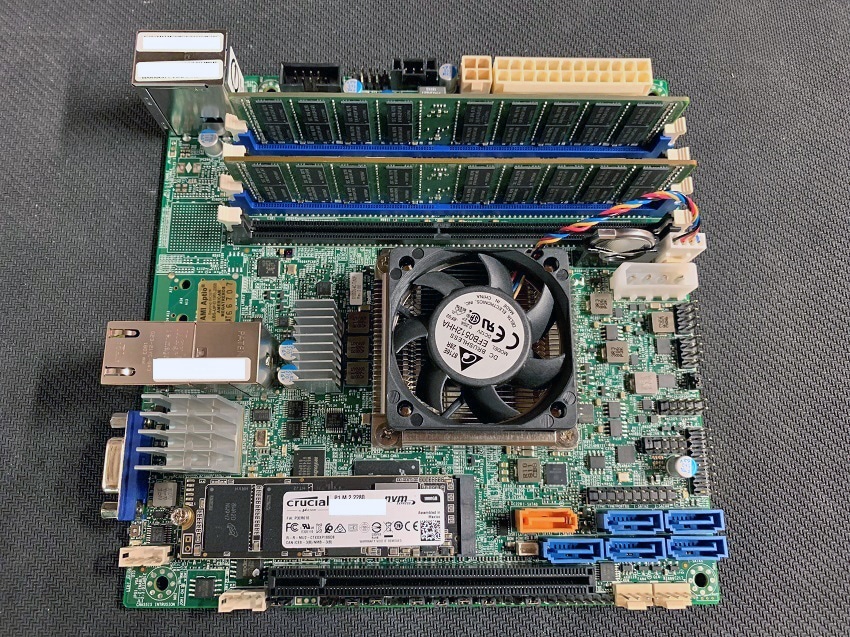
Motherboard: This board was selected because it is not only one of the few motherboards that Supermicro makes in Mini ITX form factor, but also has dual onboard 10GbE. The passive heatsink was less than desired, but we’ll touch on that part below. The Motherboard has a Xeon D 1521 with 4 cores, 8 threads with a TDP of 45 watts, it also allows for a maximum memory capacity of 128GB of DDR4 when using RDIMMs, or a maximum of 64GB when using UDIMM’s. The feature I love the most of this small form factor motherboard with onboard 10GbE is the fact it retains an IPMI port so it can be managed via the Supermicro IPMI software that is installable on Windows, or can be accessed via web browser and phone/tablet application such as for iOS, it also can report fan speeds, CPU, DIMM, and system temperature, and with the correct power supply report power usage.
RAM: Samsung is a brand I trust, the x2 16GB DDR4 UDIMM came out a bin of parts I had set aside for a raining day that I never got around to doing anything with. While they are still worth a few dollars and I could sell them for a single 32GB DIMM the time I’d spend hunting for a deal and paying eBay/PayPal fees outweighed the gain of a single DIMM.
Boot Device: I wanted something spacious and speedy, an NVMe M.2 device fits just that, and the fact the motherboard has an onboard slot for it seals the deal. Crucial has a great price for a 1TB NVMe drive and decent speeds for boot up and VM storage.
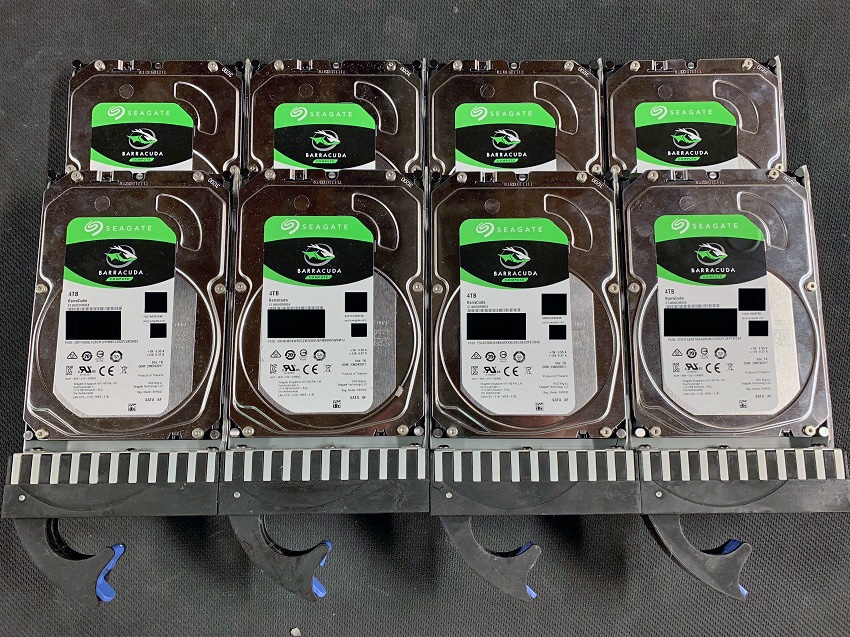
PCIe Device and Hard drives: I went with a flashed H310 because it’s what I had in my previous build, so reusing a part saved me $30 or so depending where you show, the hard drives I selected were Seagate Barracuda 4TB Compute drives which are 5400 RPM, SATA 6Gb and have a 256Mb cache. They’re both efficient and should run relatively cool and quiet and are backed with a 2-year warranty.
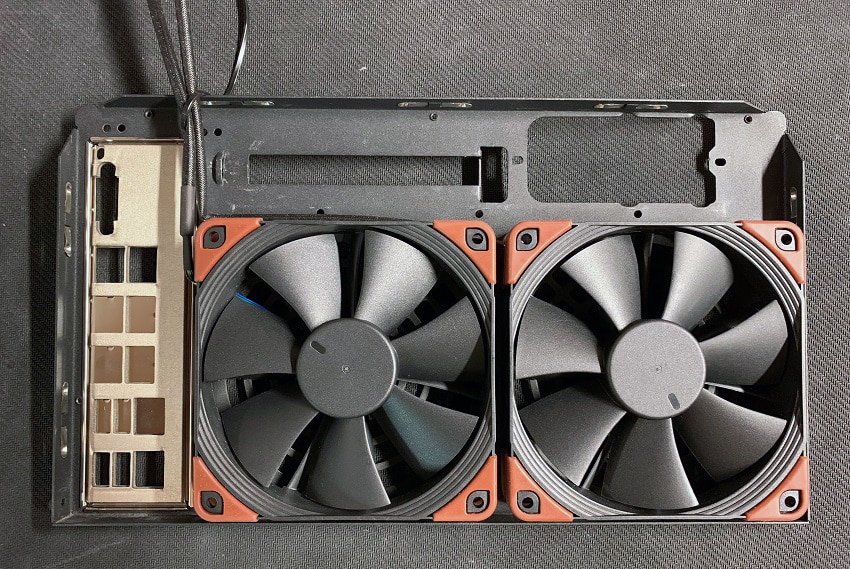
Fans: Due to the compact nature of the case I chose, and the fact I knew there would be 8 hard drives in the way of air getting pulled through the case I looked for something with a high airflow and static pressure. Noctua makes superb products all around so I didn’t have to look for long before stumbling onto Noctua’s industrial application fans that yield high airflow and static pressure while not being obnoxiously loud.
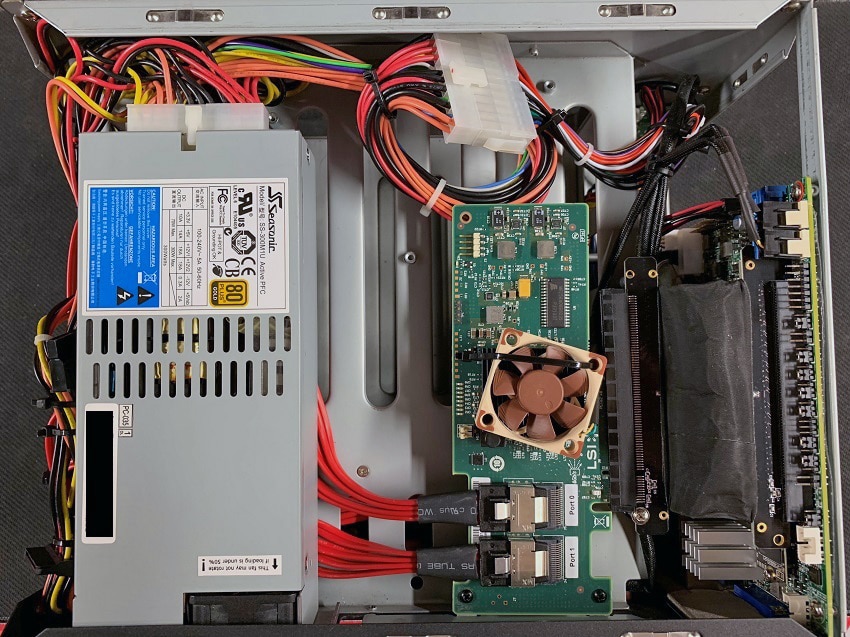
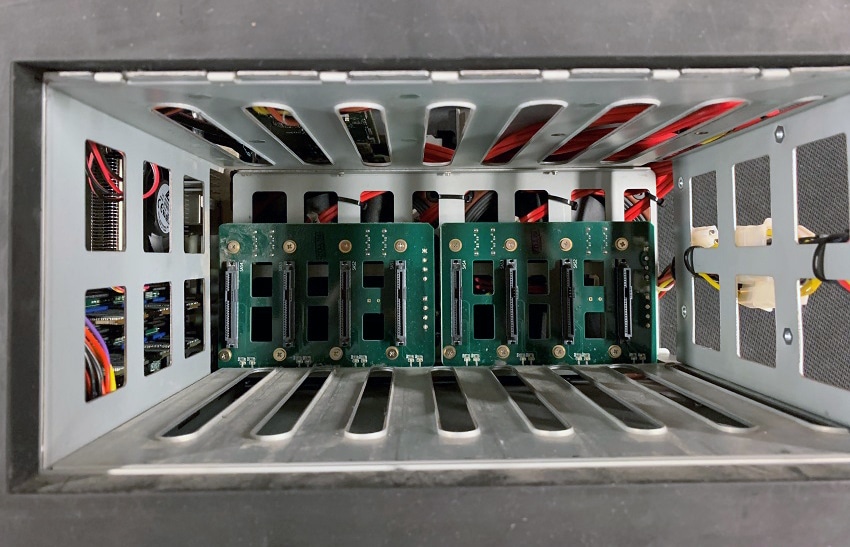
Power supply and case: The U-NAS 800 case is visually appealing, has 8 hot swappable drive bays with individual hard drive indicators. Finding a power supply to fit a compact case such as this was pretty easy as the SeaSonic has been utilized in other builds while I was researching my own and with up to 300 watts I could have easily changed out my HBA PCIe device for another device that may have required more power.
My first step was to get the passive heatsink removed, due to the confined space inside the U-NAS 800 case getting adequate airflow is difficult, and having a passively cooled CPU in said confined space did not yield good temperatures. After much tinkering and reading I came across a replacement for the passively cooled heatsink that is direct from Supermicro, prior to installing the active heatsink, temperatures with the passive heatsink were between 40-55c between boot up and idling, but never really dropping in temperature after boot. After installing the active heatsink boot up temperatures stayed under 35c and after boot maintained a steady 33c, putting load onto the server the maximum temperature I was able to gather via the Supermicro IPMI was 57c.
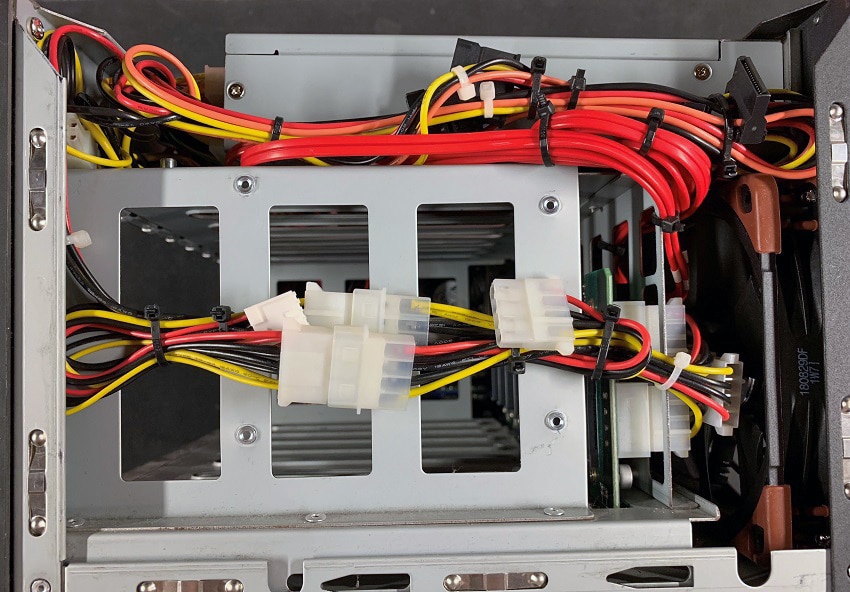
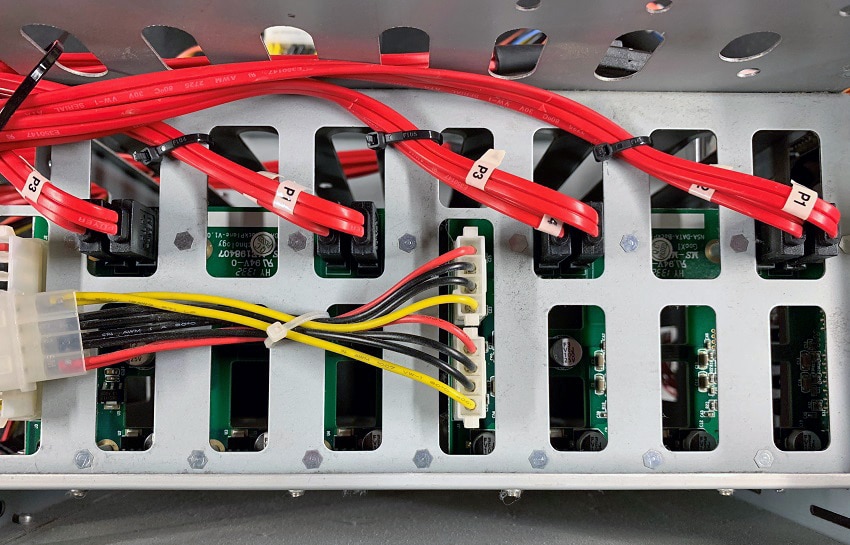
After getting the motherboard fitted into the case, redoing some cable management for the hard drive back plane, and rerouting some cables away from the dual rear fans I was ready to start putting everything else into the case. This included mounting the H310 using a flexible PCIe extender, seating the dual SAS to SATA cables that connect the HBA PCIe device to the SATA backplane which will eventually have hard drives connected to them, and placing the SeaSonic power supply so it can be secured to the rear of the case.
For anyone who has yet to build a compact PC, without a modular power supply cable management can be extremely difficult, while I hate using zip ties at times they’re just the easiest way to accomplish the task. After zip tying all the cables I did not need such as the dual SATA power cables, the single CPU 4 PIN cable, and shortening the 24 pin ATX power cable I was able to tidy up the dual molex power connectors I needed that power the hard drive backplane, which in turn power the hard drives, tying these to the side of the hard drive wall provided enough space for the hard drive to slide in and out and keep the cables out of the way when the case was closed.
The software build
After completing the difficult part of making everything look pretty inside the case, making sure everything fit just right and had proper clearances for any moving parts (fans), it was time to start the software part.

While both Synology and QNAP make attractive products, neither of which supported an OS I wanted to utilize, this OS was VMware ESXi version 6.7, a type 1 hypervisor. My reasoning for choosing VMware ESXi was that it is simple to manage via a web browser, is very light on resources once booted, and I’m already familiar with it from work. Once ESXi was installed I was able to navigate to the IP address displayed on the monitor and access the newly installed OS, after uploading the latest stable release of FreeNAS 11.2 I proceeded with VM creation, selecting my Crucial 1TB M.2 SSD as the datastore in which to store the FreeNAS VM files.
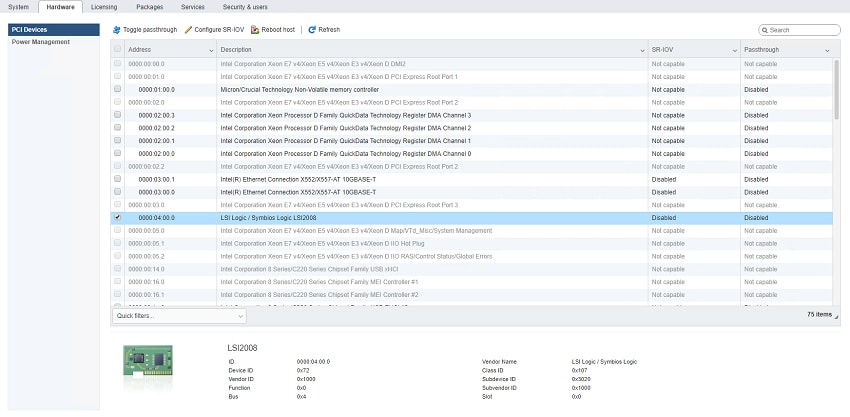
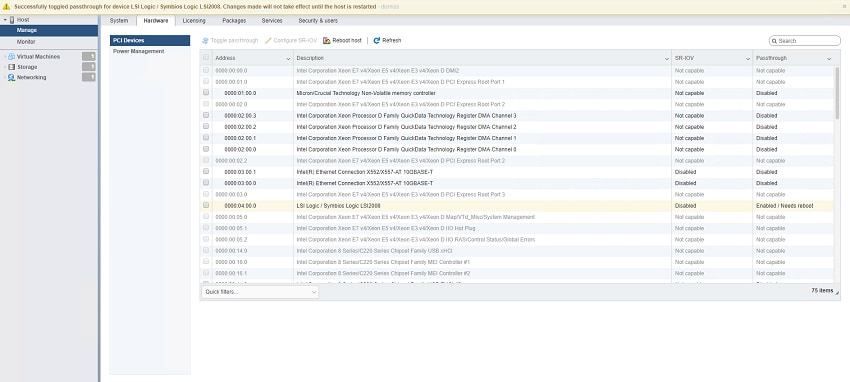
After creating the FreeNAS we have one very crucial step to complete and that is to pass the HBA (the H310) PCIe device through from the host hardware to the virtual machine, this allows FreeNAS unrestricted access to the hard drives so it can read/write data without issue, as well as view, run, and report SMART tests. To do this we’ll login to the ESXi web interface, navigate over to “Manage” and select “Hardware”, this will list all the hardware on the server, we’re specifically looking for a “LSI2008” device, select the check box next to it and select “Toggle Passthrough”, one quick reboot (thanks to our M.2 SSD) and we’re ready to pass this device on through to the FreeNAS VM.
Once the host has rebooted, selected the VM and select “Edit”, then select “Add other device” and in the drop down select “PCI Device” and choose the LSI2008 device. While we’re here, lets also attach the FreeNAS 11.2 ISO we’ll need for the installation, to do this select the CD/DVD Drive drop down and click “datastore ISO file” then navigate to your datastore and select the FreeNAS 11.2 ISO, select save and we are ready to get FreeNAS installed.
Once the VM is saved we’re able to select “Power on” and once powered on we’re able to select “console”, this will allow us to interact with the VM and get the OS installed. Follow the onscreen prompts and be sure to select the virtual hard drive you created when making the VM and not one of the physical hard drives from the LSI adapter. From there, enjoy!
– William Menser
This post is part of an ongoing series of user-submitted content dedicated to exploring the fun and challenges of building, maintaining and sometimes building again a home lab. This series is in partnership with our friends at /r/homelab. If you’re interested in sharing your set up, please send an email to [email protected]


 Amazon