
If you find yourself here reading this article, it probably means something has gone terribly wrong. Take a deep breath, we’re going to get through this. Buried in the depths of the Google search results for “deleted file recovery,” past the very aggressive SEO results of various companies trying to get you to buy their software, lies a result for one of my favorite pieces of free open-source software, PhotoRec. It is a companion program to TestDisk, another piece of wonderful open-source software, created by CGSecurity under the GNU General Public License. In this guide, we will go through the relatively painless process of recovering deleted files with PhotoRec. These tools are especially useful for recovering files from portable flash media used with digital cameras.
If you find yourself here reading this article, it probably means something has gone terribly wrong. Take a deep breath, we’re going to get through this. Buried in the depths of the Google search results for “deleted file recovery,” past the very aggressive SEO results of various companies trying to get you to buy their software, lies a result for one of my favorite pieces of free open-source software, PhotoRec. It is a companion program to TestDisk, another piece of wonderful open-source software, created by CGSecurity under the GNU General Public License. In this guide, we will go through the relatively painless process of recovering deleted files with PhotoRec. These tools are especially useful for recovering files from portable flash media used with digital cameras.
A few considerations before we get started to save you time; if the memory card was formatted in a professional-level camera, such as a Sony FS7 or Arri Alexa, the chances of recovery are very low, if not impossible. Unfortunately for this scenario, when you format cards in these cameras, the cards are zero’d out for security (so others can’t recover data from a sensitive or private shoot), and to maintain performance of the media. File recovery in this scenario is best left to professionals or the camera manufacturer, and even then the chances are unfortunately slim. Additionally, if the card has been used since formatting, it is very likely the media you are trying to recover has been overwritten.
If the above scenarios don’t apply to you, and you simply deleted a file or formatted a drive in a computer (note: Quick Format only, a full format in Windows also zero’s out the media), there’s a very good chance your files are still there waiting to see the light of day again. PhotoRec is available on basically every operating system, but for this guide we will be walking through this in Windows 10 Pro. The steps will still apply for Mac OS X and Linux to recover deleted files with PhotoRec.
Get Started: Recovering Deleted Files with PhotoRec
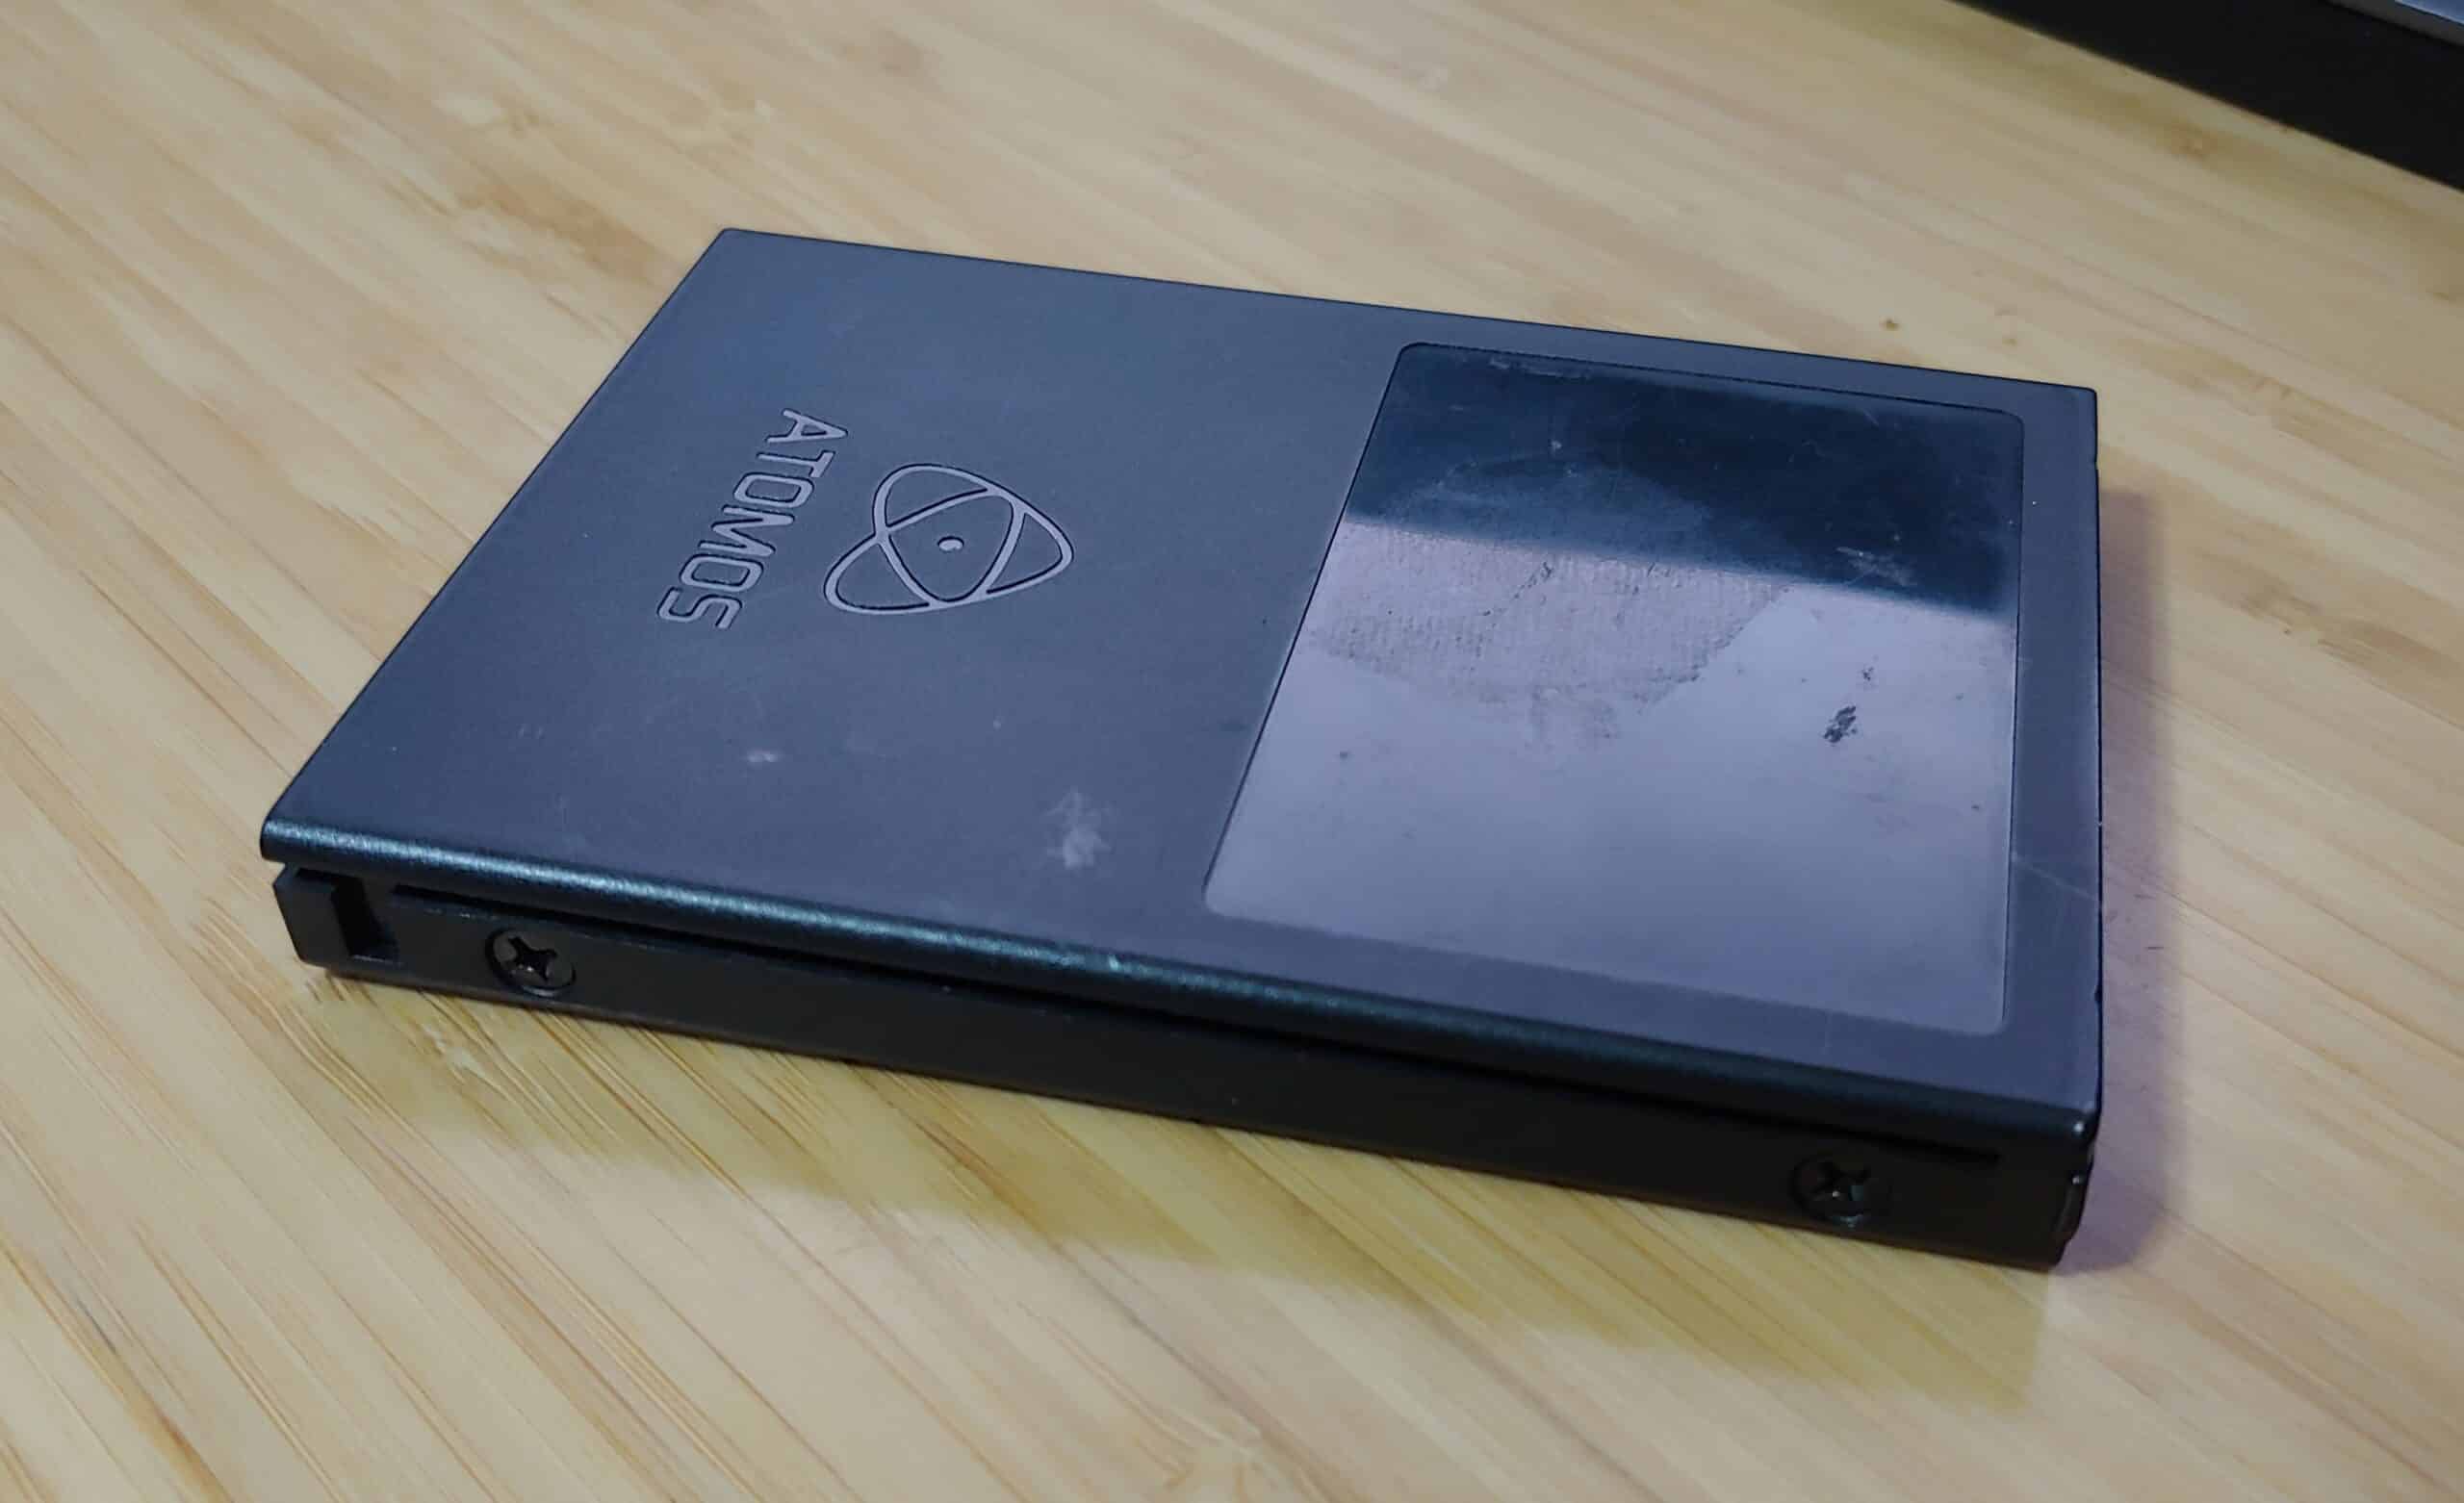
For this example, we will be using a card from an Atomos Shogun external recorder.
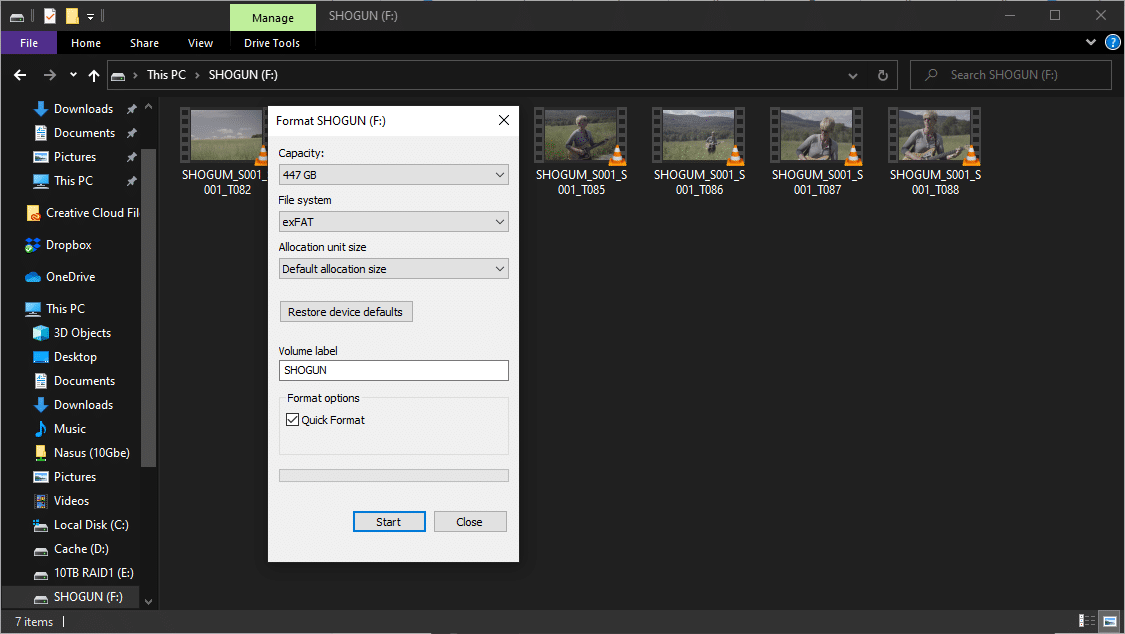
We will format it to exFAT and use Quick Format (note, using a full format will cause the files to be unrecoverable). As we can see, there are seven QuickTime .mov files currently on the drive (two obscured by the formatting window). They are all 4k ProRes 422 files recorded on the device.
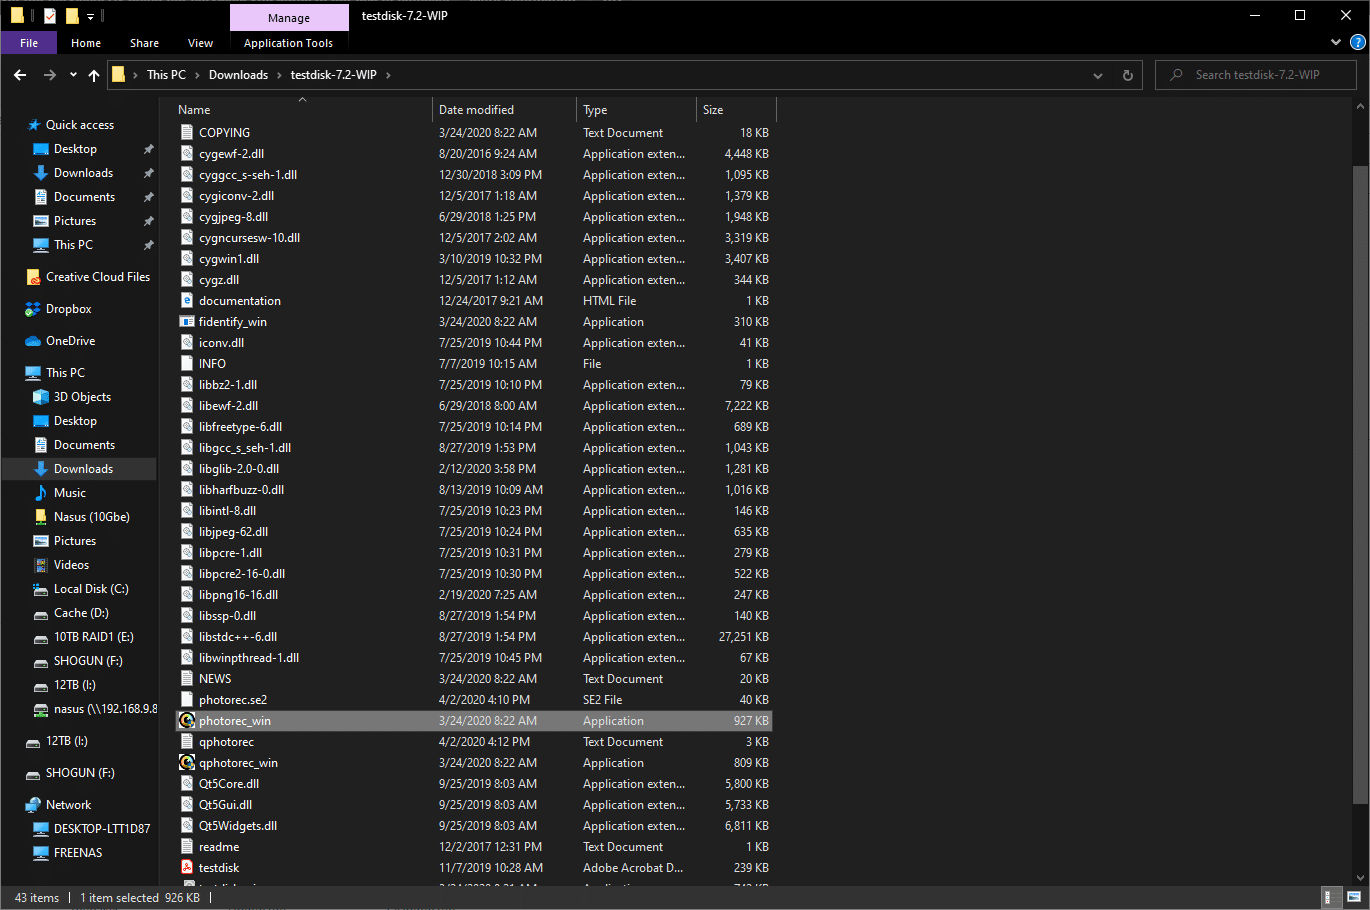
First step is to download the TestDisk and PhotoRec software suite for your operating system and extract the ZIP to wherever you’d like: https://www.cgsecurity.org/wiki/TestDisk_Download.
By this point, the media that needs to be recovered should be plugged in. Navigate to where your extracted files are and launch the PhotoRec executable. Note that the ‘qphotorec’ file is the same application, but with a GUI. You can use either one and get the same results, but this guide will walk you through the command line-based interface, since it will be most similar between platforms.
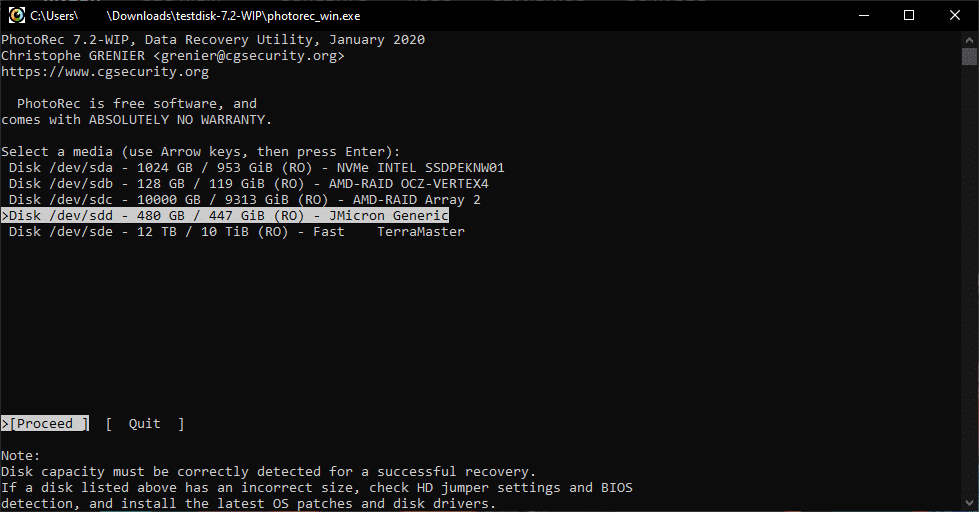
Let’s select the drive that we want to recover. In this example, it shows up as “JMicron Generic” as the Atomos drive is actually a 480GB SanDisk Ultra II SATA SSD.
On the next screen, we’re going to select the [File Opt] option with the arrow keys. This is the most critical step as it will let PhotoRec know what type of files we’re trying to recover.
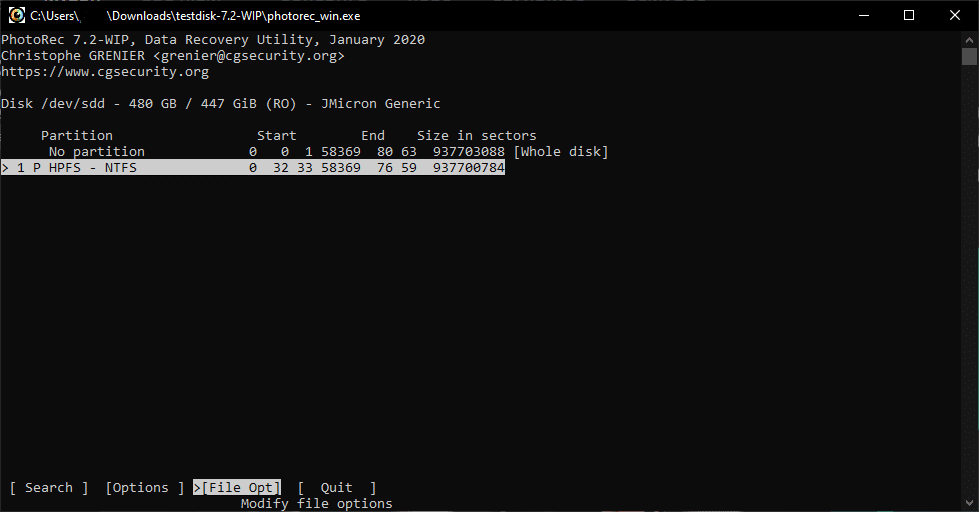
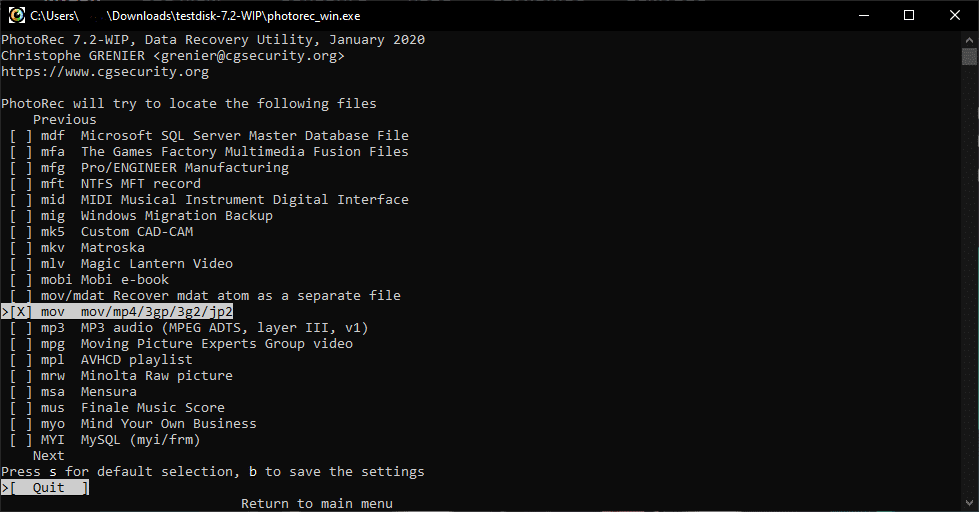
By default, all the file extensions should be selected (don’t worry if they’re not). We’re going to follow the prompts on screen and press ‘s’ to disable all of the extensions, scroll down with the arrow keys, and use the spacebar to select the file extension(s) we want (if you wish to save metadata files, you can also select .xml, .csv, or whichever format your camera saves metadata in). In this example we’re going to select ‘.mov’ since we’re recovering QuickTime files. Press ‘b’ to save these settings and select ‘Quit’ twice to return to the partition selection page.
It’s worth noting that if your files come out unplayable, you can try to come back to this screen and select the ‘mov/mdat’ option, which will allow PhotoRec to recognize the fragmented files and keep them together. Please refer to the additional notes at the bottom of this article on how to merge these files if this applies to you.
Back at the partition selection screen, we’re going to select Partition 1, since in this case it is our empty, freshly formatted partition. If you don’t find all of your files, you can come back to this screen and try again and select ‘Whole Disk.’ This is also useful if the filesystem of the drive is corrupt.

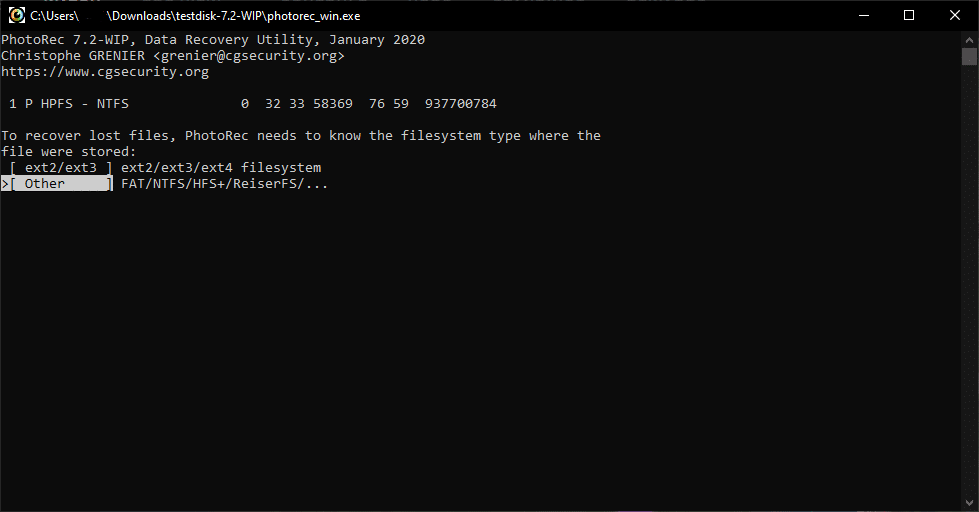
Next step is straightforward. We’ll select ‘Other’ as our file system type, since it is exFAT.
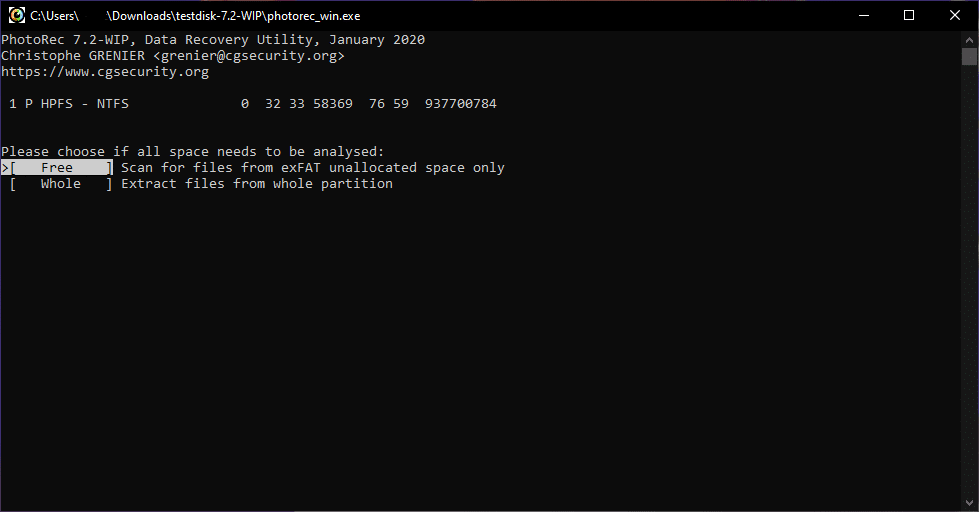
In the next step, we’re going to select ‘Whole’ so PhotoRec searches the whole partition for deleted files.
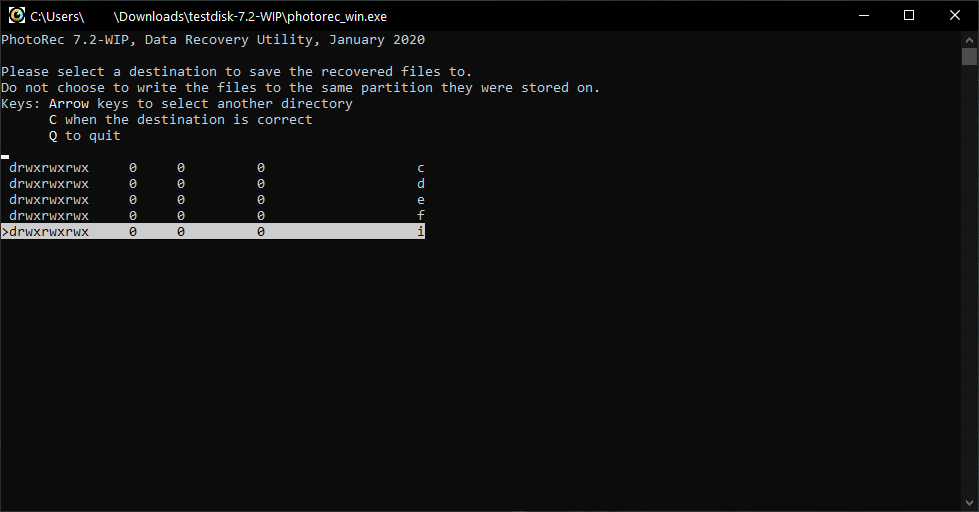
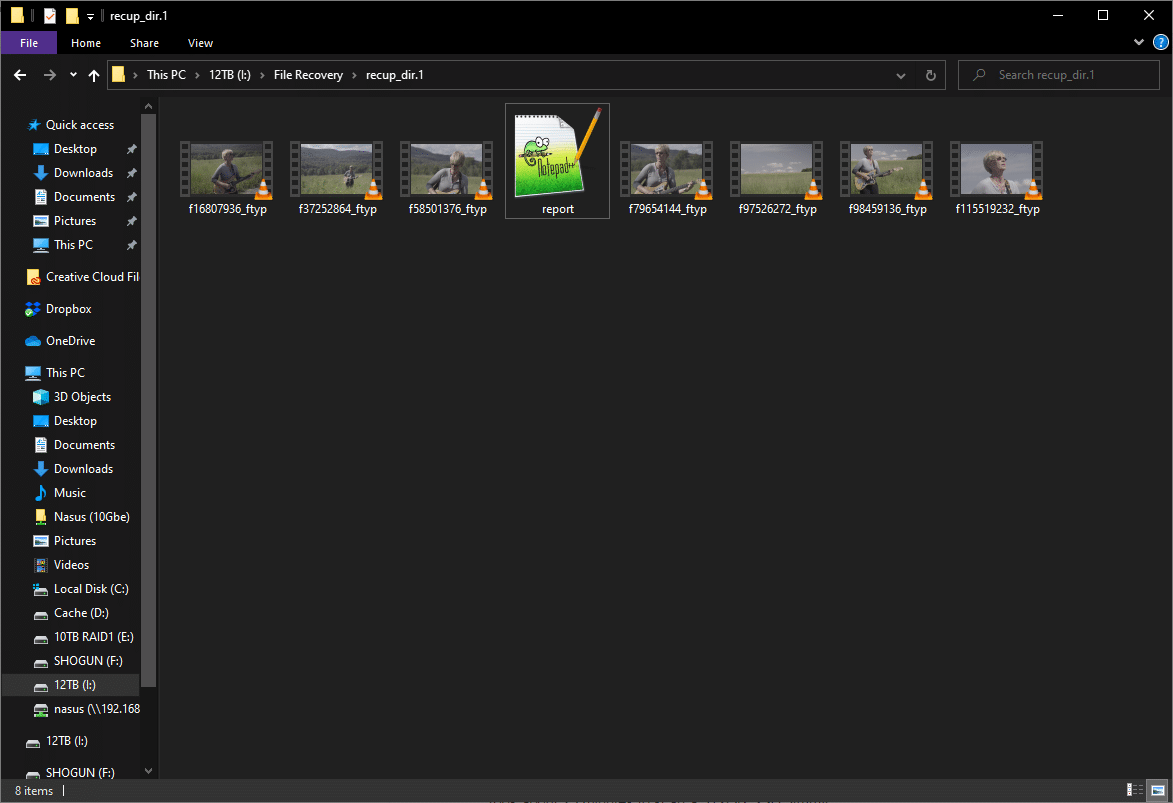
In the next step, we’re going to select a destination for PhotoRec to recover the files to. Of course it goes without saying, but I’ll say it anyway, that the recovery destination should absolutely not be the media you are trying to recover. Use the arrow keys to navigate the directories (left arrow will bring you to the parent directory, up to drive selection). I recommend making a new folder on a separate drive from your operating system to recover the files to. Use ‘enter’ to enter the folder and press ‘c’ to select it. Once selected the recovery process will start automatically. PhotoRec will create a subfolder named “recup_dir.x” where ‘x’ is the number of recoveries in this folder (e.g., recup_dir.1, recup_dir.2, etc.).
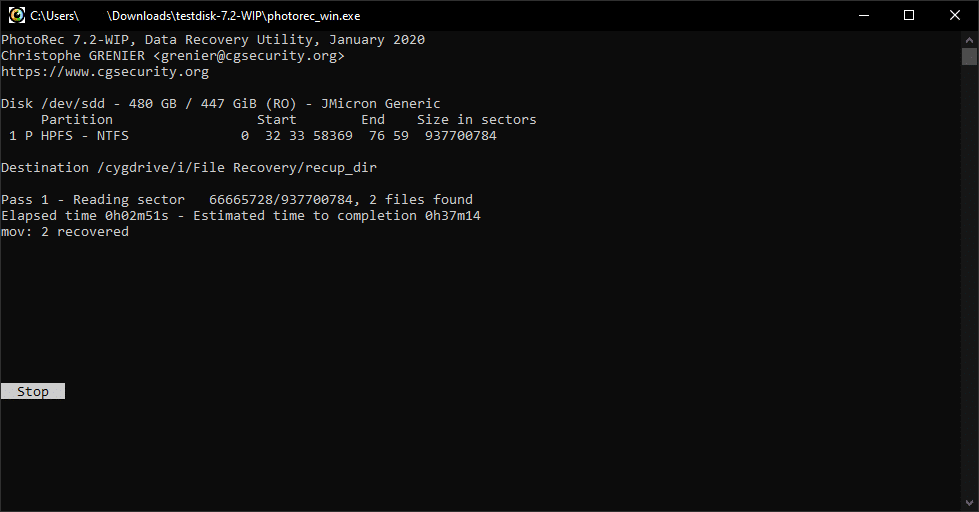
Sit back and grab a stiff drink while your files (hopefully) come back from the abyss. The process is fairly quick, but will of course vary wildly depending on what type and what size the media you’re recovering is. As a frame of reference, this example took about 25 minutes for a complete scan on a 480GB SSD over a USB 3.0 reader. The recovered files were backed up to an external Thunderbolt 3 dual-bay storage array in RAID0. The seven files were found and recovered within the first 5 minutes of the scan. You can view the files as they are being recovered.
By now, your files should be back! Breathe that sigh of relief and keep this article bookmarked to share with anyone you know who may find themselves unfortunate enough to be in the same situation you were just in. If no files were recovered, skip to the next section; all hope is not lost (yet). A few of the caveats with this recovery process (and most other recovery software) include a loss of any directory structure, and a loss of the file names. This is a small price to pay for file salvation. It’s worth noting that if necessary, you can get the file names back; see the notes below on how to do this.
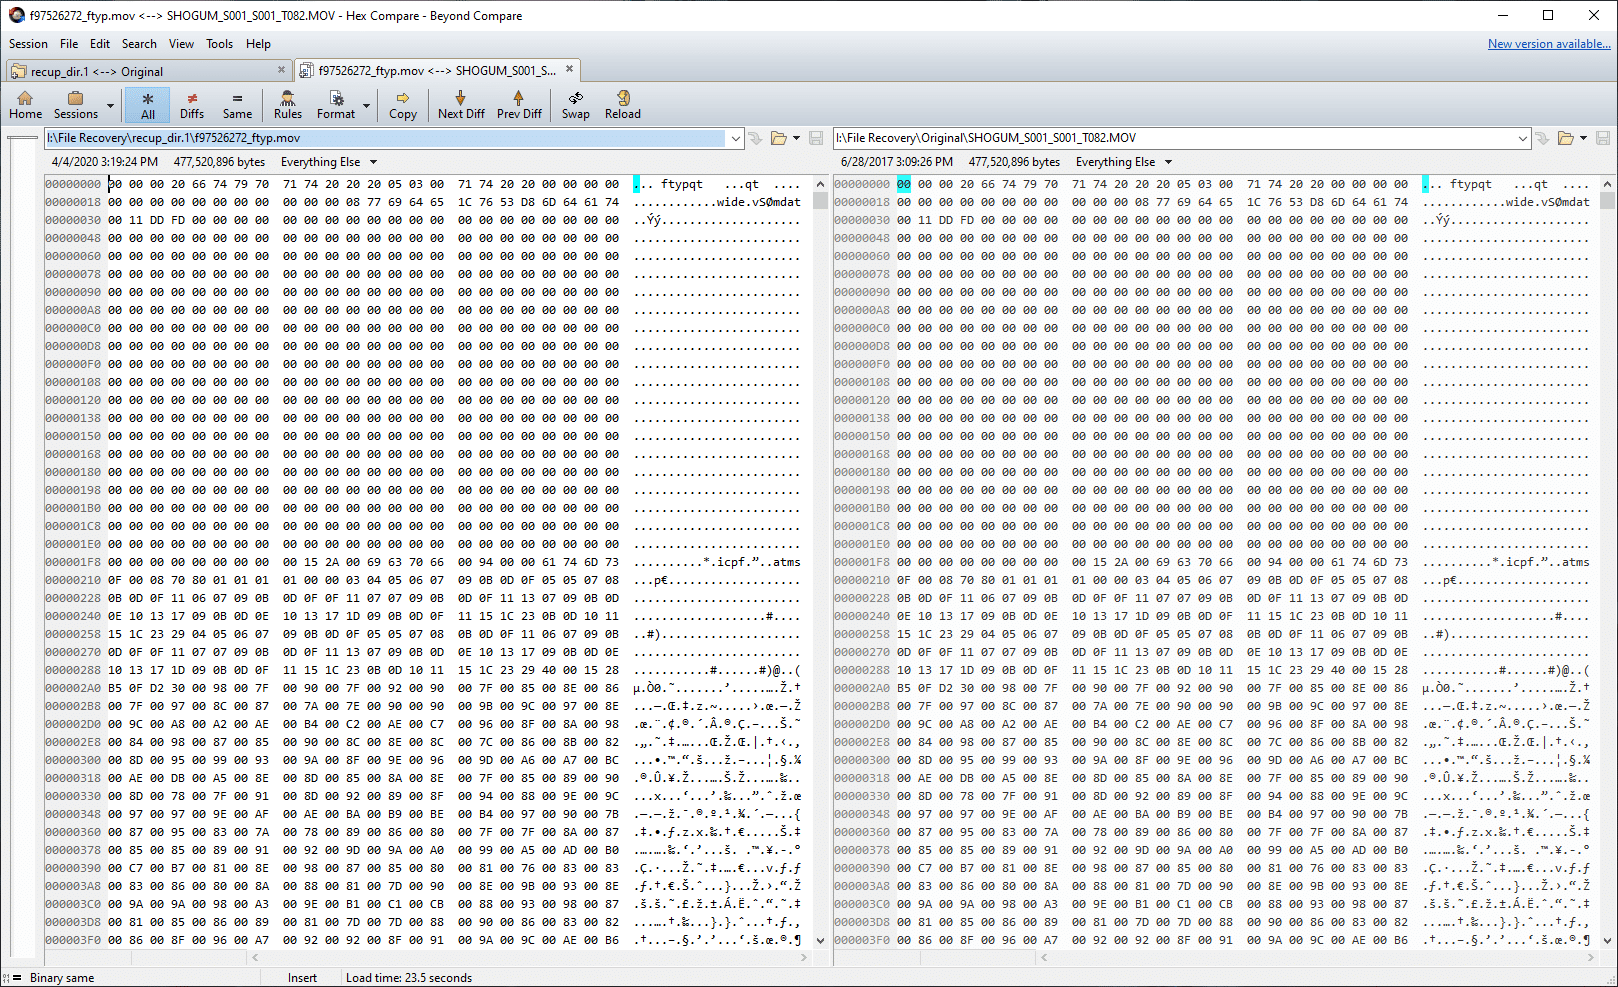
Just as a sanity check, I opened up the original file and the recovered file in an app called BeyondCompare and checked the binary data between the two files. They were a perfect match!
File Recovery Didn’t Work?
If the process didn’t work, there’s a few more things you can try. To reiterate the beginning of this article, if the media was formatted in a professional camera or overwritten, the chances of recovery are very slim.
- If you’re only getting partial or unplayable .mov files, certain cameras, such as the Canon 5D Mark III, write data to the card in fragments, which PhotoRec does not expect and does not recover. Files from GoPros will be more problematic as they create several fragmented files. You may be able to merge these in your video editing software of choice afterwards.
You can return to the partition selection screen (the screen after you select which drive to recover), select [File Opt] and in addition to selecting .mov, select ‘mov/mdat.’ This will create two files with similar names, one with _ftyp.mov and one with _mdat.mov.
This is a little advanced, so I’ll be making a few assumptions here about your skill level with command prompt and terminal. In Windows, open up a new Command prompt as an Administrator, go to the directory where the files are with the ‘cd’ command. We’re going to merge the files using the ‘type’ command. Usage goes ’type file2_ftyp.mov file1_mdat.mov > test.mov‘. This will have to be repeated for every set of files PhotoRec recovers. Under Mac OS X and Linux, the same usage applies, however we will use ‘cat’ instead. If you get permission errors, make sure you use ‘chown -R’ to take ownership of the recovery directory.
- If you’re trying to recover JPEG images from a card and only got a few images, you can return to the partition selection screen (the screen after you select which drive to recover), select ‘Options’ and go up to the ‘Paranoid’ option and hit enter until you select ‘Paranoid : Yes (Brute force enabled).’ This will tell PhotoRec to save more fragmented JPEGs that can possibly be saved using other software, such as Photoshop. Note that this process happens after the regular scan and will take a bit of time and you may notice your computer get sluggish, as this is a very CPU intensive task.
- If the application outright crashes, you can return to the partition selection screen (the screen after you select which drive to recover), select ‘Options’ and go up to the ‘Low memory’ option, and select ‘yes.’ If you have at least 16GB of RAM in your system, this shouldn’t be an issue, but if you have a lower spec machine, this should help. Also make sure (in Windows) that you are running the application as an Administrator, even though it should launch that way by default.
- If you are only able to get a few files or none at all, you can return to the partition selection screen (the screen after you select which drive to recover), select ‘Options’ and go up to ‘Keep corrupted files’ and select ‘yes.’ This will tell PhotoRec not to discard corrupted files and may let you recover parts of the file in a separate video or photo editing program.
Renaming the File Back to Original
If your file recovery was successful, but you’d like to rename the recovered files to their original file names, you can use another piece of software called ExifTool. This tool is fairly straightforward, but requires a prerequisite knowledge of command-line use. It will read the embedded metadata in the files to restore the filenames back to original. Please refer to the ExifTools documentation and Chapter 14 (page 43) of the testdisk.pdf document on instructions on how to do this. It’s a little too niche and involved to explain here.
Conclusion
At this point, you’re either elated that your files are back or in desperate need of inebriation. In either scenario, let’s take a look at how we got here in the first place and how to prevent it from happening again in the future.
I would start with using applications such as Pomfort SilverStack or ShotPut Pro to download media off the cards. These applications offer checksum verification to ensure that the data has been transferred without error. They can also create reports that have the checksums, thumbnails, and all the file information in them to make sure everything is where it’s supposed to be. Simply copying and pasting files from the media to a hard drive is borderline negligent and should never happen if you care at all about what you’re copying. These programs are not free, but worth their weight in gold for peace of mind. SilverStack is Mac OS X only, and ShotPut Pro is available for Windows and Mac.
Another fantastic application is PARASHOOT from OTTOMATIC. This app is only available in Mac OS X, but is free and provides an indispensable level of “idiot checking” to make sure cards are not overwritten. As their website states, Parashoot “checks if files on an inserted memory card are already backed-up somewhere[…] It can also fake format a memory card so once inserted again into a camera it prompts to reformat the card.” This lets whoever puts that card back in the camera know that if the camera doesn’t prompt a format, something is amiss and can check if the card has been properly backed up. This process is also reversible as all it does is flip every bit of the first 2MB of the card, destroying the file system information, but in a controlled way that can be undone.
Finally, I would adhere to the industry standard 3-2-1 backup rule. This is an easy way to remember to have your data in three locations, two on separate drives, and one offsite. At the very least, you should have your data in two locations while on set before a third backup is sent offsite. And remember, RAID is not a backup! And neither is “the cloud” for that matter.
I hope this article has helped you out. Nobody wants to be in a situation where files need to be recovered and I hope the tips for best practices will prevent this from happening to you in the future. I’ve been in this situation before and I know how stressful it can be. Best of luck on all your future creative endeavors and I wish you nothing but the most reliable data storage.
Engage with StorageReview
Newsletter | YouTube | Podcast iTunes/Spotify | Instagram | Twitter | Facebook | RSS Feed