

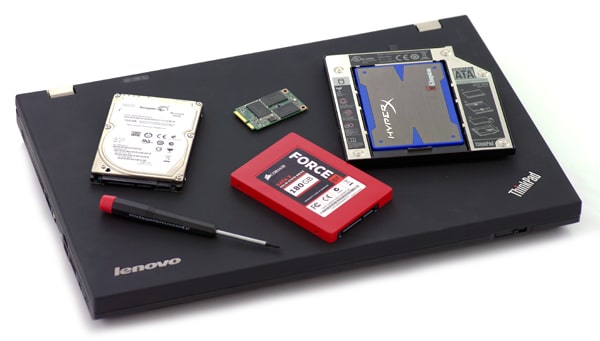
At StorageReview we realize many users may not be comfortable opening up their own computer to install a new SSD or more RAM. In this upgrade guide we cover how to upgrade a conventional Lenovo ThinkPad W520 notebook computer. We take you step-by-step, from unscrewing the access panels to installing the new components.
It’s important to ground yourself to eliminate any static electricity. Touch a solid piece of metal such as a faucet to do so. It’s also a good idea to wear an anti-static wristband while performing the upgrades.
Lenovo ThinkPad W520 Component Specifications
- System Memory: 204-pin PC3-10600 (DDR3 1333) DDR3 Memory
- Primary Drive Bay: 9.5mm 2.5-inch SATA Hard Drive or SSD (Some models ship with 7mm height drives which will use a different drive caddy and rubber rails)
- Secondary Drive Bay: 9.5mm 2.5-inch SATA Hard Drive or SSD
- mSATA Slot: Compatible with all newer mSATA SSDs
System Memory
Often times it’s less expensive to upgrade memory yourself rather than paying the manufacturer for the upgrade at the time of purchase. Additionally, it is desirable to add more memory to a system to increase its useful lifespan; those that use resource-intensive programs such as Adobe Photoshop can greatly benefit from large amounts of memory.
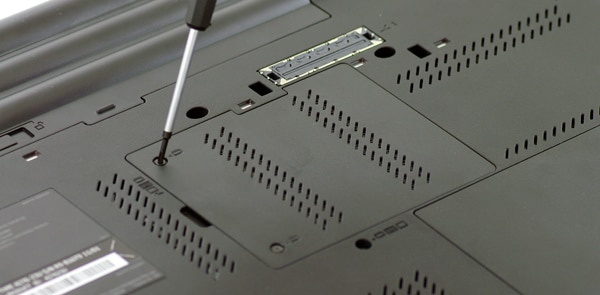
Fortunately most notebooks are designed for easy RAM upgrades and the ThinkPad W520 is no exception. Turning the notebook upside down (with the lid closed, of course!) we can see a single panel directly under the keyboard area. Remove the two Phillips head screws to see one of the two memory slots. It may already be occupied by a memory chip (or SO-DIMM). Buyers who opted for a W520 with four memory slots will see two on the bottom and two up top.
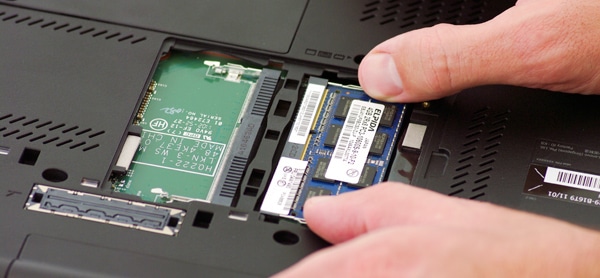
The other memory slot is located under the keyboard. How in the world is that accessed!? It’s actually a lot easier than you might think.
To start, remove the single screw revealed in the compartment we just opened on the bottom of the notebook. One more screw needs to be removed, also located on the bottom of the chassis (it has a small imprint of a keyboard next to it). Now turn the notebook over and remove the keyboard; this is accomplished by pushing the keyboard slightly forward to unclip the two tabs holding it in place at the front. Only a small amount of pressure is required to do so; the keyboard will lift up easily afterward. Be careful not to lift the keyboard too abruptly; there is a small cable that connects it to the computer.
To remove the memory chip, push the two silver clips holding it on either side outward simultaneously – use two fingers. The memory chip will then pop upward at an angle; gently pull it out in that direction.
To install a memory chip, push it in at an angle; it will only fit one way (see the little notch in the bottom of the chip and line it up with the slot). Once the module is firmly seated, tilt it down until the clips lock in place.
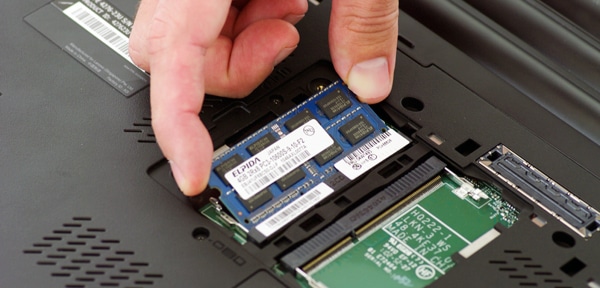
Avoid excessive handling of the memory – it’s not good to get dirt and oils from your fingers onto them. Never touch the gold connectors at the bottom; this can cause serious errors.
Hard Drive or SSD
The included hard drive or SSD is another upgradeable item on the ThinkPad W520. There are a number of reasons for upgrading; one reason could be the fact that more space is needed, another reason is to get better performance. There are three options for expanding or upgrading the storage on the W520:
- Primary 2.5-inch bay
- UltraBay, which can accommodate a second hard drive
- mSATA slot
All three are relatively easy to get to and upgrade.
The primary 2.5-inch bay is what most users will upgrade first. Start by turning over the notebook and locating the rectangular service panel in the corner of the chassis; remove the single Phillips head screw. To remove the drive tray, grab and lift the plastic tab and pull the drive out.
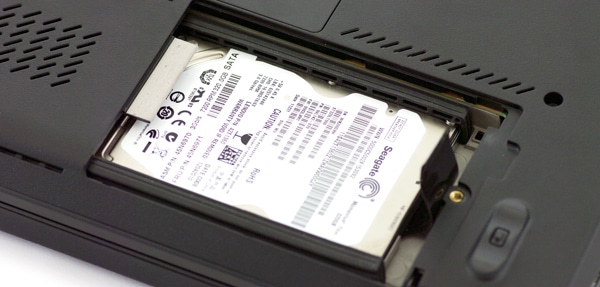
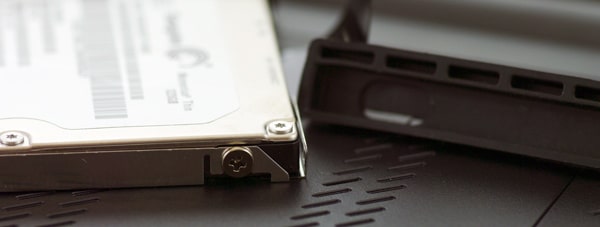
Once the hard drive is out of the system, tug the rubber bumpers off the side of the drive. Finally to remove the drive from the caddy, unscrew the four Phillips heads around the edges and the drive will come free. Installing a new drive is exactly the reverse of what we just went through.
Keep in mind the W520 comes with either a slim 7mm height drive or a standard 9.5mm height drive; the hard drive tray will be sized appropriately. A 9.5mm drive will not fit in the 7mm caddy. Verify which drive you have first. Not sure how? Ask us in the forums.
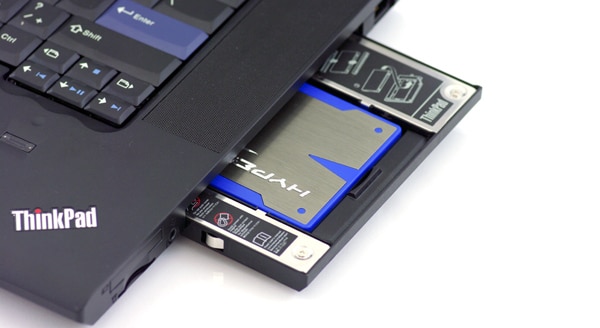
The next way to expand the W520’s storage is through the UltraBay; for most users this will mean replacing their optical drive. The UltraBay is an accessory for the W520; if you didn’t order a second hard drive with the notebook you will have to purchase the caddy first. The upgrade is straightforward once you have the caddy. There is a designed slot in the caddy for the new drive; make sure you line up the connector tabs on the new drive correctly so the drive slides in properly (it only fits one way). Then simply slide the caddy into the notebook.
For users interested in configuring RAID on their W520, note that you need to make this decision while first configuring the system when you buy it. RAID-enabled notebooks not only come with the secondary UltraBay caddy but also include special firmware that enables RAID at the system level.
The last upgrade option is the mSATA slot; this slot is reserved for specialized mSATA SSDs or optional WWAN 3G cards. This is an excellent option for many users because it allows them to install a fast SSD for boot. while keeping a high-capacity hard drive in the primary 2.5-inch bay for storage.
To access the mSATA slot, first remove the keyboard as detailed earlier in this guide. The card is located roughly in the center of where the keyboard sits. Those that ordered their W520 with the WWAN option will find this slot already occupied, in which case you may want to consider another upgrade option or getting a device such as a 3G/4G Mi-Fi and remove the WWAN card.
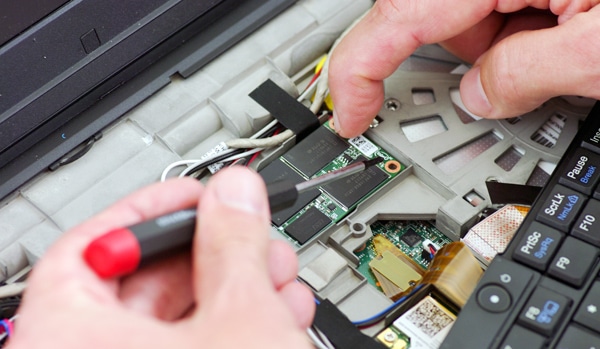
Installing an mSATA SSD is similar to installing a memory chip. Remove the single set screw first; next, insert the mSATA SSD into the slot at a slight angle as shown in the picture. Push it in and screw it down, then reassemble the notebook.
Remember if you plan on using the mSATA SSD as your boot drive, you need to go into the BIOS when starting the notebook and change the boot order.
Wrap-up
The Lenovo ThinkPad W520 is one of the most versatile notebooks on the market when it comes to upgrading storage. We showed you how to upgrade the system memory chips and detailed three different ways for upgrading the storage: the primary drive bay, the UltraBay, and the mSATA slot. Looking to upgrade another component we didn’t cover in this guide? Be sure to ask our resident experts in the forums!


 Amazon