

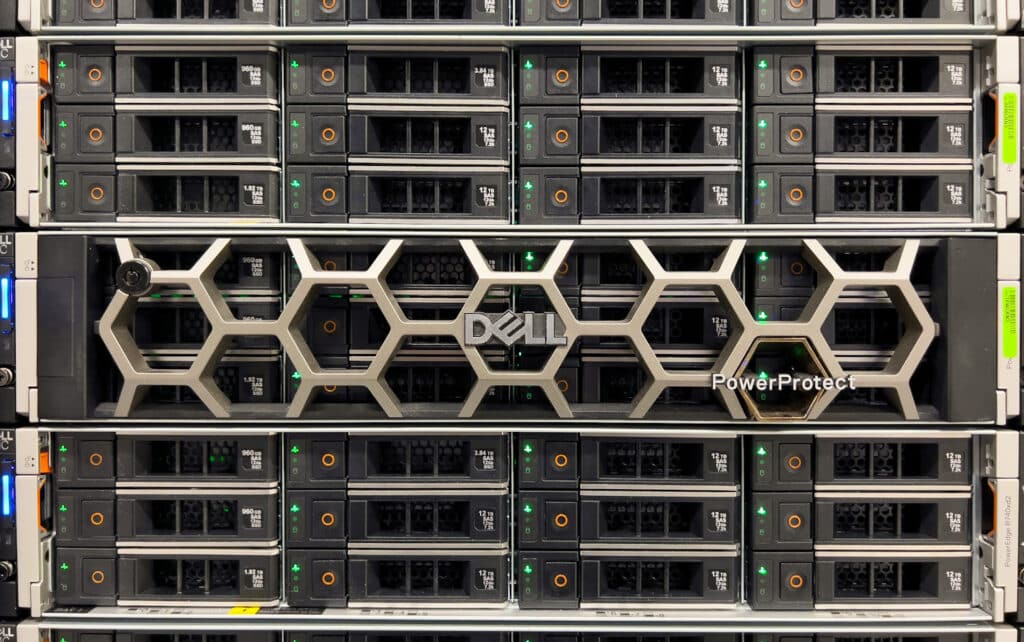
In November of last year, the Dell PowerProtect Data Manager Appliance was launched with the mission of helping organizations simplify data protection, improve cybersecurity and enhance IT self-service capabilities. The appliance, with built-in PowerProtect Data Manager software, helps streamline backup and recovery operational management. Moreover, it provides an automated way to protect and secure traditional VMware environments and modern workloads like Kubernetes across multicloud deployments.
There are a few key pillars fundamental to the Dell PowerProtect Data Manager Appliance, one of which is simplicity. Operational simplicity is often overlooked for backup and recovery, leaving customers with complicated environments that often get fragmented and increasingly difficult to manage over time as workloads change. A recent Global Data Protection Index (GDPI) survey found 65 percent of organizations are facing increased operational time and management complexity.
The PowerProtect Data Manager Appliance uses Identity and Access Management (IAM) to provide centralized authentication, authorization, single sign-on, and user management capabilities. IAM gives users a unified login experience and provides enhanced security using Role Based Access Control (RBAC).
The PowerProtect Data Manager Appliance can be configured for 12TB up to a maximum of 96TB in increments of 12TB. There is also a Cloud Tier which, when combined with the appliance’s maximum 96TB, offers 288TB. As part of their Future-Proof Program, Dell guarantees a deduplication ratio of 55:1 for the Data Manager Appliance, meaning the appliance supports 5.2PB, and with Cloud Tier, it supports 15.6PB.
Now let’s dig a little deeper into the data protection capabilities of this software-defined appliance.
Modern Data Protection — Workloads and Capabilities
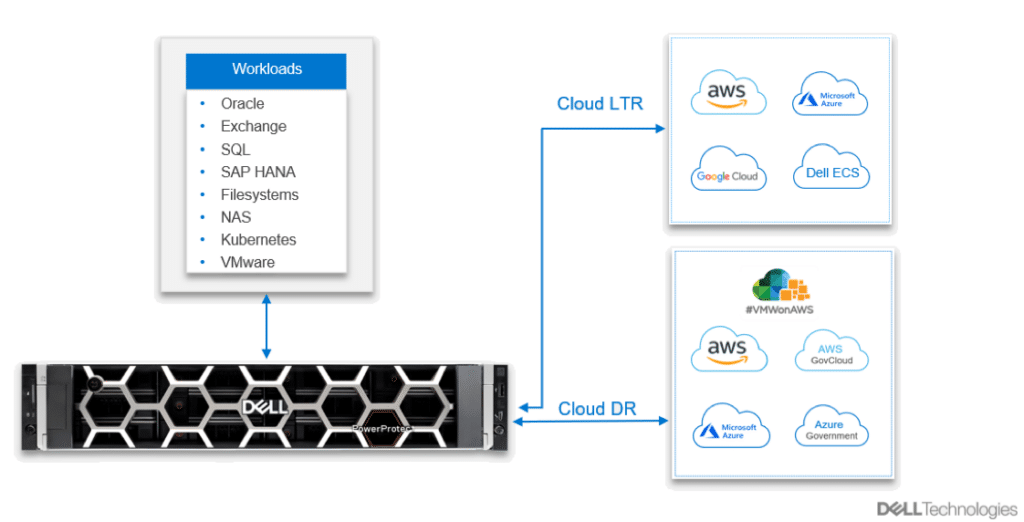
The appliance enables backup administrators to schedule backups for various asset types from a unified GUI on the Data Manager Appliance, including VMware Virtual Machines (VMs), file systems, Kubernetes containers, Microsoft Exchange Server, Microsoft SQL Server databases, Oracle databases, SAP HANA databases, and network-attached storage (NAS) shares. The appliance also offers data backup and recovery self-service operations from native applications combined with central IT governance.
PowerProtect Data Manager extends an organization’s data center to a more efficient cloud environment for long-term data retention (Cloud LTR). PowerProtect Data Manager natively tiers deduplicated data, sending it directly from protection storage to low-cost object storage without incurring additional hardware or cloud gateway costs.
The deep cloud integration also supports Cloud Disaster Recovery and protection for native cloud workloads. Cloud Tier supports various cloud object stores, including Dell ECS, AWS S3 storage, Microsoft Azure Blob Storage, and Google Cloud Platform.
Data Protection for Modern Workloads
Transparent Snapshots
Simplicity is only part of the story. The appliance offers a deep feature set like integrated deduplication and replication. With the continued growth in data and data retention, IT administrators readily acknowledge the performance hit when running protection applications during production, especially for VMware VMs.
Dell created a solution to address the adverse effects of backup and restore operations and reduce the impact of VM stun. The answer, unique to Dell, is Transparent Snapshots.
Transparent Snapshots
Transparent Snapshots is a feature within Dell PowerProtect Data Manager and is a unique VM image method that eliminates application disruption during VM backups—without compromising performance or protection. This solution simplifies and automates VM image-level backups with near zero impact on VMs or the compute environment during the backup process, significantly boosting performance. Transparent Snapshots result in faster backups and restores and reduced VM latency.
Transparent Snapshots can lower operating costs and dramatically simplify VM backup management. Other benefits include:
- Zero proxies: Proxies not required for data movement
- Storage agnostic: Single VM backup that works with any VMware-supported storage
- Auto-scaling: Orchestrated management via ESX-based plug-in without proxies and additional impact on the host
- Direct data transfer to PowerProtect appliances: No need for copies, resulting in reduced infrastructure
Kubernetes Containers
Container popularity continues to gain traction, and for a good reason. There is also a great need to find the best solution to protect those containers and the resident data. In many cases, containers are the repository for that long-term data storage, making it easy to forget the importance of the data in the cloud. That could result in a massive miscalculation.
Currently, backup and recovery solutions are an either/or decision when considering which product to select and for which platform. Backup solutions in place today may not be a fit for containers, so it would be best for organizations to start looking for a solution that fits a hybrid environment.
Kubernetes Containers
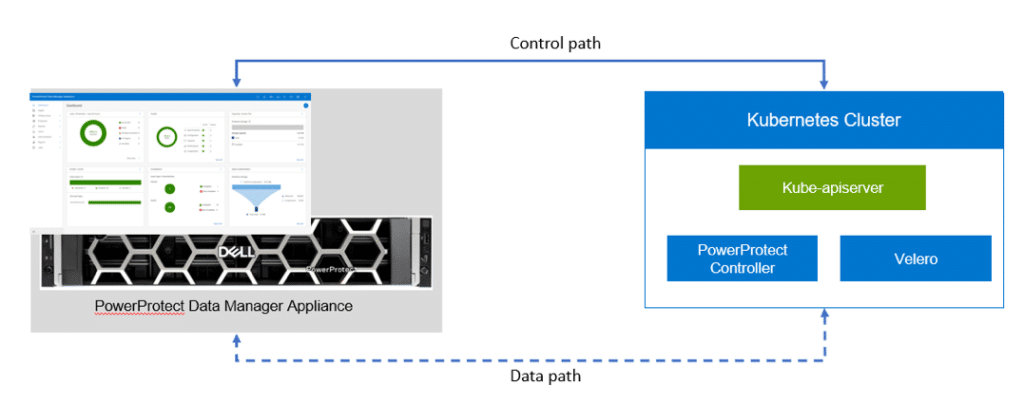
The Dell PowerProtect Data Manager Appliance is modern and purposefully designed to handle increasingly popular workloads like Kubernetes. Kubernetes workloads are protected through the same wizard-based process as traditional VMware protection. This is critical because a single admin can manage data protection for various applications.
Kubernetes containers are trusted, and as deployment becomes more prevalent and pervasive, they must be protected. PowerProtect Data Manager discovers Kubernetes containers to allow development teams to back up and restore Kubernetes dev/test and production environments.
With PowerProtect Data Manager, operations and backup administrators can manage Kubernetes data protection from a single GUI. This gives them the ability to protect Kubernetes persistent volumes, namespaces, and storage claims and then also restore through the PowerProtect Data Manager.
Specific capabilities include:
- Discover and manage unprotected Kubernetes natively
- Protect Kubernetes in-cloud with Data Manager in AWS, Azure , and Google Cloud
- Protect Kubernetes clusters in multicloud environments
- Protect OpenShift PaaS resources
- Agentless, application consistency for Cassandra, PostgreSQL, MySQL, MongoDB
- Ability to restore to another Kubernetes cluster, enabling migration, upgrade, test/dev use cases
Multicloud
Organizations looking for low-cost, long-term data retention resources are turning to cloud environments. Cloud providers offer a simple, efficient, cost-effective solution for application availability and business continuity. Keeping that data secure continues to rest heavily on the minds of most admins. However, PowerProtect Data Manager provides a solution that allows managers to sleep easier, knowing they are saving money and their data is protected.
Cloud Tier offers support for various cloud object stores.
- Cloud Tier: Low-cost object storage without the need for additional equipment. Support includes Dell ECS, AWS S3 storage, Microsoft Azure Blob Storage, and Google Cloud Platform.
- Cloud Disaster Recovery: Ability to copy protected VMs to the cloud for orchestration and automation of DR testing, DR failover, and failback of Tier 2 workloads to/from the cloud in the event of a disaster. Support for AWS, VMware Cloud on AWS, Azure, and Google Cloud.
- Cloud Native Workload Protection: PowerProtect Cloud Snapshot Manager provides visibility, control, and insight into data protection across the public cloud infrastructure.
Dynamic NAS Protection
PowerProtect Data Manager’s Dynamic NAS Protection is a software-only solution supporting centralized backup and recovery for NAS assets. Dynamic NAS Protection supports multi-stream backup and restore. With centralized support, Data Manager controls and manages end-to-end backup and recovery operations. Dynamic NAS Protection automates and optimizes the protection of your NAS infrastructure.
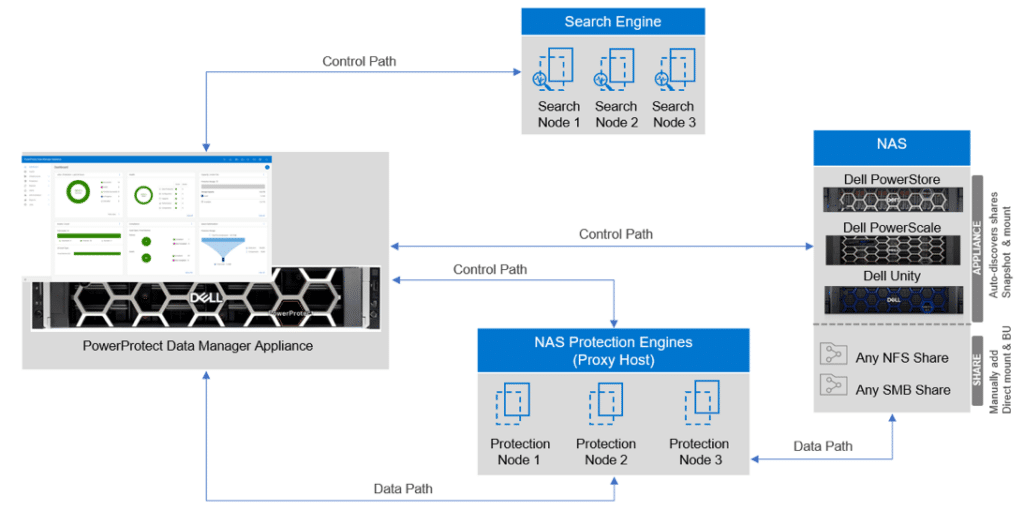
Dynamic NAS Protection
This solution also protects and recovers any NAS that supports NFS or CIFS, including Dell PowerStore, PowerScale, and Unity. NAS assets are automatically discovered through communication with the NAS array. Data Manager for NAS protection supports all the Data Manager objectives, such as DD Replication, Cloud Tier, progress monitoring, and SLA compliance.
Dynamic NAS Protection intelligently and automatically scales to optimize performance. Multiple proxy hosts are deployed with Dynamic NAS Protection, and as load requires, proxies can be spun up and torn down efficiently. Because proxies are virtual, reconfiguration happens without the need for manual intervention.
Cyber Resilience
The appliance will offer little value if it’s not secure. To that end, the Data Manager Appliance supports Multi-factor authentication (MFA) for users to log in to the UI dashboard, providing additional layers of challenge beyond usernames and passwords to guard against the risk of stolen credentials. The appliance also supports external identity providers such as Microsoft Active Directory (AD) server over SSL (AD over SSL) and locally defined identity providers for application and operating system users.
Securing storage systems involves many moving parts that, ultimately, must work together to ensure data integrity. With these mechanisms in place, data recoverability can be assured. The PowerProtect Appliance has been designed as the data store of last resort.
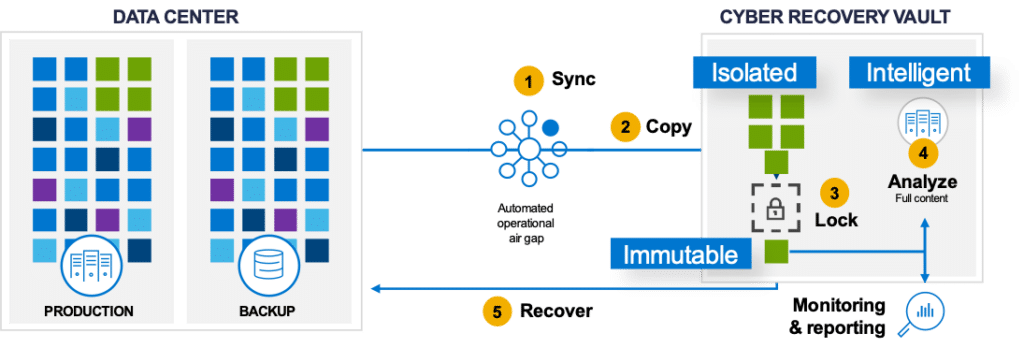
Cyber Recovery Vault
Currently available with the PowerProtect DD platform, Cyber Recovery Vault will be integrated with the PowerProtect Data Manager Appliance in a future update. In case a cyber attack goes undetected and results in a denial of data access or denial of a key service that is essential to run business operations, customers will have the option of recovering from the Cyber Recovery Vault.
As an additional layer of security, Dell offers CyberSense software that runs within Cyber Recovery Vault. CyberSense delivers petabyte-class scanning of backup images designed to check the integrity of data and detect suspicious behavior, including encryption, mass deletions, and data corruption. CyberSense continually checks data for signs of ransomware corruption and will send an alert when corruption begins. When an attack occurs, CyberSense provides post-attack forensic reports to diagnose the damage and report on the last known good files to facilitate a rapid recovery.
The key to ensuring data integrity issues is a robust defense mechanism. The Data Invulnerability Architecture (DIA) provides a hardened defense against data integrity issues with advanced verification that new backup and archive data is stored correctly. DIA includes a proprietary RAID 6 implementation that protects against up to two disk failures. Even if the failed disk exhibits a data read error, DIA immediately corrects the errors during read. Additionally, the architecture includes a background scrub process that actively searches for faults and repairs them before they become an issue.
From Rack to Backup in 15 Minutes
One of the critical claims from Dell is this appliance can be deployed in under 15 minutes. We had the opportunity to get hands-on with the Data Manager Appliance to see just how simple the system is to deploy and how flexible it is when handling the protection of enterprise workloads. This short deployment window becomes even faster when you realize it is both storage and backup software versus a system that splits both roles across multiple systems.
Dell provides a comprehensive Data Manager Appliance Installation Guide that walks through the entire process from required rack size, rail installation, power, drive installation, cabling, and more. When everything is in place, it’s time to start the initial configuration. The following screen images will step through the process from logging into the appliance to getting access across the network. Dell also has several Hands-On Labs, including one for Data Protection.
There are two parts to getting from Rack to Backup. The first step is to get the PowerProtect Appliance configured and on the network, and the second step is identifying assets for protection. For the sake of brevity, we have selected a few screen captures to give a feel for the interface and the help provided during setup.
To get started, the PowerProtect appliance must be in a rack, cabled to the network switch, and powered on. If those steps are complete, attach the service computer to the appliance, and set up a static IP address and subnet on the computer. Ping the management IP address, 192.168.100.100, to verify it’s reachable. Open a browser window, enter https://192.168.100.100, and connect to the appliance to display the configuration login screen.

Log in to the appliance using the default Admin username and password. The current password for setup is dm@<appliance serial number>. The next screen will force a password change.
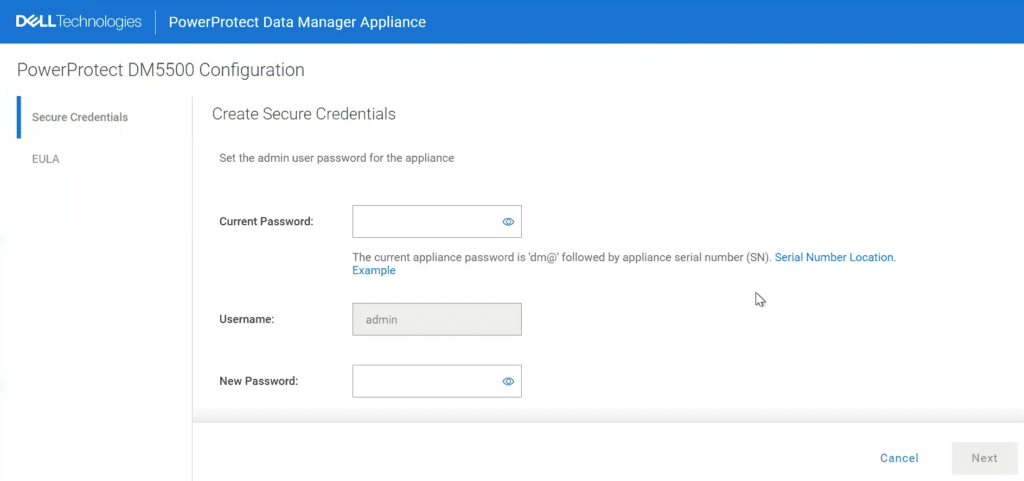
After successfully changing the password, the screen will display the EULA information. It is necessary to scroll through the EULA before you can proceed.
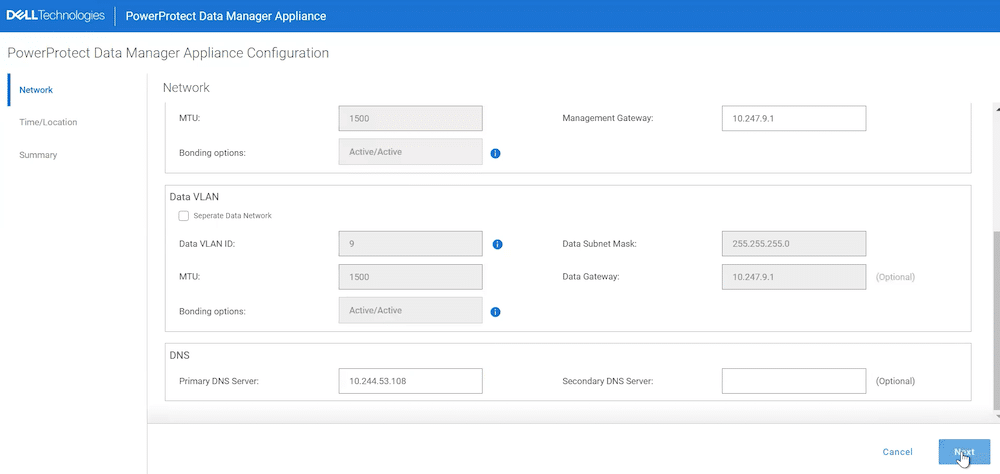
Now that you are logged in and have changed the password, the next set of screens will walk through the Network details. It will be necessary to gather network details before attempting this section. This stage will require IP addresses for the interfaces, DNS addresses, MTU size, etc. Use the scroll bar or arrow keys to scroll down for additional input. After filling in all the details, press NEXT to go to the next screen.
As you complete each section, clicking NEXT will move you to the Time/Location section to set up NTP details followed by the summary display.
 After each section is completed, the status shows a checkmark indicating complete. After inputting all the information, click next to view the Summary. If any information needs to be updated, click the back button to return to the previous page and enter new details. If satisfied with the data displayed, click Apply to finish the initial setup.
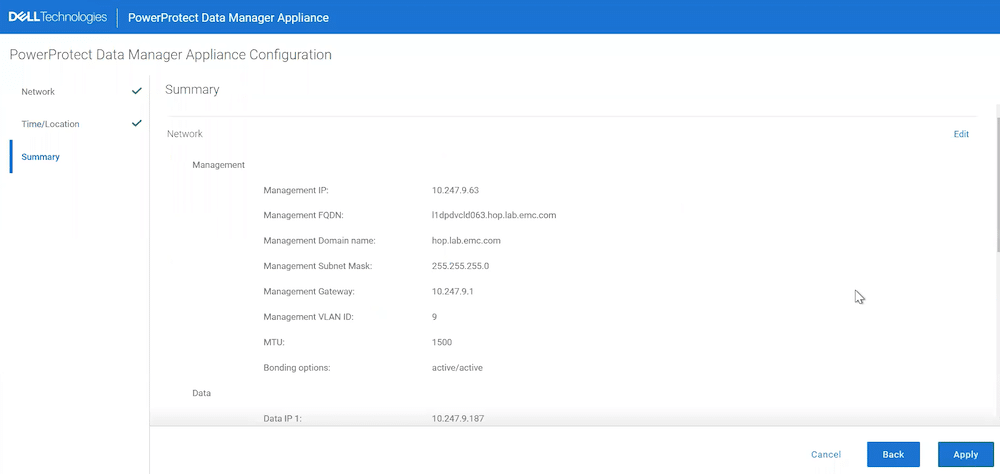
The screen will display the update status and indicate any error encountered during the process.
Clicking Apply will commit the configuration to the Data Manager Appliance. This can take up to ten minutes. During this process, the appliance ensures it can connect to the proper network error-free. Errors would be listed below the status bar.
Dell PowerProtect Data Manager Appliance GUI
We’ve mentioned simplicity several times, but nowhere is the natural ease of system management more evident than the GUI. The information provided is easy to understand and straightforward. Data protection never had it so easy.
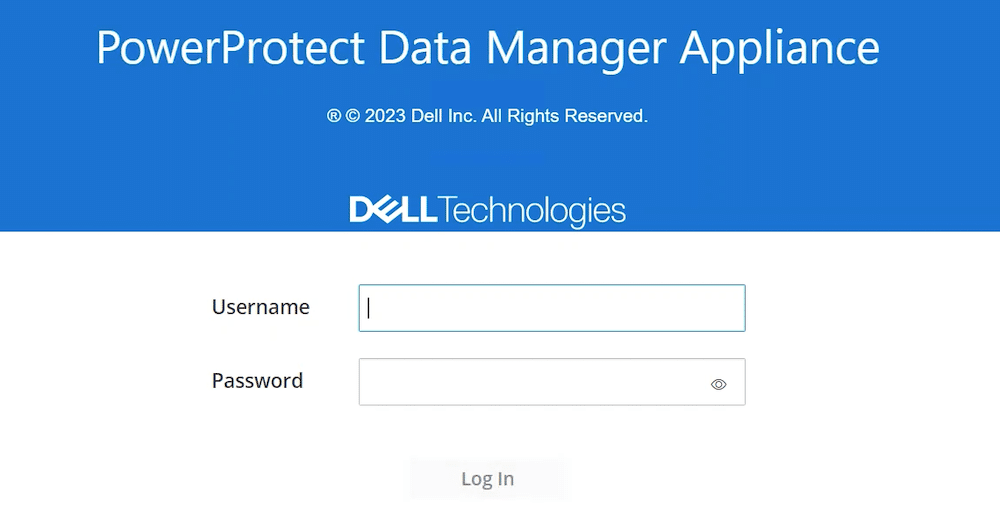
Once the initial setup is complete, the Data Manager Appliance can be reached through a browser window by simply entering the IP address or the appliance’s hostname and logging in using the credentials set up during the initial configuration process.
After successfully logging into the system, the Get Started screen will take you through the final stages of the setup with licensing, support, selecting assets, and creating a security officer before configuring asset protection. Clicking the Configure bar under each area opens a dialogue box to walk through the process. Once all the key areas have been configured, a checkmark will be displayed in each area.
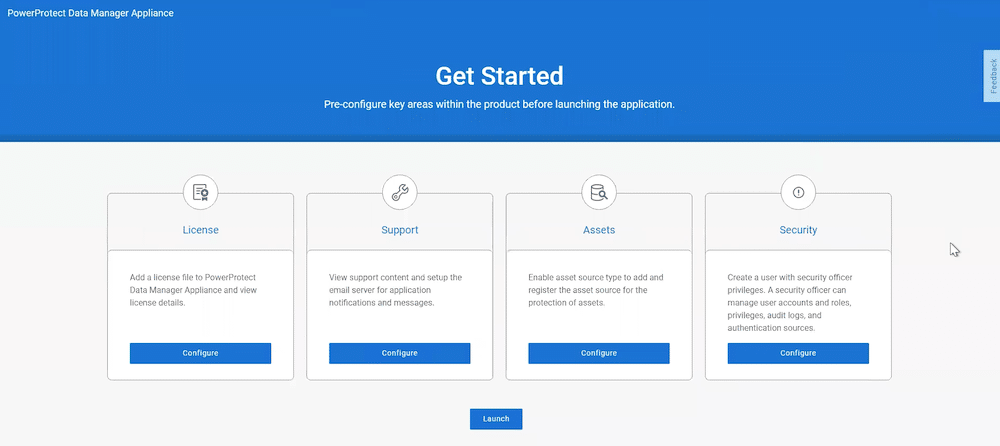
Licensing
The first thing to do is license the system. Clicking the Configure button in the License box will display options. If the license file is available, it can be uploaded to the system. Otherwise, there is the option to gather the license details online and activate the license automatically.
Support
After the license is applied, the system returns to the Get Started screen. Select Support to configure options for SupportAssist, Email, and AutoSupport.
SupportAssist is a tool that communicates with the PowerProtect Appliance to monitor, detect issues and collect diagnostic data to send to Customer Support. Enter the necessary information in the fields provided, then click Connect Now to move to the Email Setup screen.
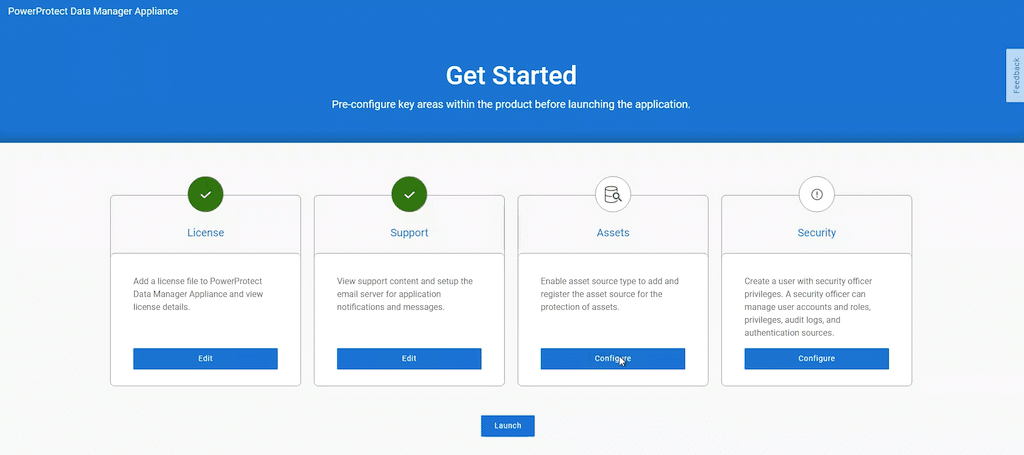
Next, enter the email address of the person managing the system and an email address to send a test message. Once the email is set up for SupportAssist, select Save, and return to the Get Started screen. With the system licensed and support established, the system displays a green checkmark indicating completed.
 Assets
 Assets
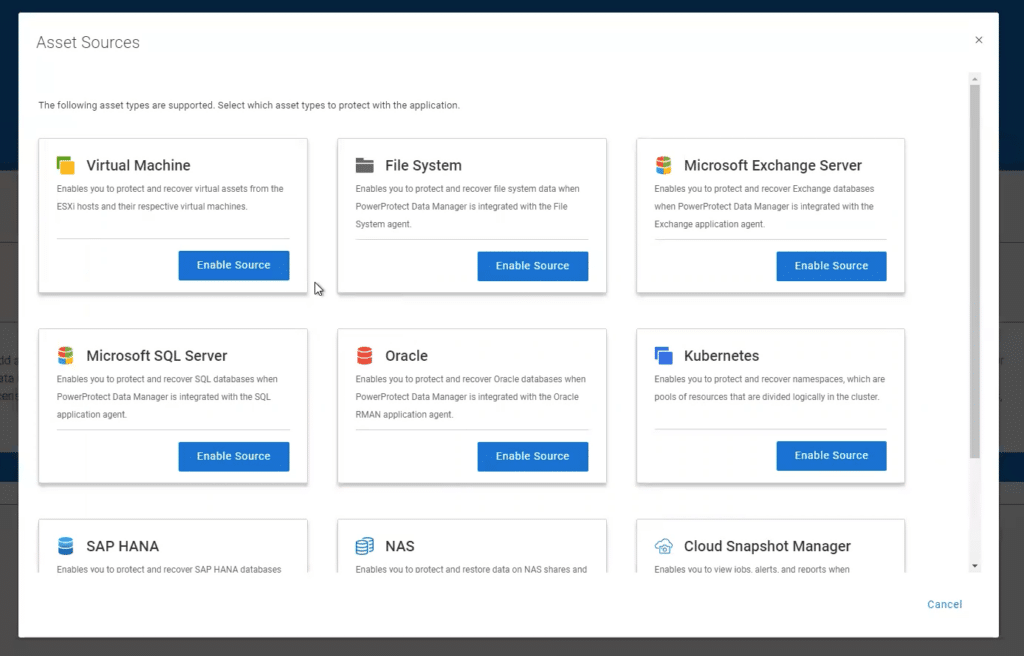
Selecting the Asset option on the Get Started screen will open a window displaying all asset types available to the user. Click on Configure in the Assets pane to open the Assets wizard.
Security
Selecting Enable Source in the Asset Pane enables the assets to be protected. After selecting all the asset sources, click the save button and choose Security to set up the Security Officer detail. The Security Officer (there can only be one per appliance) is responsible for authorizing critical operations within the appliance.
Clicking save will return to the Get Started screen, where we start setting up the system to protect assets. Upon initial setup or if the software has been updated, the user will be presented with a What’s New screen providing information on any new features in the release.
Closing the What’s New window opens the Dashboard where system management and monitoring tasks are performed. The GUI is consistent throughout, with the left panel for selecting configuration or monitoring options. The following screens are for reference and are not in any particular order.
The Dashboard provides the interface to everything visible to the PowerProtect Appliance. Selecting an option from the left panel will update the Dashboard to reflect the detail for that view.
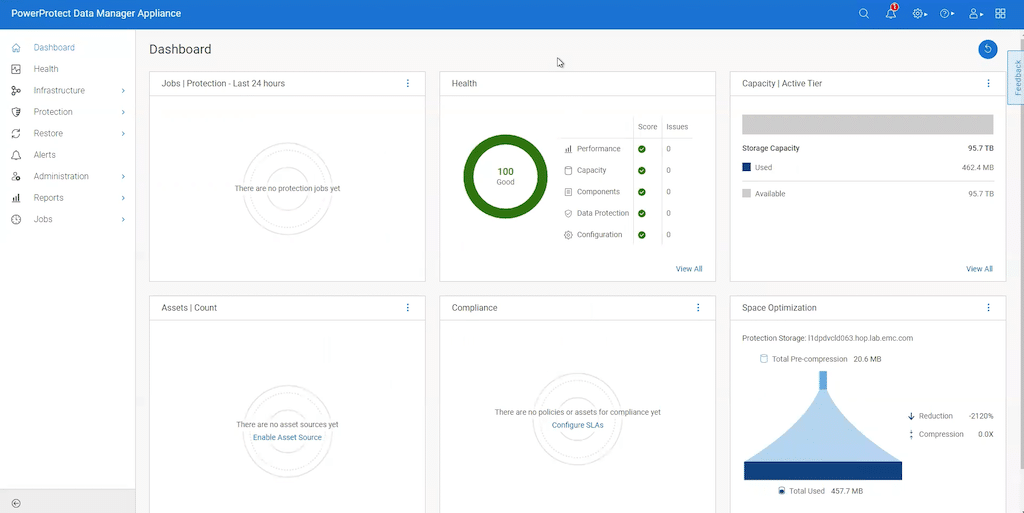
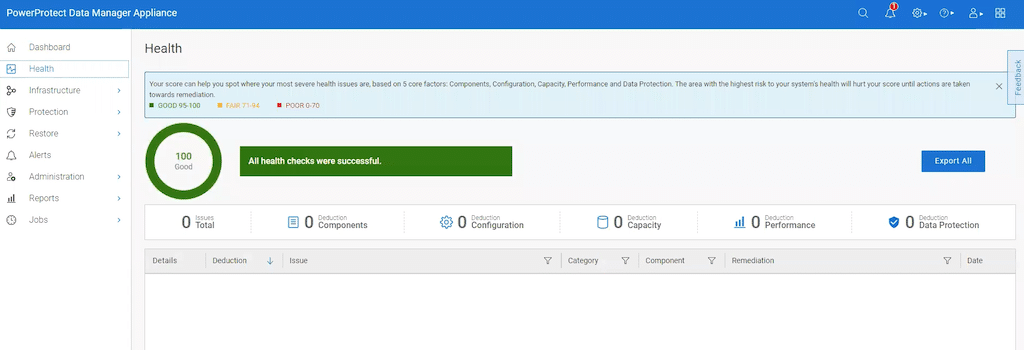
The dashboard provides a high-level view of the PowerProtect Data Manager Appliance through widgets. The left-side panel provides easy navigation to everything happening within the appliance. For instance, any health issues with the system or its components would be reflected on the dashboard in the Health widget. For details of anything flagged, click on the health option in the left-side panel. The “health score” is not an aggregate of issues. Instead, only the worse case score would affect the percentage. So if there were issues with scores of 5, 15, and 30, only the highest number would be reflected in the health score. The issues would be presented to the right of the Score column.
Our system is in good shape, so we can move on.
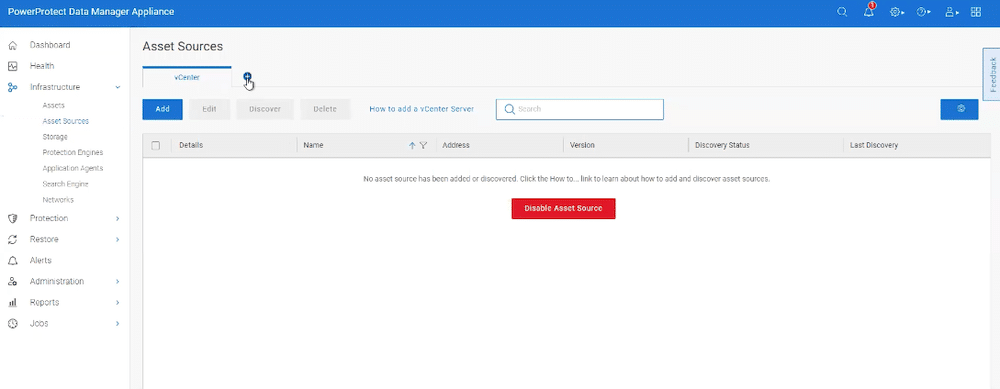
Since this is a new install, no assets or backup sources are defined. Let’s fix that. Selecting Infrastructure in the left-side panel will display options for defining assets.
Previously we selected Virtual Machine as an asset type. However, we have not defined assets or asset sources, so there is nothing to display. If you forgot to add an asset type earlier, instead of having to exit, return to the screen to select asset types, and then return to this screen, click the “plus” character next to the asset type to add more without leaving the asset sources screen. This is just one of many features that make the GUI and the appliance so easy to set up and use.
In the PowerProtect Data Manager Appliance, assets are the basic storage types or devices it protects. Asset sources are the mechanism that PowerProtect Data Manager Appliance uses to manage assets and communicate with the protection storage, where backup copies of the assets are stored.
Asset sources can be a vCenter server, Kubernetes cluster, application host, or Cloud Snapshot Manager tenant. Assets can
be virtual machines, Microsoft Exchange Server databases, Microsoft SQL Server databases, Oracle databases, SAP HANA
databases, file systems, or Kubernetes namespaces. Before adding an asset source, you must enable the source within the PowerProtect Data Manager Appliance user interface.
The Asset Source selected earlier in the setup was vCenter. If there were others, it would display them along the top.
If you need to add Asset Sources, simply click Enable Source, and it will get displayed across the top of this screen.

Selecting any asset source tabs will take you to a configuration screen. Complete the fields to move to other detail. After clicking save, the GUI will display the screen to Add Credentials for the Asset (in our case, vCenter Server). After adding the credentials and clicking Save, a summary screen will display to allow you to verify the details and go back and correct any information that might be in error or select Save.
If everything is good, click Save to verify the SSL Certificate for the virtual machine. Review the details, and if satisfied, click Accept. After the certificate has been validated, the Asset Sources screen will appear and show any newly added assets.
Infrastructure
Selecting Infrastructure-Assets from the left panel provides protection details for assets in that VM. If this is the initial setup, all assets will be unprotected because policies have not been set up in the PowerProtect Appliance. There must be a policy for all assets that require protection. Creating a policy is straightforward. In the left panel, click Protection -> Protection Policies to open an Add Policy screen, and the Dashboard will take you through adding policies. The process is the same for all Asset types.
The first step is to select the asset to protect, define the policy type, and then the policy’s purpose. The system will step you through each iteration. Next, define the policy objectives.
Objectives
The Objectives display provides details on the status of the Policy and the Objectives, such as creating a backup configuration. If this is to be the primary backup for the asset, the display provides the details for the Primary Backup for the asset selected. The display is formatted to make it easy to understand and complete.
Clicking Save will return to the Objectives screen, where more options like replicate, edit, add a new backup, etc., are presented. When all objectives have been defined, clicking Next takes you to the Policy Options. Select the options for this backup. There is a pop-up window to describe each item if there are any questions.
Clicking Next will open the Summary window. Here you can verify the data, go back to the previous screen, or FINISH.
Clicking Finish will take us back to the Protection Policy screen. Along the bottom of the screen is the status of the policy. It’s as simple as that to set up protection policies for any asset sources defined earlier.
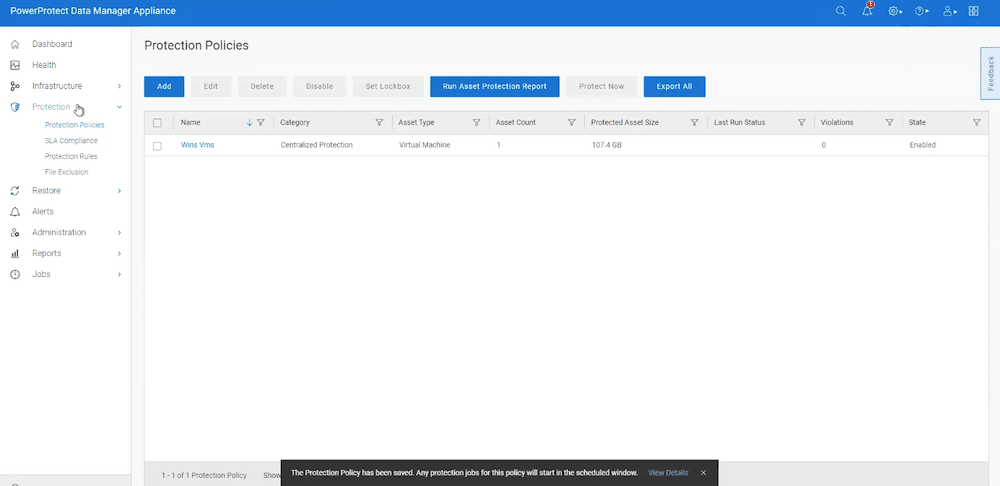
You can ensure the policy has been applied by selecting infrastructure from the left panel. Policies will kick off automatically. However, there is a simple option of starting a backup job immediately by clicking Protect Now from the Protection Policies screen.
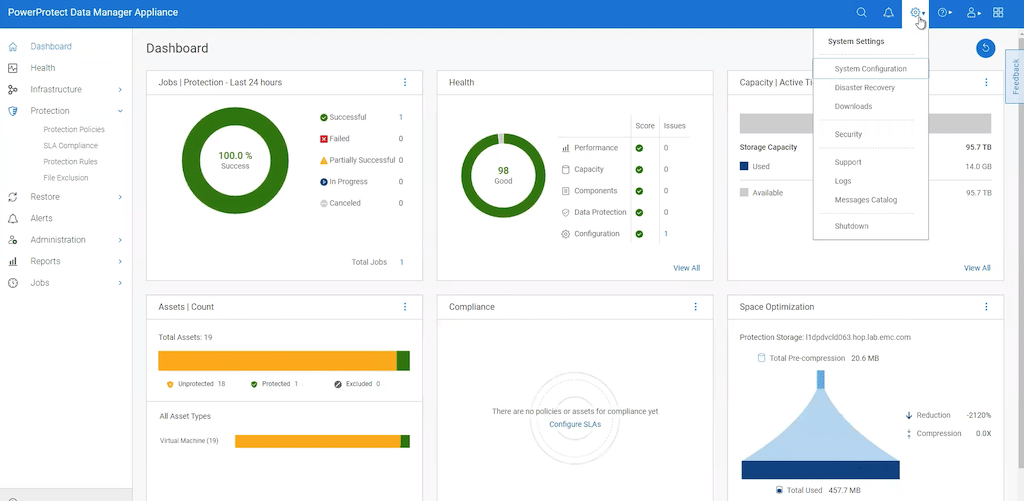
Once policies have been defined, returning to the dashboard will display health, running jobs, and assets. The screen below shows one successful protected system, 19 found assets, storage capacity, and much more. Also, should there be a need to go back to fix a System Settings, clicking on the Gear in the top right corner will display a dropdown menu to get you where you need to be.
Many more features are available such as Restore, Disaster Recovery (DR), Reports, etc. Dell has created a detailed Interactive Demo for anyone wanting to get “hands-on” and learn more.
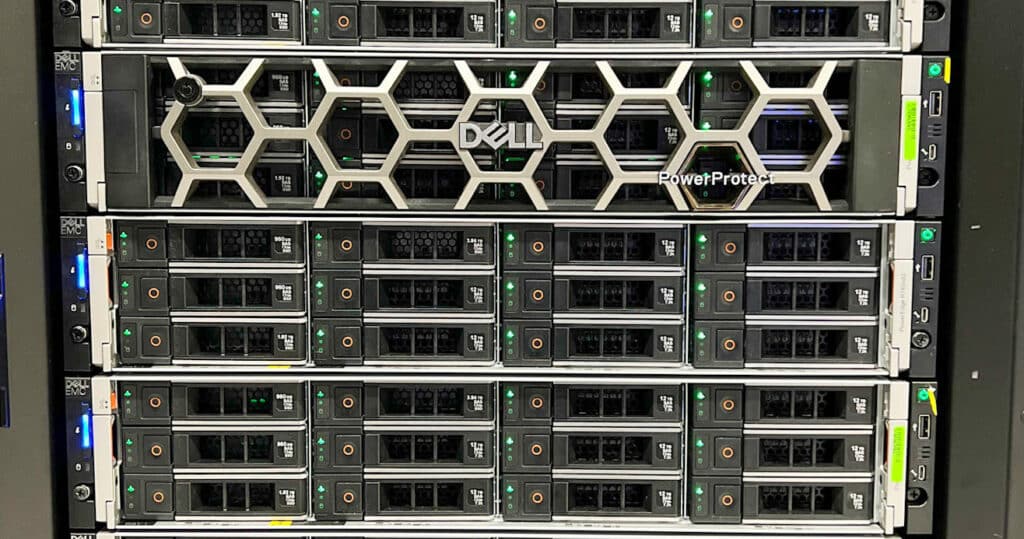
PowerProtect Data Manager Appliance Hardware Overview
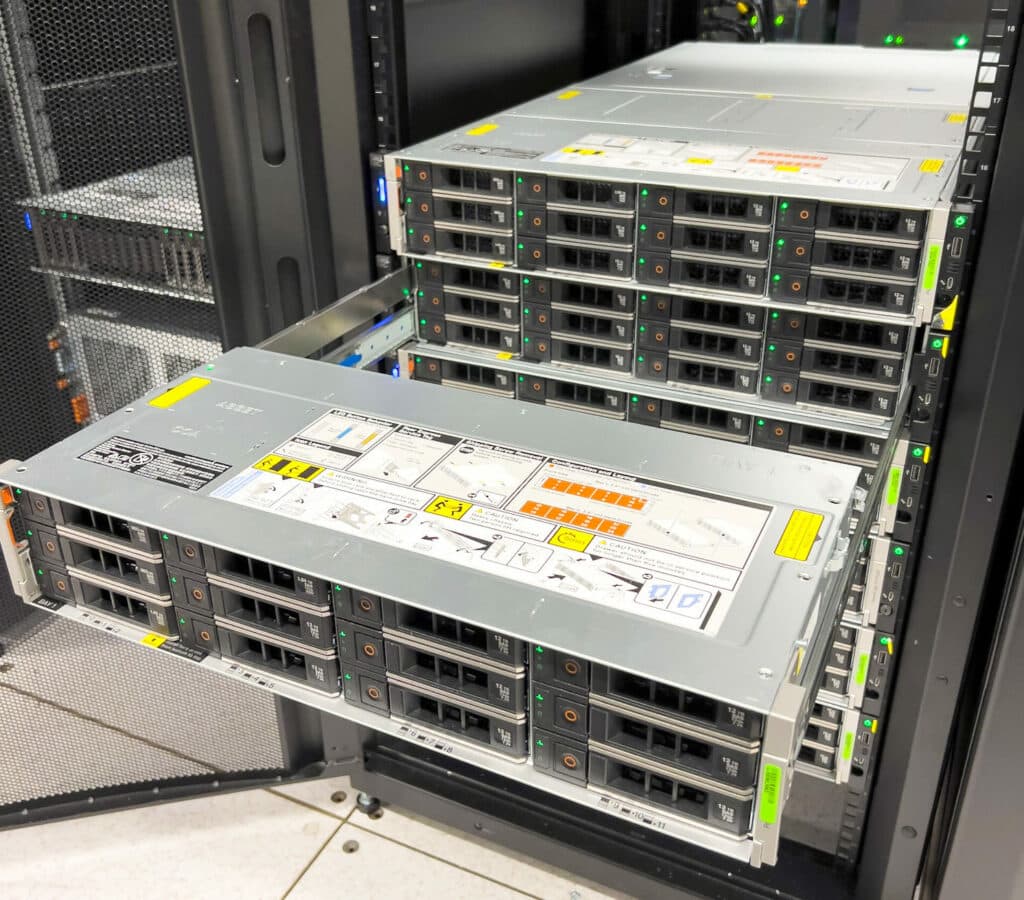
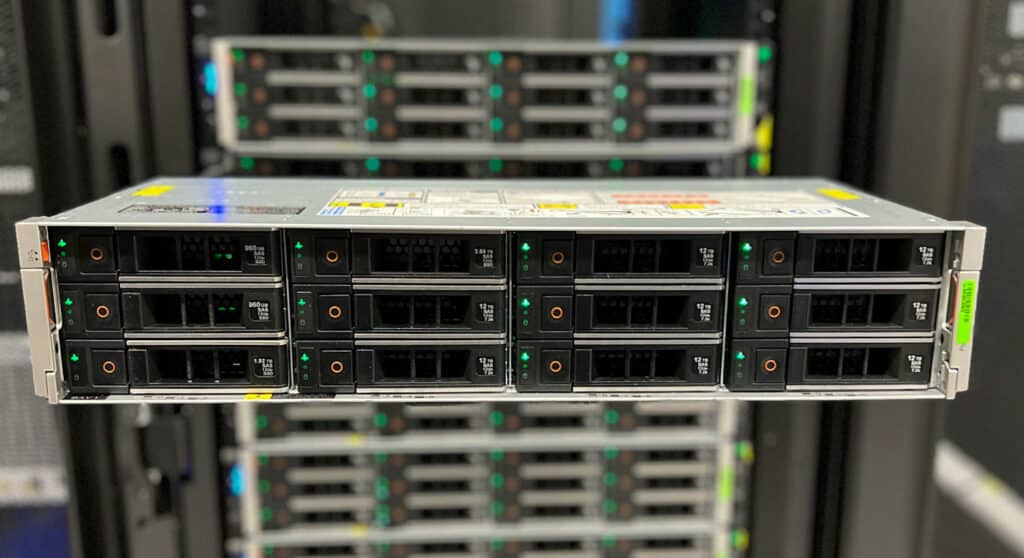
While most of the value around the Dell PowerProtect Data Manager Appliance is around ease of operations, we must mention the value of the underlying hardware that enables the Data Manager Appliance to do its job. The system is architected on a Dell PowerEdge R740xd2 server with a grow-in-place capacity ranging from 12TB to 96TB.
The Dell PowerEdge continues to be a go-to, trusted, and reliable technology keeping up with current trends and advancements in processing power and storage. Using the PowerEdge platform gives PowerProtect the reliability and performance credibility needed for success in the data protection space.
The PowerProtect Data Manager Appliance is an integrated solution that can deliver deduplication, data protection solutions, and multicloud capabilities. As a member of the PowerEdge hardware family, the PowerProtect Appliance supports a large and expanding ecosystem of traditional and modern workloads that include replication, instant access and restore, search, monitoring, reporting, cloud readiness, DR, and long-term retention to the cloud, in a single 2U appliance.
Support for Role Based Access Control (RBAC) provides an additional layer of security so data is always available and secure, and storage is optimized.
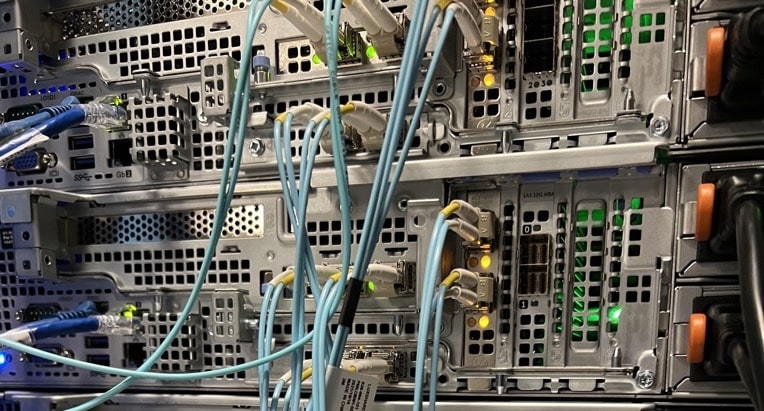
The 2U appliance is comprised of two drive bays, each supporting 12 drives. Other components in the appliance include:
- 2 x 5218R 20-core, 2.1GHz Cascade Lake Intel CPUs
- 384GB RAM or 12 x 32GB DIMMs
- 20 x 12TB HDDs
- 2 for internal storage, 6+2 base for protection storage, 10 expansions
- 12TB to 96TB usable at capacity in 2U (cloud tier @ 2:1)
- 2 x 1TB (960GB) SSD for operating system/boot
- 1 x 1.92TB, 1 x 3.84TB cache SSD (metadata cache, Instant Access/Instant Restore)
- Mirrored IDSDM 16GB SD cards for boot recovery
- Hardware-assisted compression card
- 10GbE/25GbE networking
- 12Gbps SAS card (Dell HBA 355e-s)
There are three drive bays allocated for SSDs. Located in drive bay 1, slots 0 and 1 are home to system boot files, and slot 2 is available for Protection Storage metadata internal cache. Slot 3 is reserved for the Protection Storage metadata internal cache for configurations of more than 24TB capacity.
Final Thoughts
Change is inevitable. That applies to technology and, unfortunately, cyber attacks. Cybercriminals continue to find innovative methods to breach data protection tools. The most effective way to thwart those attacks is with an integrated tool that is simple to install, configure and manage. The Dell PowerProtect Data Manager Appliance ticks all the boxes for delivering solid data protection.
The Dell PowerProtect Data Manager Appliance is an integrated solution offering deduplication, data protection, and multicloud capabilities. The Data Manager Appliance is built on the PowerEdge R740xd2 server, known for delivering high availability, security, and performance in a flexible platform.
The solution delivers complete backup, deduplication, replication, recovery, restore, a search engine, analytics, and seamless VMware integration. It is also cloud-ready with support for modern, multicloud workloads. From the start, the Data Manager Appliance automates the discovery and protection of databases, VMs, file systems, and Kubernetes containers.
In our experience, the PowerProtect Data Manager Appliance was extremely simple to get up and running, with wizard-like tiles to help admins immediately configure a number of popular backup use cases. The integration with VMware and databases will handle most midmarket needs, but there are plenty more options including modern applications like Kubernetes.
Furthermore, Dell has placed an emphasis on security, helping organizations deal with the perpetual cyber attacks directed explicitly at backup infrastructure. Even so, there’s still much more to come. Dell has clearly invested heavily in the PowerProtect Data Manager Appliance and will be keeping up a rapid cadence of software releases, bringing new and enhanced features to their customers on a regular basis.
Resources:
Dell PowerProtect Data Manager Appliance Product Page
Dell PowerProtect Data Manager Appliance Infohub
Hands-On Lab for Data Protection
This report is sponsored by Dell Technologies. All views and opinions expressed in this report are based on our unbiased view of the product(s) under consideration.


 Amazon