

We recently completed a data analytics-style project that left us with a 100TB output file. While we do have ample storage throughout our lab, hanging onto a 100TB file in perpetuity has a unique set of challenges. Further, we don’t really “need” the file, but we’d prefer to preserve it, if possible. The cloud is an obvious fit for this need, but the time to transfer that much data over the wire is immense, so we opted to give AWS Snowball Edge devices a try. The goal – to get our data from the lab in Cincinnati to an S3 bucket in AWS us-east-2 region as fast as possible.
What are AWS Snowball Edge Devices?
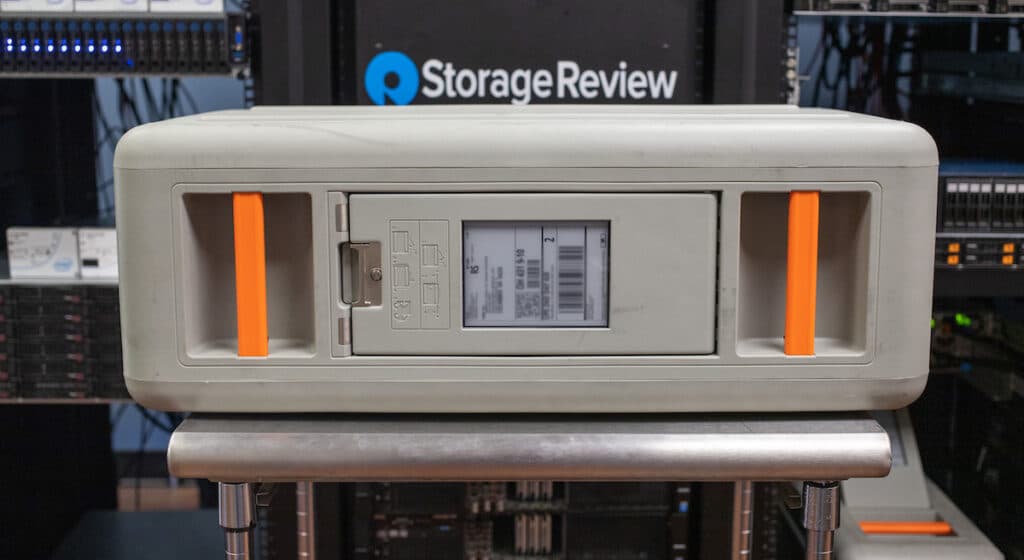
Before we delve too deeply into the data migration task, a brief primer on AWS Snowball Edge devices is warranted. AWS Snow Family is a collection of purpose-built services. These services run compute-intensive workloads while storing data in edge locations for denied, disrupted, intermittent, or limited (DDIL) network connectivity, and for transferring large amounts of data from on-premises and rugged or mobile environments. AWS Snowball Edge devices are rugged, portable, and secure and offer either Storage-optimized or compute-optimized functions. These devices are designed to help customers move (to AWS) or process large amounts of data securely and efficiently, even in remote or disconnected locations.
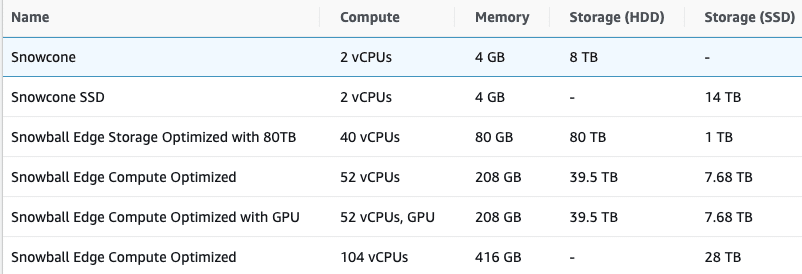
Snowball Edge devices come in two versions: the Snowball Edge Storage Optimized, which we’re using here, and the Snowball Edge Compute Optimized. The Storage Optimized version is designed for data transfer and storage use cases and comes with up to 80TB of storage capacity. The Compute Optimized version is intended for data processing and computation use cases and comes with up to 104 virtual CPUs and 416GB of RAM. There’s even an option for a Compute Optimized system to include a GPU. For those with a more modest data need, there’s also a small, ultra-portable Snow Family, dubbed AWS Snowcone.
Both versions of Snowball Edge have built-in security features, such as tamper-evident enclosures, 256-bit encryption, and Trusted Platform Module (TPM) chips to ensure the data’s integrity and confidentiality. Additionally, Snowball Edge devices can be configured to run AWS Lambda functions, Amazon EC2 instances, and other AWS services on the edge, enabling customers to perform data processing and analysis on-premises before transferring the data to AWS.
For our use case, Snowball Edge devices provide a fast, secure, and flexible way for customers to transfer and process large amounts of data in various environments, including remote or disconnected locations.
AWS Snowball Ordering Process
For seasoned AWS professionals, the ordering process for Snowball is straightforward. Even for neophytes like me, I was able to click through the steps with a little helpful nudging from our AWS friends who coached us through the process.
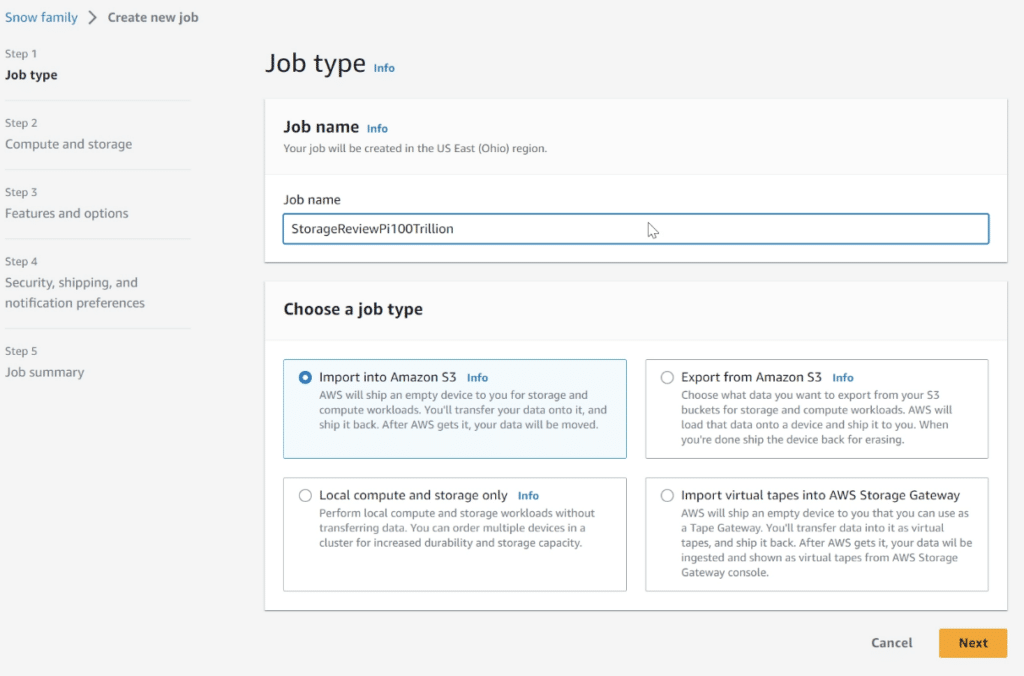
Step 1 is to give your job a name and choose the job type for your Snow device. Our task was simply to transfer data to S3, but Snow devices can also export data from S3. They can also be used as point solutions to offer local compute, storage, and GPU to an edge location.
Step 2 continues to be simple, with the selection of the Snow device. In our case, we selected the Snowball Edge Storage Optimized unit, with 80TB available. There are various pricing options for AWS Snowball. There is a pricing option for per-day usage, or AWS Snowball significantly discounts pricing (up to 62%) for 1-year usage and 3-year usage commitments. With these long-term deals, you pay upfront to use the Snowball device(s) at a discounted rate, and you avoid paying any additional service fees or per-day fees until your prepaid period ends. You can sign up for committed upfront pricing in the AWS Snow Family console when you order a Snowball device.
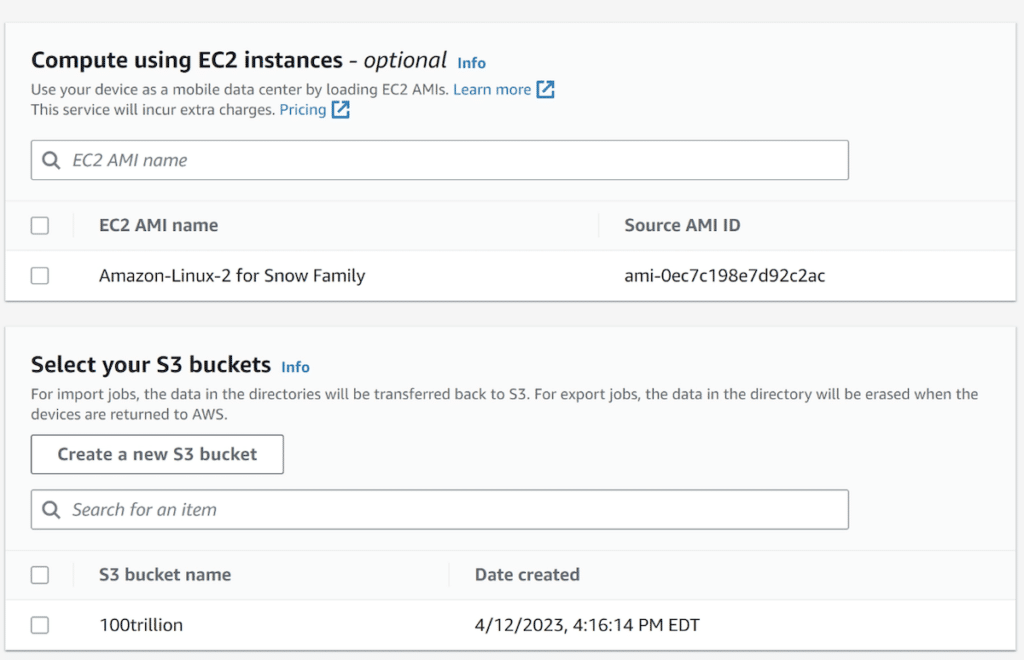
Finally, choose the EC2 instances and S3 buckets that you need for importing. This was a fresh account, so we created a new S3 bucket. We also didn’t need any EC2 for this but did end up sideloading an EC2 instance later for a bit of fun.
Step 3 offers a few additional features, like an optional AWS IoT Greengrass for Snow and an option for remote device management.
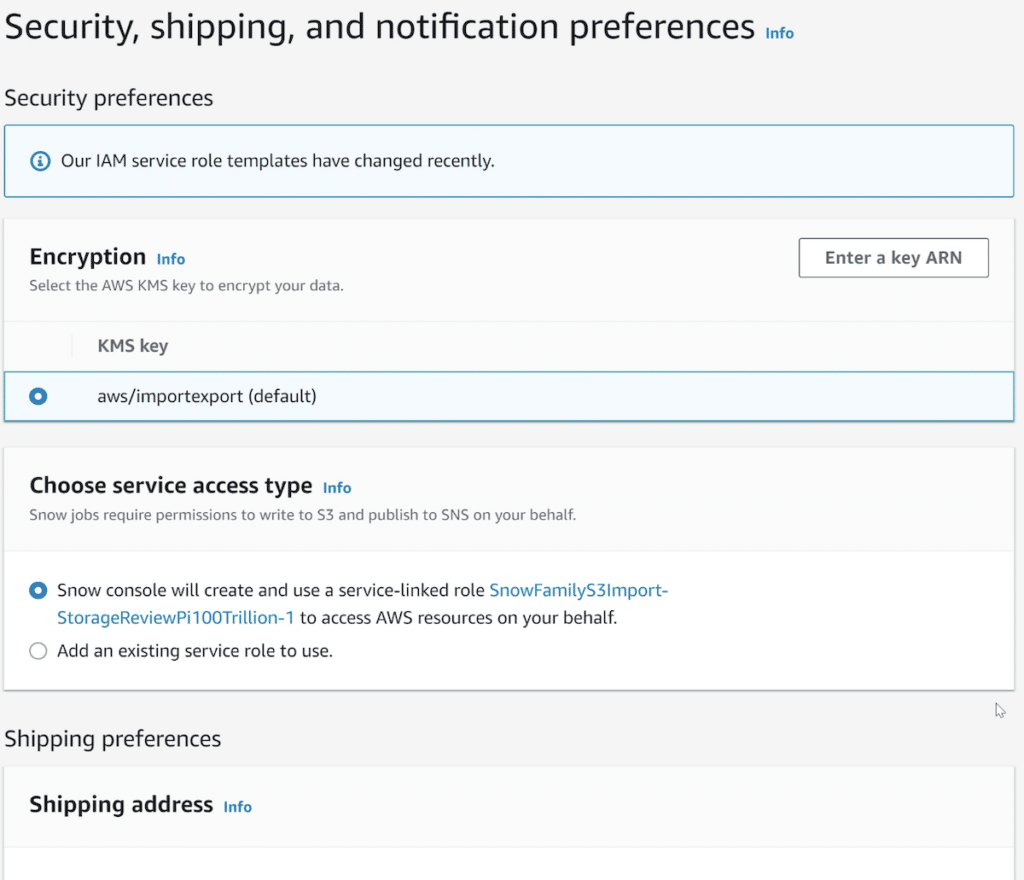
Step 4 covers security, shipping, and notification preferences. Here we used the default encryption and created the suggested service role to allow AWS to handle the data. From there, it’s adding your address and selecting one or two-day shipping. You can also add email notifications here, although the AWS console shows all of the progress as the job works through the system.
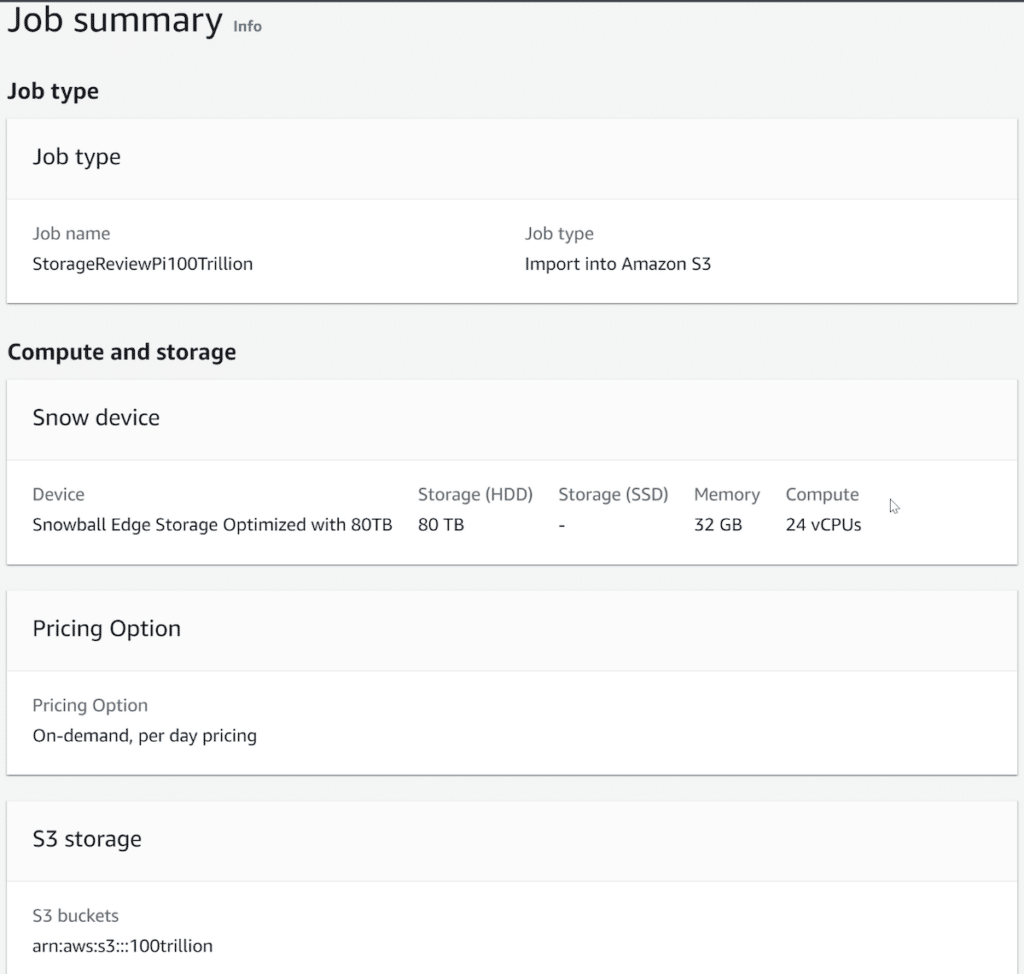
The last step is validating all of the information entered and submitting. This creates the job, and then the fulfillment process by AWS begins. We stepped through the process with AWS pretty slowly, wanting to understand all the options. Even at our casual pace, the entire process took about 10 minutes. A more aggressive path would make ordering a Snow device 2-3 minutes tops.

At the time, we thought we’d need two Snowball Edge devices. In retrospect, we only needed one. The process to clone this job is also very simple, and it’s just a couple more clicks to tally up a few Snowballs for larger data sets.
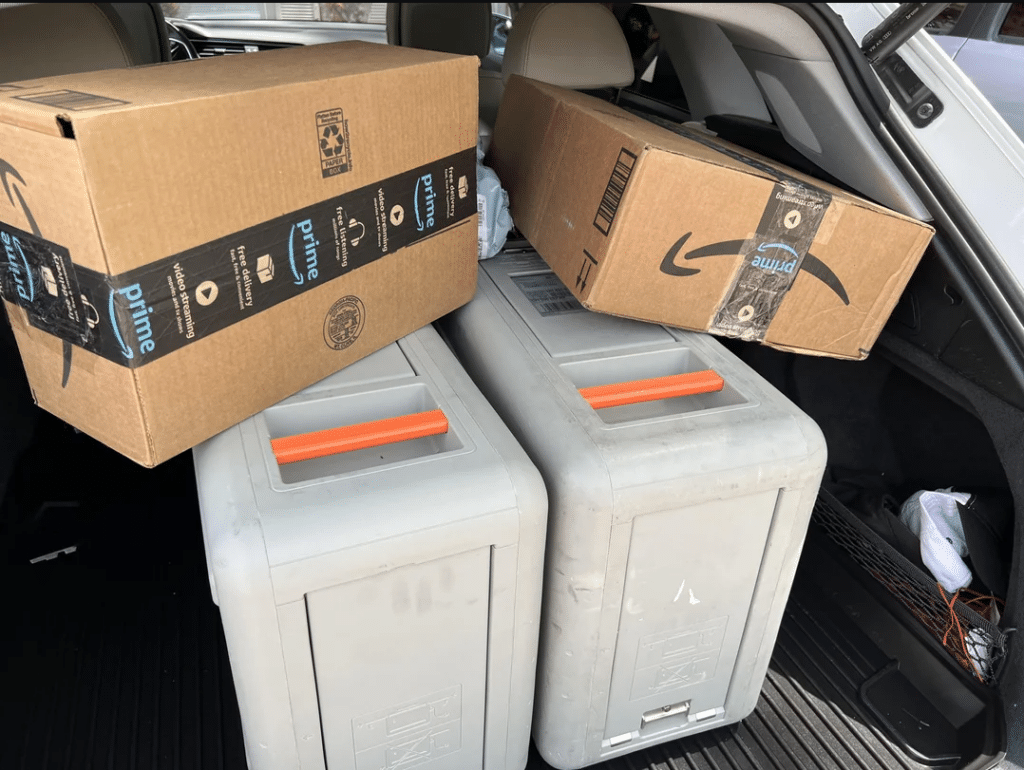
From here, it’s a waiting game as the fulfillment process works through the system. Because this was a brand-new account, we tripped a few flags ordering two Snowball Edge devices right away. But for accounts with activity, there should be no such verifications. The Snowballs showed up within just a few days, and we set out to prepare our data for transport.
One thing to consider with Snowball is pricing. There is a job fee, which includes ten days of having the unit on site. There are, of course, cloud fees in S3 once the data gets there as well. While the pricing for Snowball isn’t complicated, it does vary on the system you select, the time you need it, and which region you’re in. In our case, the job fee was $300 per Snowball, and even that could be lowered dramatically with long-term contracts. You can, however, get a feel for Snowball pricing; AWS has a table that lays it all out.
Data Preparation
We started with a 100TB text file, but for anyone with experience on S3, you’ll know that’s a problem. S3 has an object size limit of 5TB, meaning we needed to do something about our single non-compliant file. Our answer was to chop it up and see if we could land some compression benefit at the same time. The hope was that we could get down to a single Snowball unit, which tops out at 80TB usable. While we waited for the Snowball Edge to arrive, we set about preparing the data.
Recreation of the process
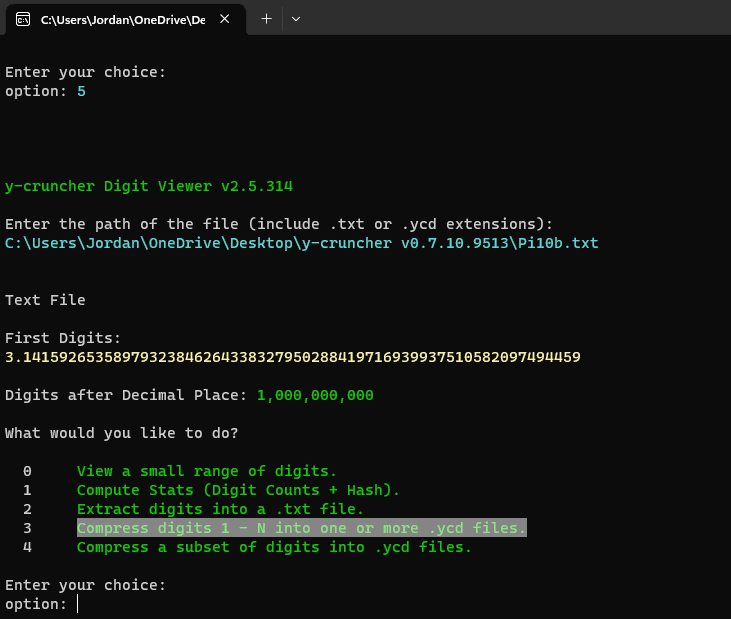
We used our favorite application for working with large numbers, y-cruncher, which includes a digit viewing, splitting, and compression utility. Due to the object size limitation of S3, we elected to split all 100 Trillion digits of Pi into 200 files. After compression, that gave us a file size of approximately 191GB, each containing 500,000,000,000 (500 billion) digits.
AWS Snowball Configuration
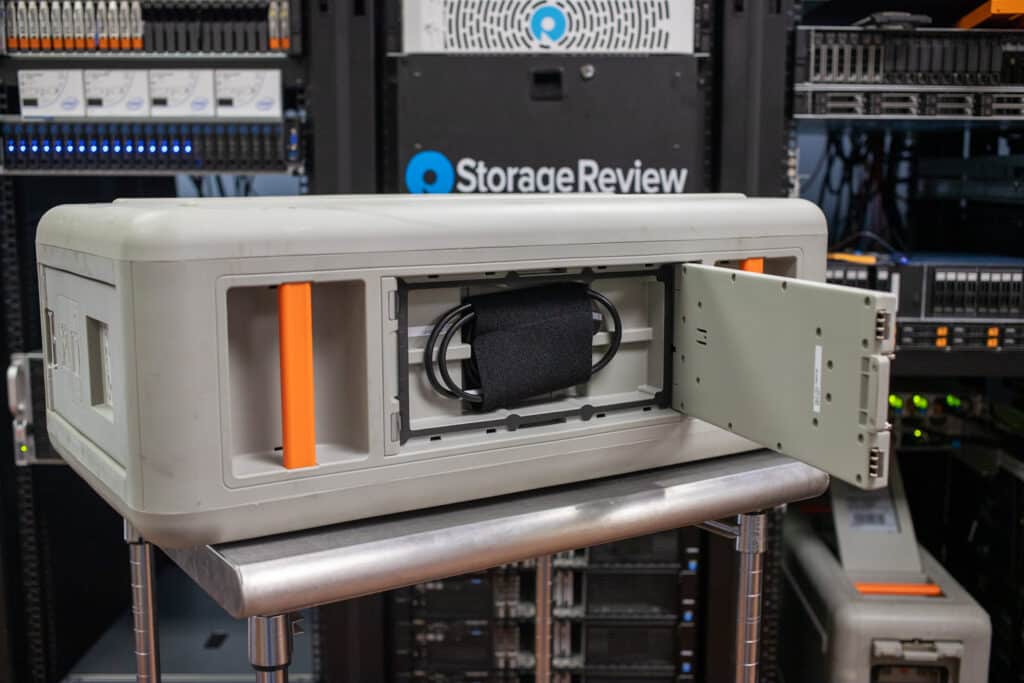
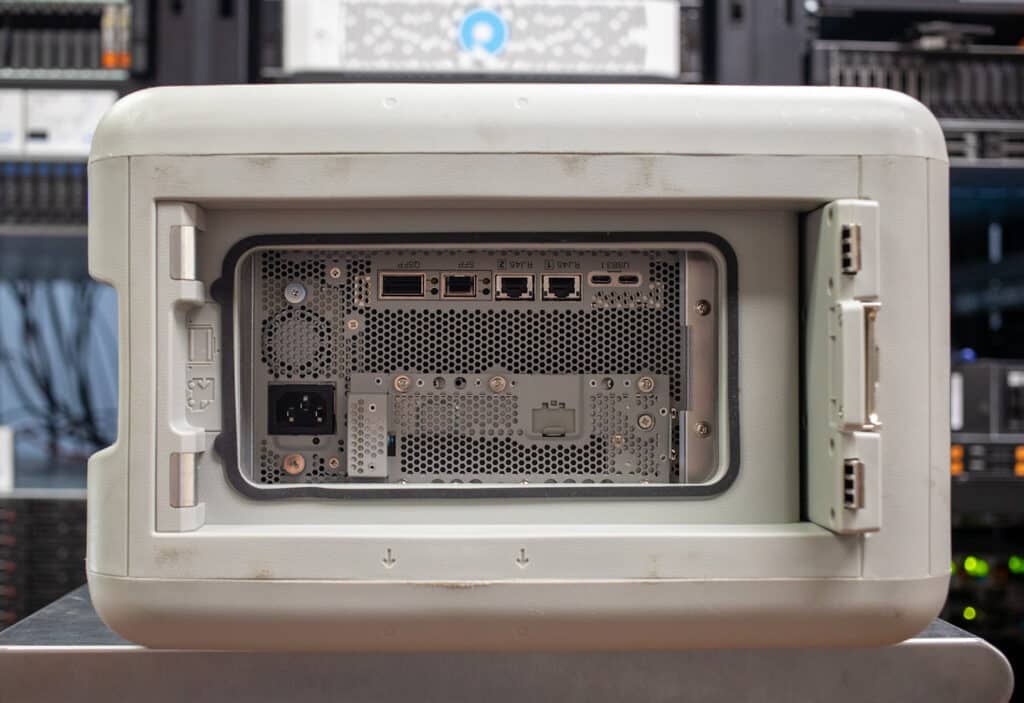
With data prepped and the Snowball device in hand, we fired up the first unit to get it online. Setting up Snowball is very simple, giving it power and access to the network; we opted for the 10GbE port. Many will opt to use CLI to interface with the Snowball, which is probably the preferred method. Still, for the sake of visuals and wanting the experience from a non-AWS professional viewpoint, we opted for AWS OpsHub for Snow Family.
AWS OpsHub for Snow Family is a user-friendly tool that helps customers manage their Snow Family devices and local AWS services. Users can unlock and configure devices, transfer files, launch and manage instances, and monitor device metrics through a graphical user interface, which provides a unified view of AWS services running on the devices. AWS OpsHub automates operational tasks and is designed to accommodate users with different levels of technical expertise, making it easier to manage a large number of Snow Family devices.
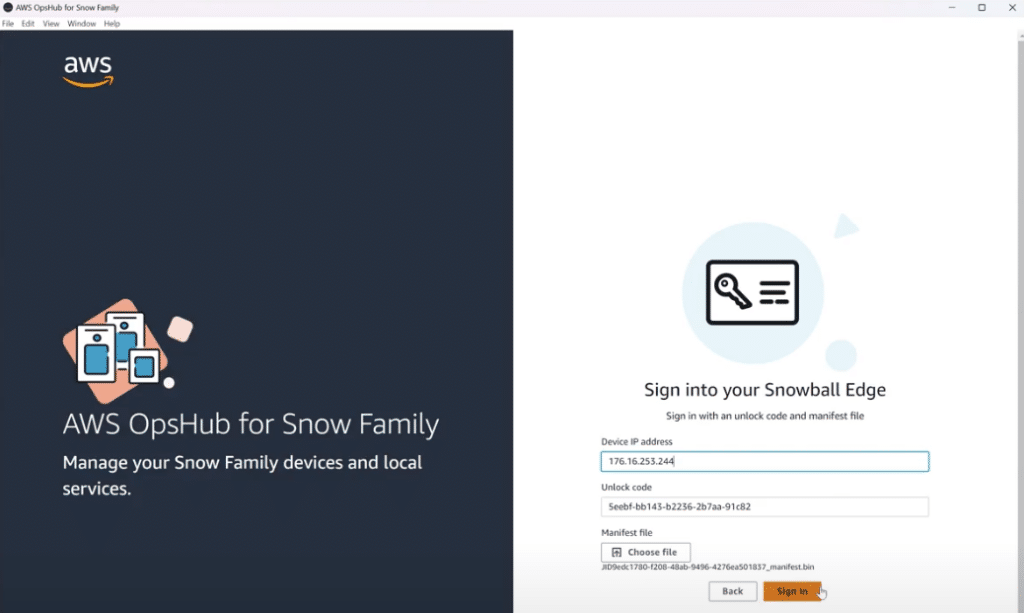
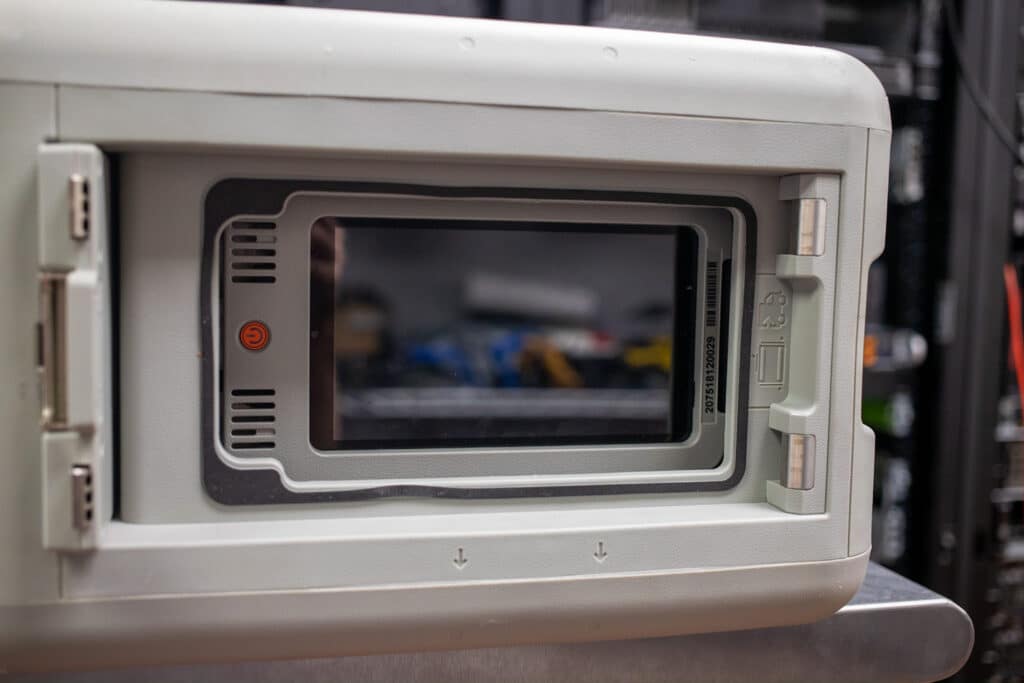
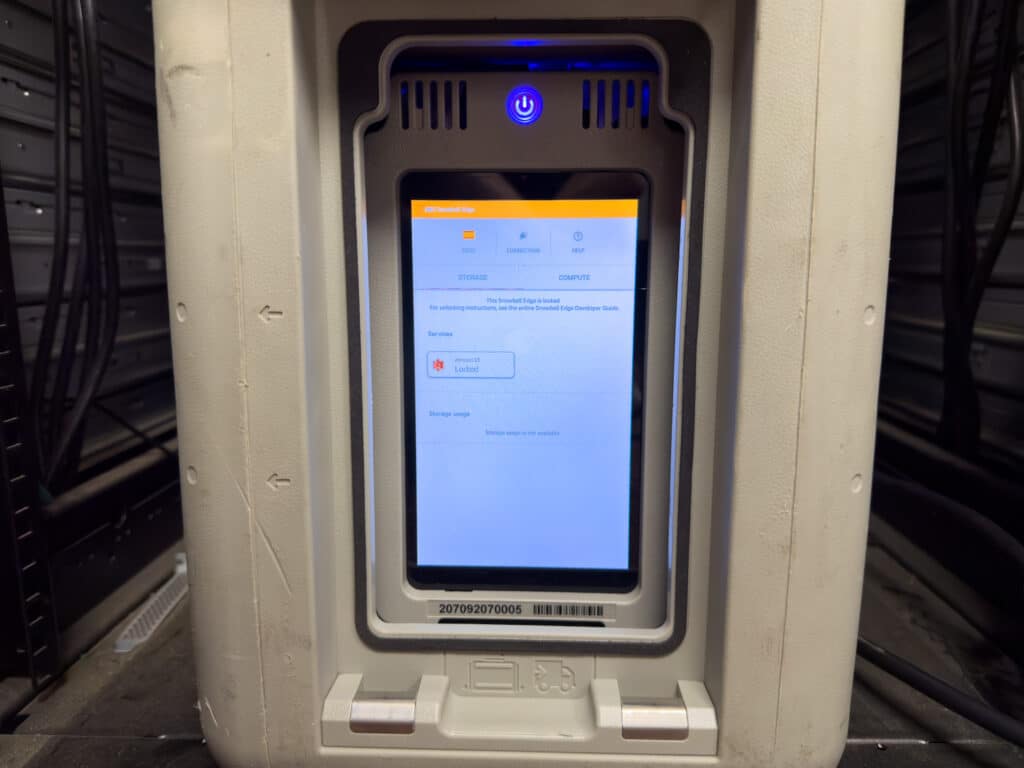
With the IP address from the LCD screen and the unlock code and manifest file from your AWS console, you can unlock and access the Snowball Edge. This can take a few minutes as AWS validates the credentials, decrypts the contents, and handles a few other housekeeping tasks.
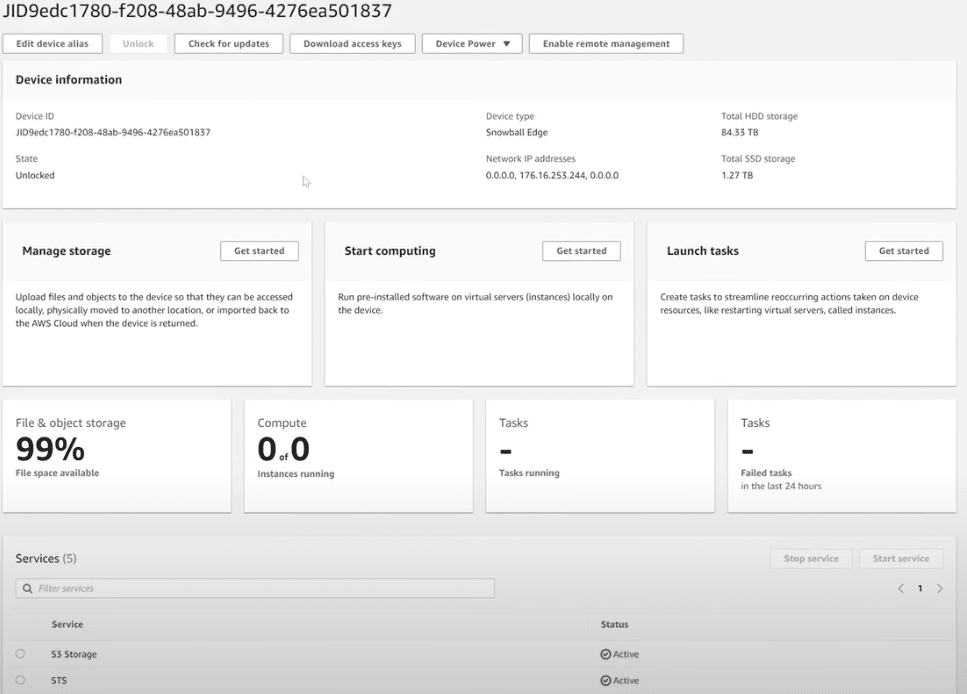
Once logged in, you get transported to a visual dashboard with the relevant device information and the services enabled. At this point, we’re online, connected to the network, and ready to move our data.
Transferring Data to AWS Snowball
With Snowball Edge set up, on the network, and OpsHub connected, it’s time to move over our 200 200GB files. While most would use the CLI interface for this process and would benefit from a more time-optimized experience, we opted for simplicity. Using OpsHub in Windows, we simply selected the folder with our Pi data inside and let the data go. It took us about four days for the files to make it over to the Snowball.
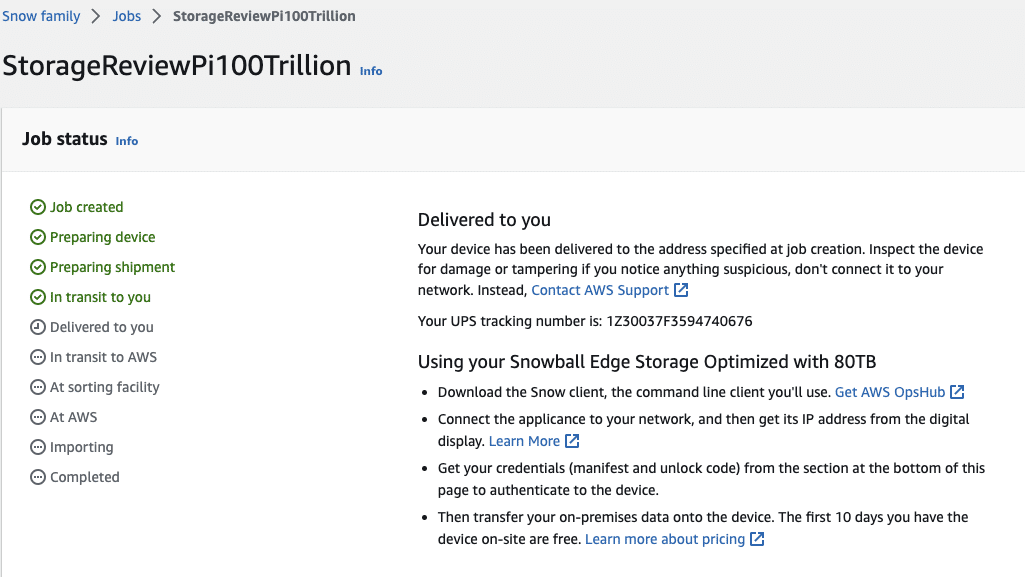
After the data transfer was complete, we powered off the unit, at which point the e-ink display changed to the address for ingest. In our case, that meant Columbus, Ohio, the home of us-east-2. Incidentally, once it’s in the shipper’s hands, the access credentials also go away from the Web console, protecting the data while en route.
AWS Tracks Snowball Status
Once dropped off with UPS, the AWS web interface updates the job status with the tracking number and the Snowball’s progress of transit, sorting, AWS receipt, and importing into S3. It took a couple of days for the Snowball to make its way to Columbus and two days for the import to be completed.
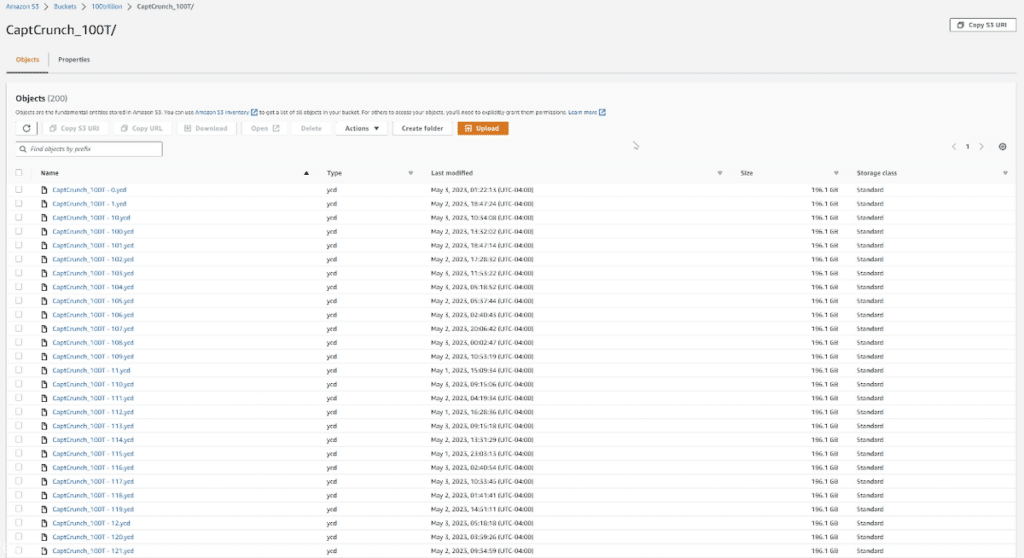
Once the process was confirmed complete, we did a visual in S3 to ensure all data looked to be imported correctly. To give customers a more formal peace of mind, AWS also provides an audit report for the entire process, along with any exceptions.
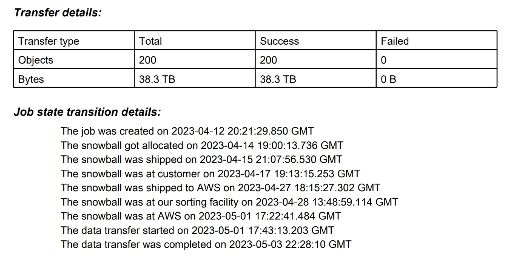
In our log, we can see the 200 files completed with no failures. AWS also logs the highlights as the Snowball Edge, and its data, is moved through the system.
Final Thoughts
AWS Snowball Edge devices aren’t new; AWS was an early mover when it came to providing its customers with a secure way to accelerate moving offline data or remote storage to the cloud. Had we just tried to copy our data to S3 over the wire, we’d probably still be waiting for that job to complete and unable to do much else productive as our Internet pipe was tied up. For us, the Snowball Edge Storage Optimized unit was exactly what we needed to get our data to the cloud as quickly as possible.
This isn’t without cost. While long-term customers can get better pricing, our out-of-pocket cost for the Snowballs was about $700. That’s not bad, though, considering we ordered an extra one by mistake, and we didn’t move all that quickly to spin the units back to AWS. There was no fee to ingest the data to S3, and the ongoing S3 cost is determined by your contract rate with AWS.
It should be noted we used the Snowball Edge in the most basic of ways. The Snowball devices with Compute, especially those with GPUs, offer much more potential for more intensive use cases. Those who are interested should tune into our recent AWS Snow Podcast. Ultimately the Snow devices are just a more diminutive version of AWS with a storage and compute limit. But as we saw, they’re very flexible, extremely easy to deploy, and reliably get data where it needs to be. For anyone considering AWS Snow devices, we highly recommend giving them a try.


 Amazon