

LucidLink Filespaces is a cloud file system for distributed workloads that works with any cloud storage. The service provides remote storage streamed over the Internet but accessed as if it was in your local computer or network. In this article, we quickly overview the cloud NAS concept and the LucidLink Filespaces solution. Here we also explain how to set up an account, and we will run a basic test to better understand its usability.
More than ever, storing data in the cloud is positively acknowledged by enterprises and consumers, as working from home has become a new standard. Now, users need to rethink their IT technologies. Among these technologies, Cloud NAS (Network Attached Storage) has risen. The service offers streaming access to data as if it were a local disk. This particular cloud technology differs from other cloud storage offerings and similar services in its high-speed data access.
You are probably familiar with cloud storage services like Google Drive, One Drive, Dropbox, Box, and others. More often than not, these offerings will need a client app to sync the data in your computer with the cloud. In this way, the data is always stored in two places. These services usually offer an advanced option. Bypassing the need for syncing data, they resemble Cloud NAS. As practical examples, Google has Google Drive for desktop; Dropbox, Smart Sync; and even QNAP offer QuTScloud, a cloud-optimized version of the QNAP NAS operating system. There is no need to sync or download data with these services; the data is only stored in the cloud, but it’s accessed in a local fashion.
What is LucidLink Filespaces?
The cloud-native file services transition, including Cloud NAS, has been delayed by a combination of inadequate performance, security, and features. LucidLink Filespaces, from LucidLink Cloud Technology, seeks to tackle these problems with its unique solution. The service works like a standard NAS but reduces latency as primary file data is hosted in the public cloud.
The technology has been specifically developed to offer a near-local user experience, even when accessing data over distance. It functions as a NAS or file server, from a high-level perspective, but both the clients and data repository can be located anywhere. All authorized client devices can see and access the same shared data set, irrespective of their operating system or location, as long as they have network access to the object-store.
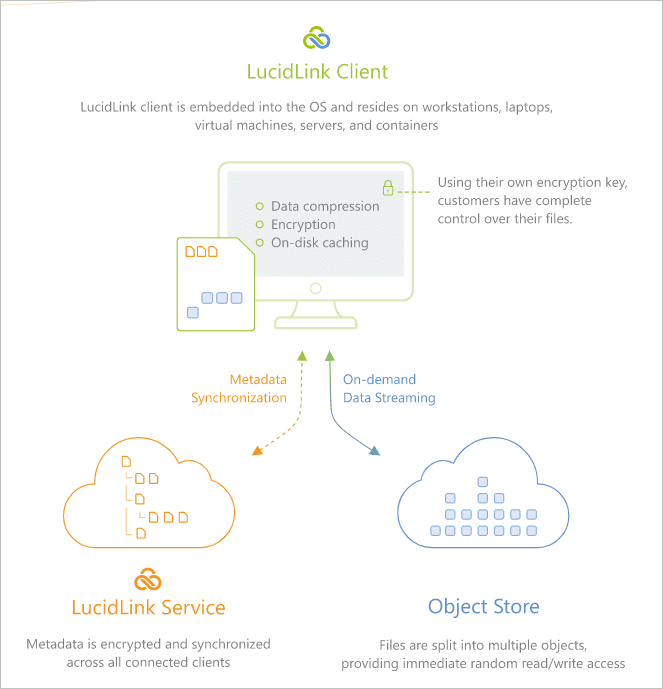
LucidLink aims to solve the problem of distance and latency in cloud environments by reducing the traffic between applications and remote storage. Filespaces boost responsiveness and enable file data to be delivered efficiently and streamed on-demand. Performance is further optimized by advanced data prefetching based on a proprietary, adaptive algorithm; parallel TCP streams; local write-back caching; and in-line compression. This cache can be adjusted through the control panel once the client app is installed.
LucidLink Cloud Technology highlights:
Fast: No downloading or syncing
- Data streamed on-demand
- Access files directly in the cloud
Secure: End-to-end encrypted
- Protected with snapshots
- cloud-to-cloud backups
Software as a Service: Your choice of cloud
- No hardware or virtual appliances
- Elastic, pay-as-you-go
LucidLink & IBM Team Up to Reduced Egress Fees
Most cloud storage providers charge an egress fee when data is retrieved from the cloud. LucidLink recently announced that was collaborating with IBM to bundle IBM Cloud open hybrid cloud storage offerings with LucidLink Filespaces. The partnership allows LucidLink customers cloud-based egress pricing 60% below LucidLink’s previous fees and often below the organization’s current negotiated rates with public cloud vendors.
Getting Started with LucidLink Filespaces
We need to sign up for a new LucidLink account. Once you log in, you will be brought to the LucidLink Web GUI. We begin in the dashboard, which is straightforward and simplistic. The menu here is limited; we can just navigate the Dashboard, Billing, and Profile options. Another clickable option is to download the client software. We’ll do this later. More settings are available once the client app is installed from its Control Panel.
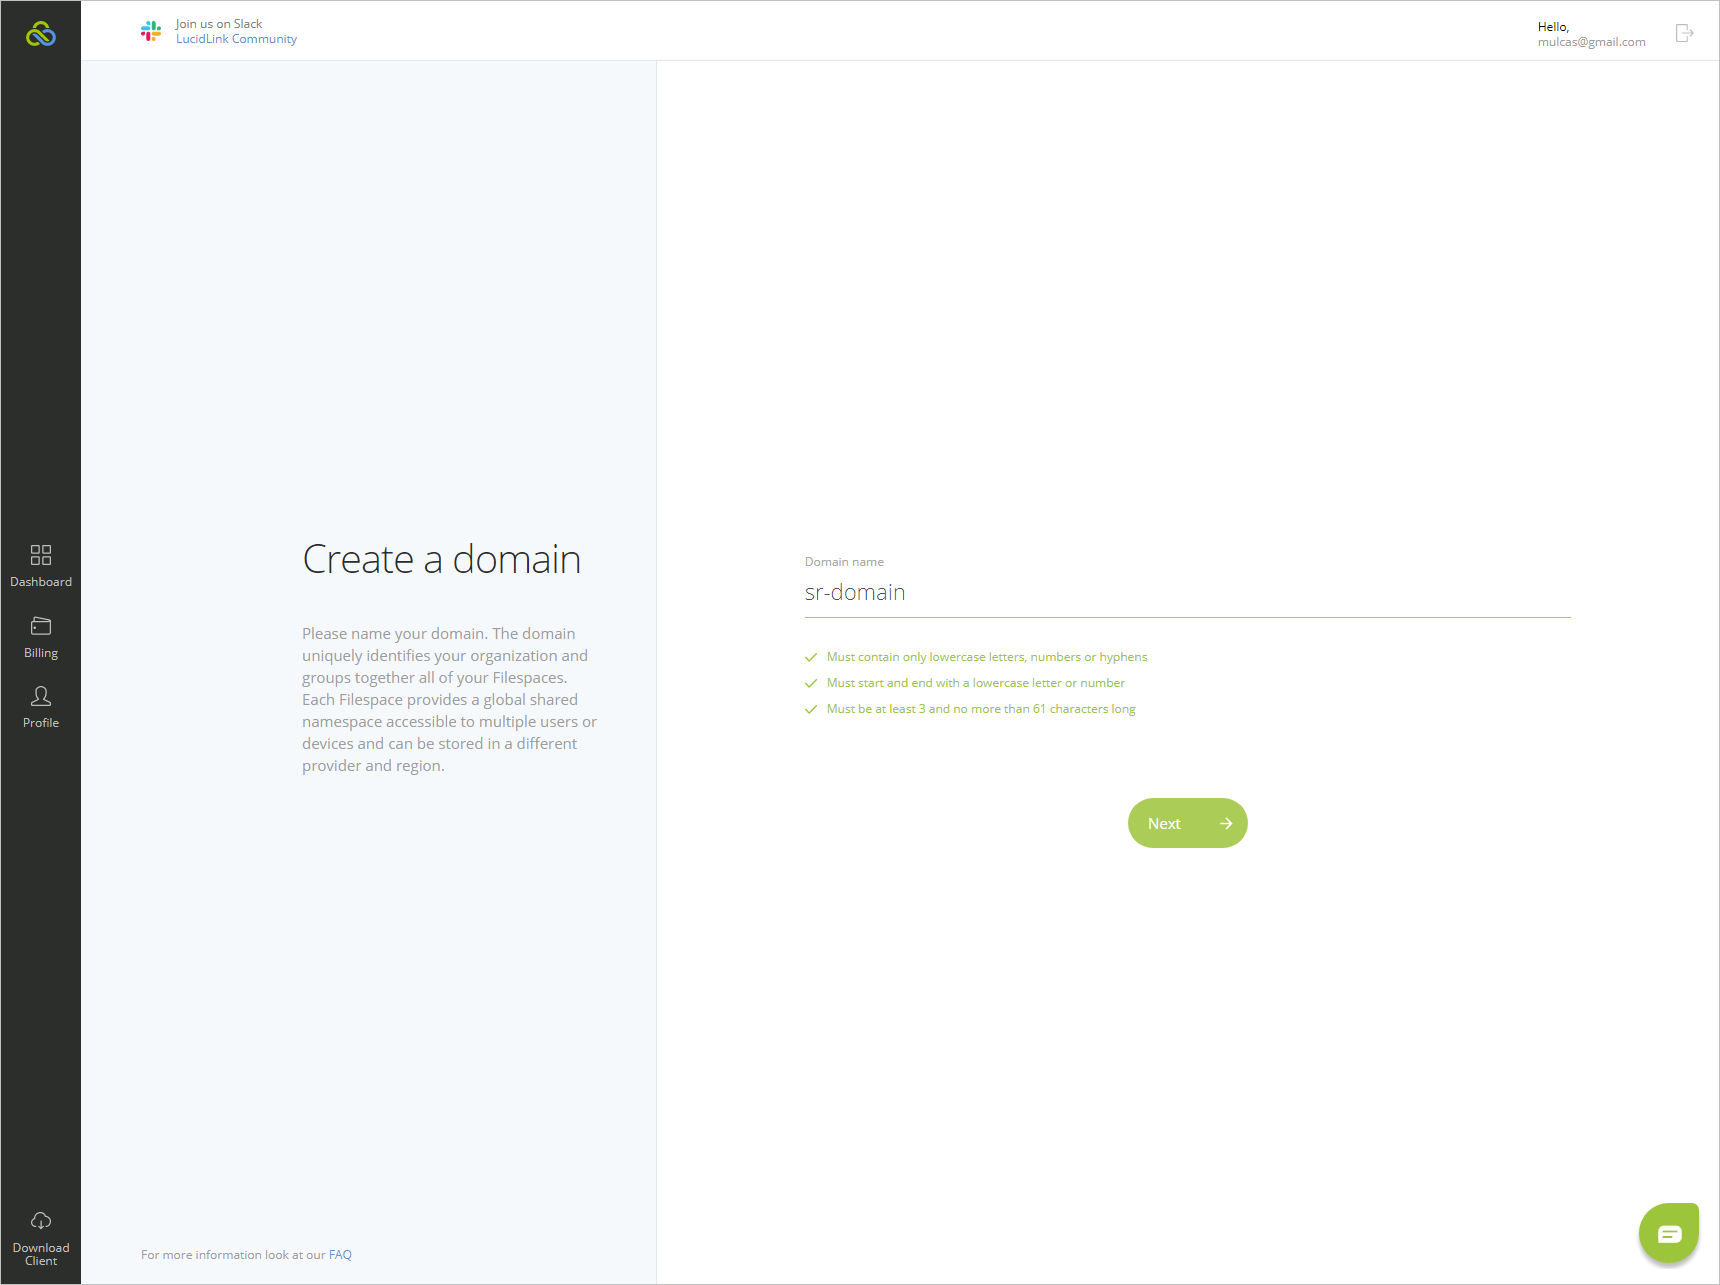
Step 1: Create a domain
From the dashboard, first, we need to name a domain. The domain uniquely identifies your organization and groups together all of your Filespaces.
Step 2: Create a filespace
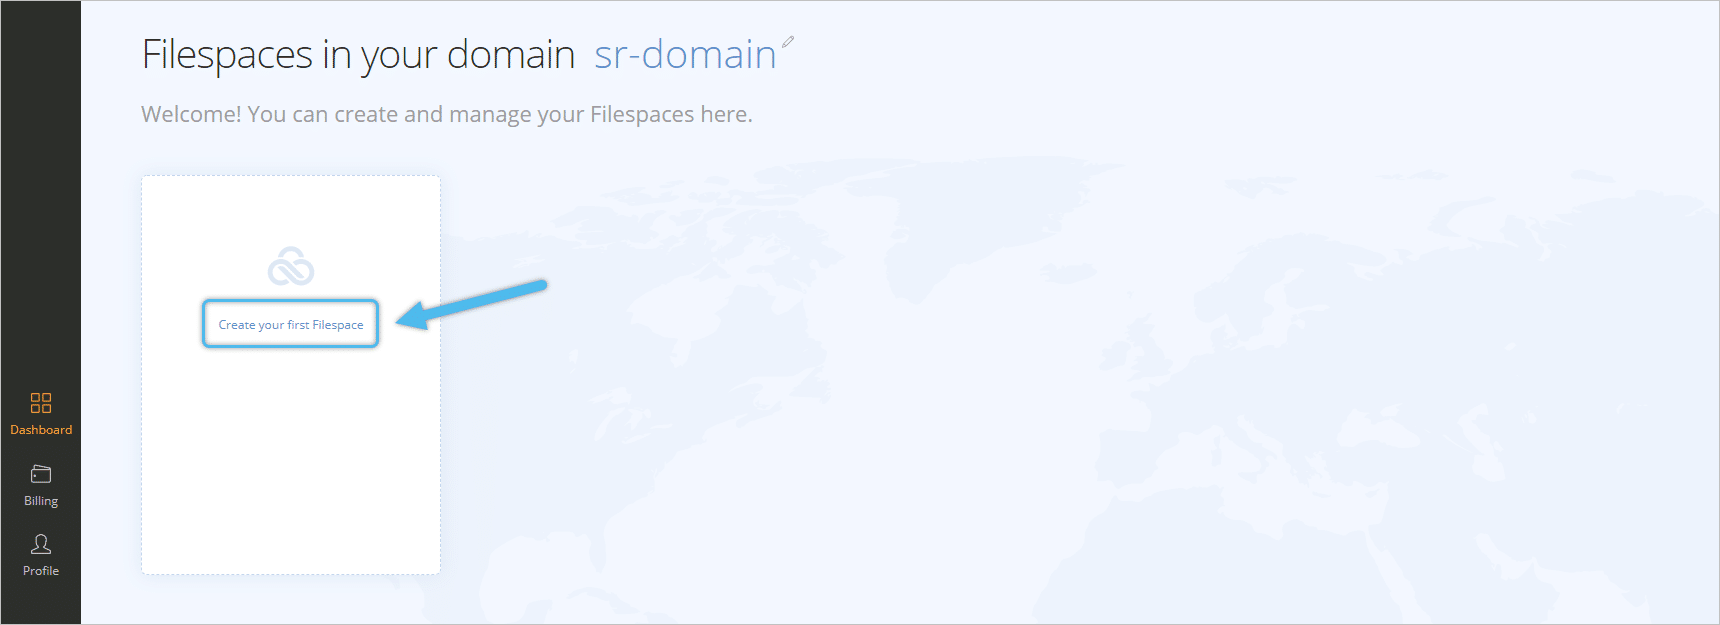
After creating the domain, we can now create Filespaces. We click on “Create your first Filespace.” Each Filespace provides a globally shared namespace accessible to multiple users or devices and can be stored in a different provider and region.
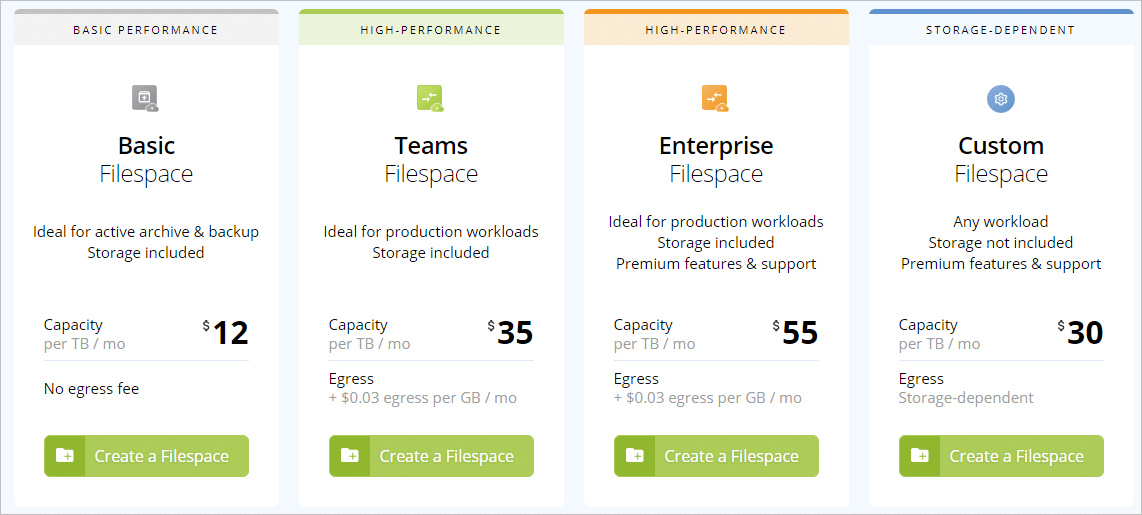
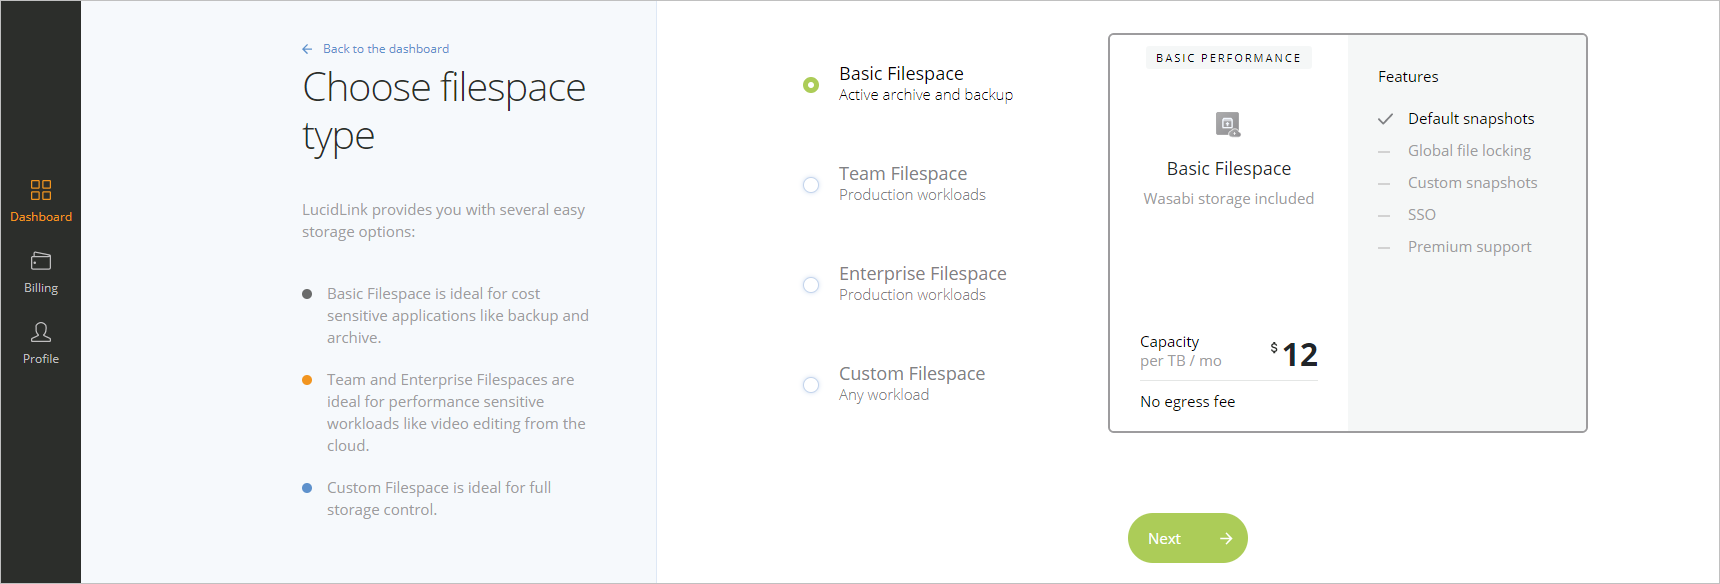
Then, we should choose the filespace type. LucidLink provides four storage options: Basic Filespace, Team, Enterprise, and Custom. For this example, we are selecting Basic Filespace.
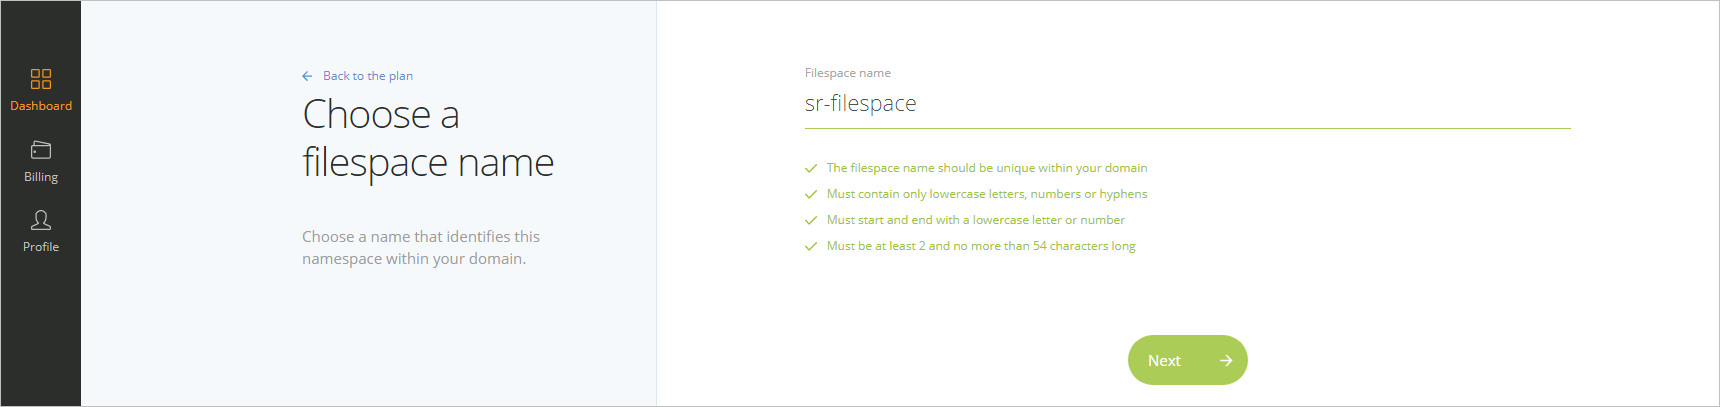
On the next page, choose a name that identifies the namespace within your domain.
Choose cloud storage region
Selecting a region closest to your client devices offers the best performance. Since we are using the basic storage option with Wasabi, limited regions are presented. We are using Plano, TX, for this example.
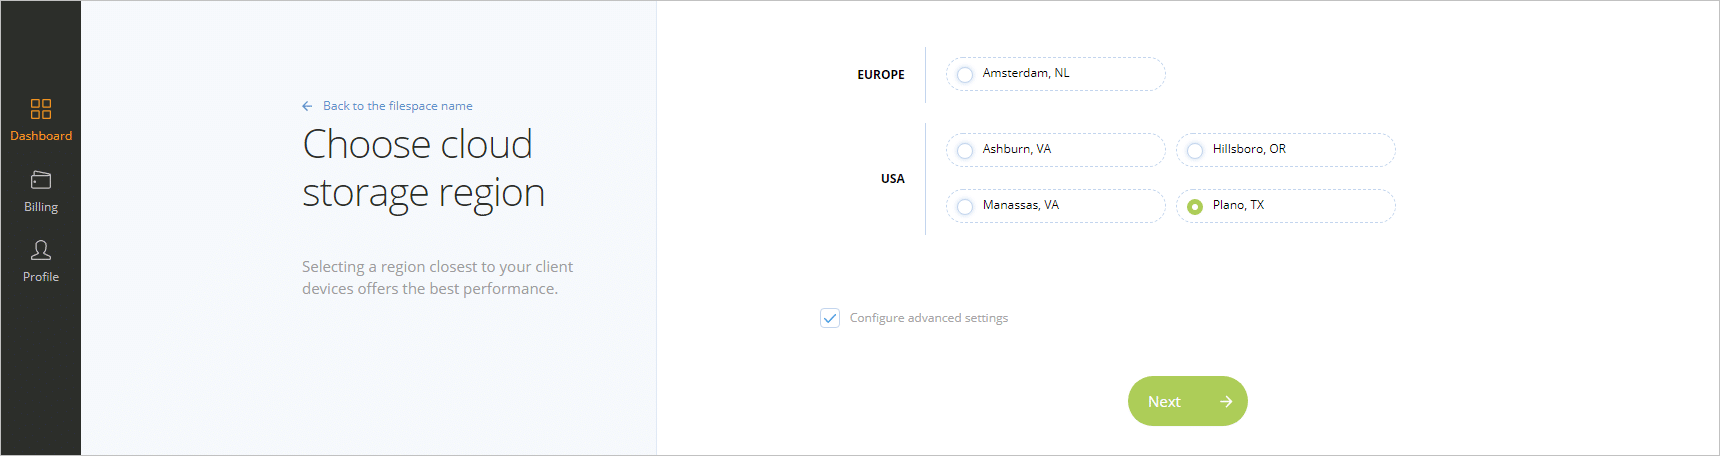
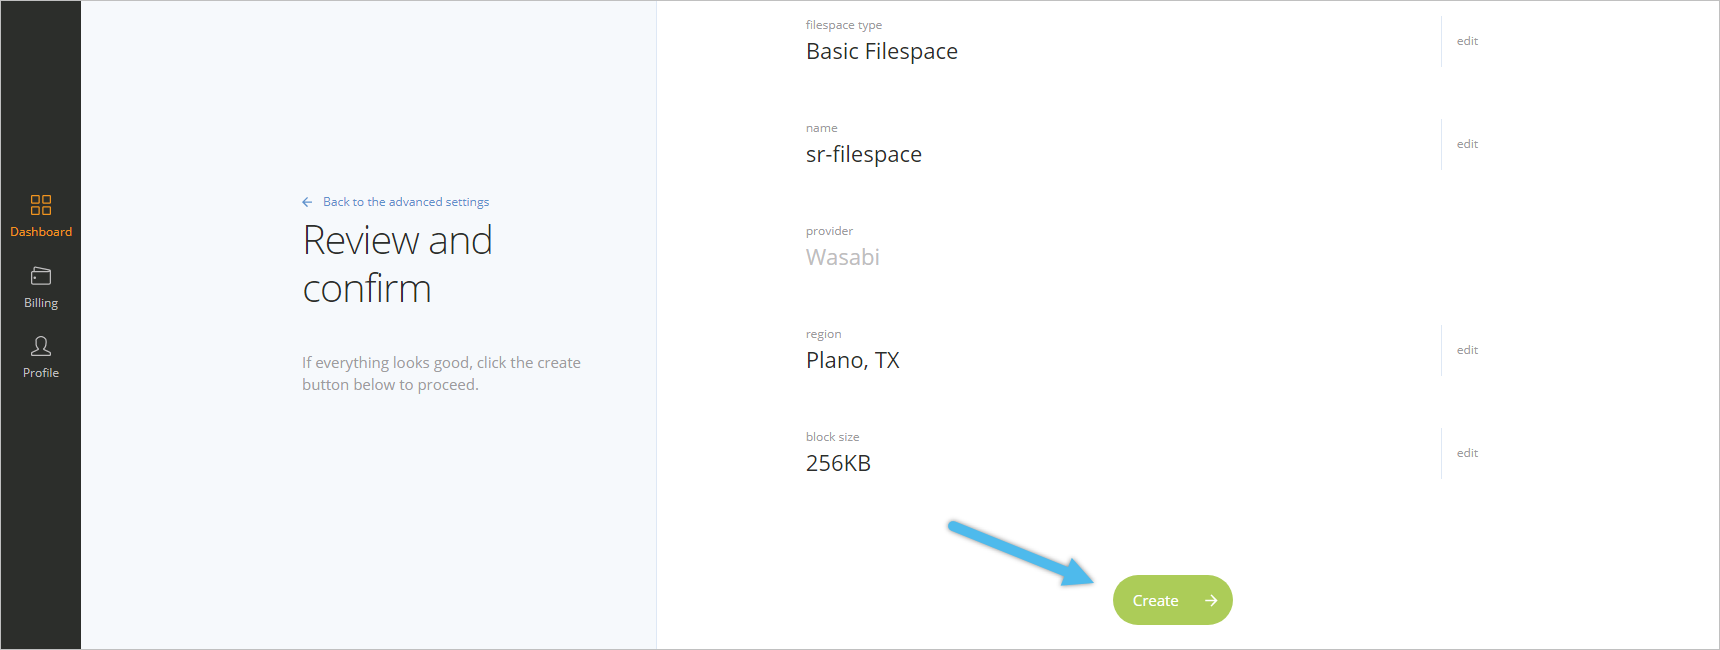
We can also configure some advanced settings specific to the Filespace. And after reviewing the configurations, finally, we proceed to create the filespace.
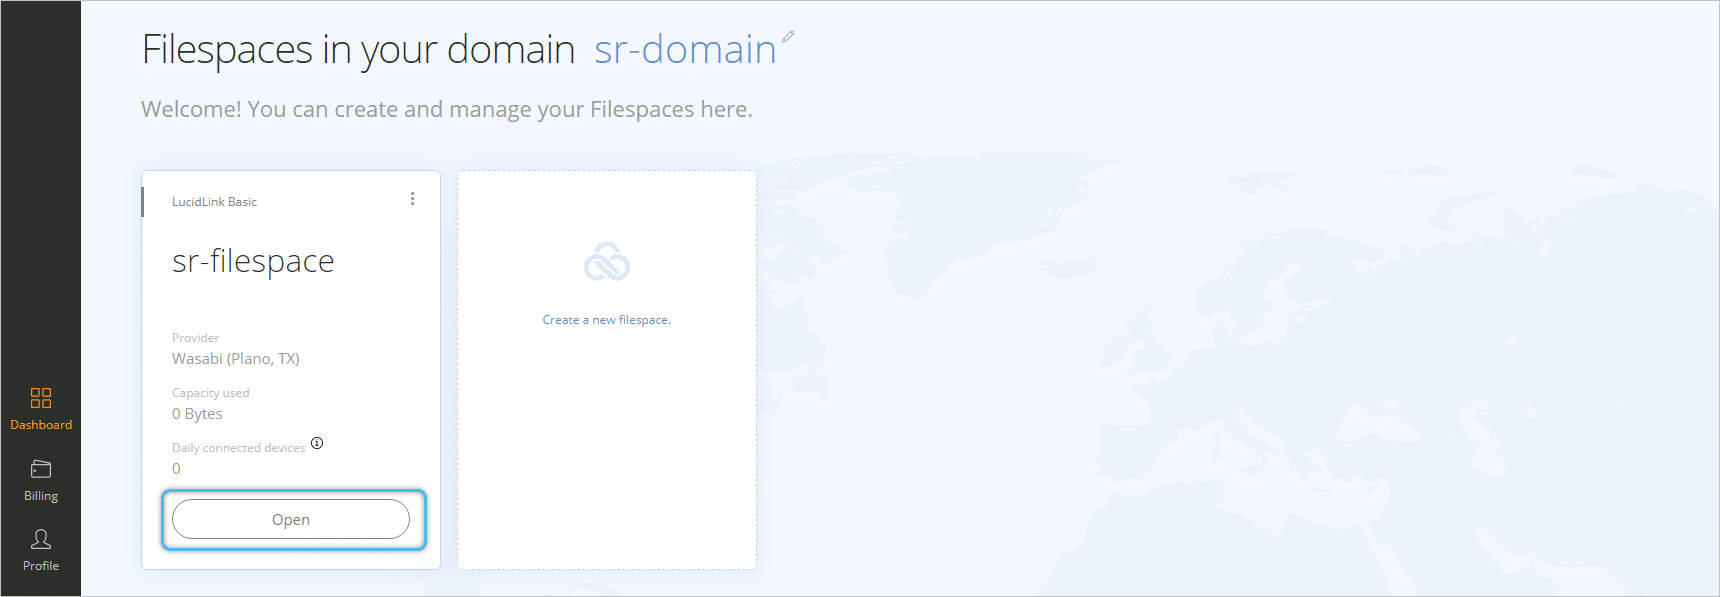
From the dashboard, our new filespace is displayed under the domain created previously. Now we need to initialize it.

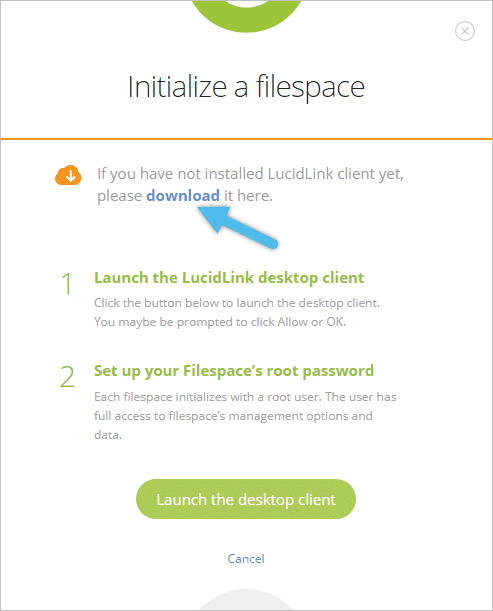
Step 3: Download and Install the Client
If you haven’t installed the client yet, now is time to do it. After initializing the filespace, we need to launch the desktop client. Installing it is straightforward, and after that, the client app will be pop up immediately. You can still open the app from the Start Windows menu.
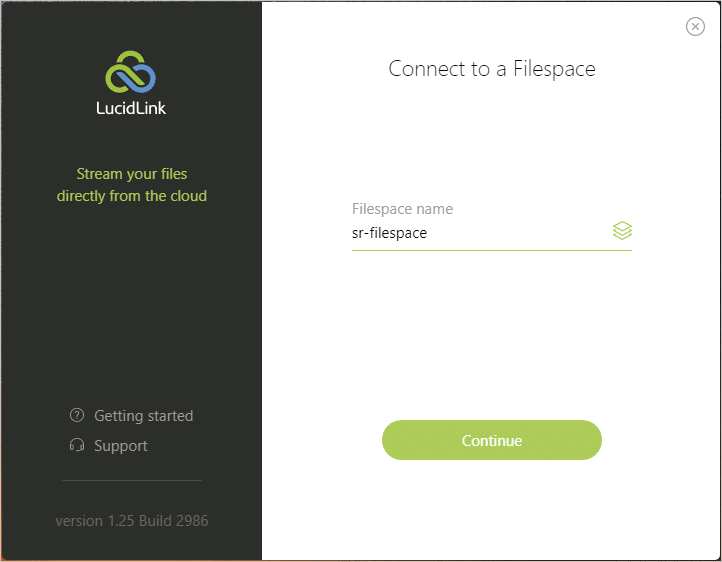
Step 4: Connect to a Filespace
Here, we just type the name of the filespace, enter our credentials, and that’s all.
Under the specific domain, the filespace will now ready to be “Open.”
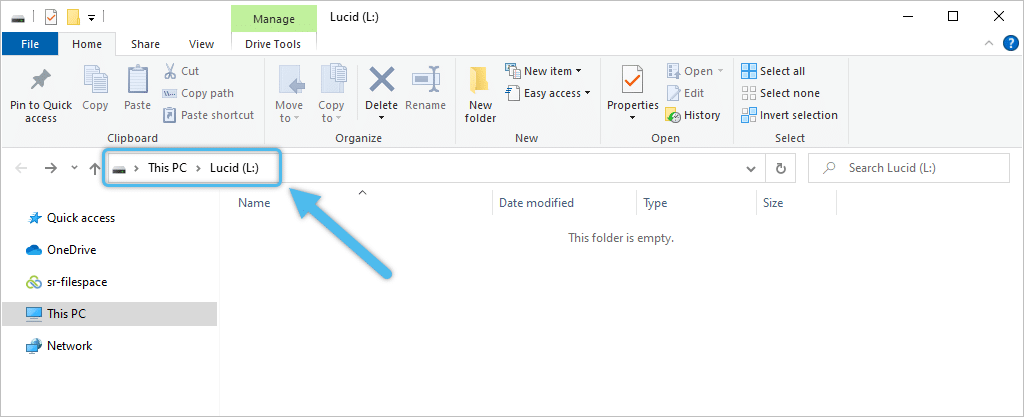
The Cloud NAS is ready to be accessed as it was a local drive on our computer. We can now create folders and move files in a new, fancy way.
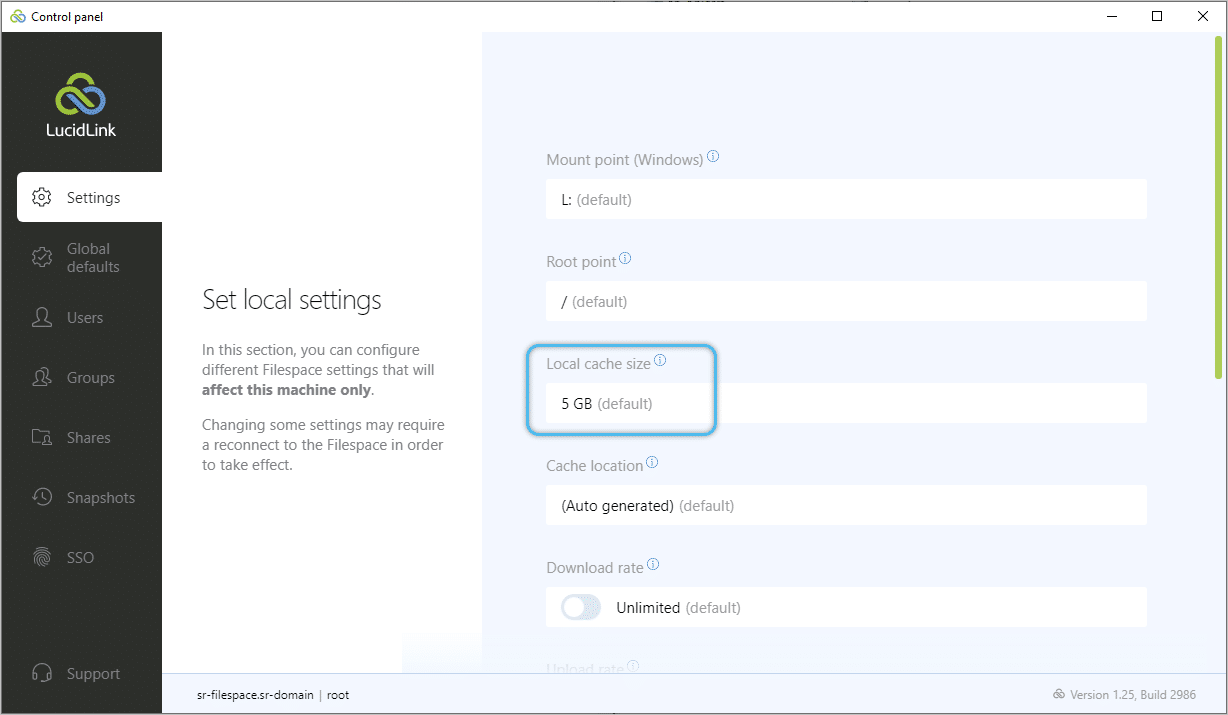
More options and settings are available using the app control panel. For example, the LucidLink cache can be adjusted here. Before changing the cache, we should ensure that we have sufficient free disk space available.
LucidLink Filespaces: Quick Test
Using Filespaces, moving data back and forth to your computer will behave pretty similar to other cloud services. In fact, Google Drive for Desktop is faster when uploading files. However, the company focuses more on file collaboration, such as remote post-production workflows. They make some claims that call our attention. They say the service has the capability to “perform video and post-production editing directly in the cloud.”
Using an Enterprise tier running on IBM Cloud, we worked on some basic video editing projects. Using Premiere Pro and Blackmagic Resolve, the LucidLink client app accesses all the media files and brings down the files from the Internet into the local cache. Like so, we are basically editing as if we were local, and there are no issues.
However, for bigger projects that are larger than the local cache, the system gets lit little laggy. This particular situation happens with Blackmagic Resolve as the app generates thumbnails and previews of basically every clip at once. Deleting and redistributing the cache also presents issues, causing the app to freeze for a couple of seconds.
As an important note, we are testing with a 40GB project and limiting the local cache to 3GB. Most editing projects are well over 100GB. If that a large local cache is needed for a smooth experience, we don’t as much benefit versus other cloud storage services. That is unless you have a decent amount of cache on your computer. Additionally, videos that are under 1GB are quick to load and run without issue.
Conclusion
LucidLink Filespaces provides a file interface to cloud storage, streaming data securely and eliminating the need to download and synchronize. Both users and applications can connect to the same single namespace and use it natively as if it was local. This kind of service aims to enhance team collaboration and productivity.
The service is similar to other Cloud NAS offerings but stands out on its high performance due to an advanced and proprietary data prefetching algorithm, with local write-back caching and in-line compression. LucidLink considers technology to be ideal for remote post-production workflows, remote team collaboration on CAD/CAM projects, and storing and immediate access to video footage.
We ran some basic tests based on video editing, using some common scenarios. Ultimately the solution is easy to use and folds into a user’s computer the same as local storage. That said, for large video projects, the user will need to allocate more cache for a seamless experience. Overall though, there’s definitely some really interesting utility here. LucidLink offers a free 14-day trial on IBM Cloud storage to make it easy to check it out for yourself.


 Amazon