

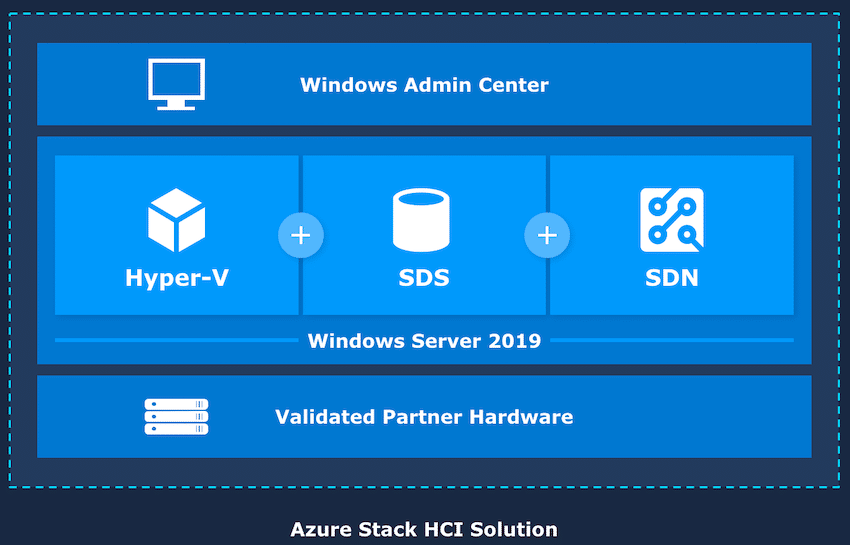
So far we’ve dived deep into the Microsoft Azure Stack HCI, the on-premise implementation of Microsoft’s Azure cloud service. Azure Stack HCI can be seen as a best-of-both-worlds type of platform. It has all the management tools from Azure like Azure Monitor, Azure Security Center, Azure Update Management, Azure Network Adapter, and Azure Site Recovery, while housing the data on-prem and meeting certain regulations. Azure Stack HCI is broken down into three parts: software defined architecture, Azure services, and hardware.
Choosing the right hardware is important as we detailed in our article, “The Importance of Hardware in Microsoft Azure Stack HCI.” The first step to deploying Azure Stack HCI would be to find a certified hardware vendor, in this case, DataON. DataON has had a strong partnership with both Microsoft and Intel for several years and brings this partnership to full realization in the hardware layout for Azure Stack HCI in an Intel Select configuration. An interesting facet of the partnership with Intel is the ability to leverage the company’s PMEM (and of course, its latest processors) with Azure Stack HCI.
In many cases, the DataON HCI Intel Select solutions are configured and shipped in their own rack, ready to deploy immediately. This delivery method is particularly useful at the edge, where existing IT infrastructure is limited or nonexistent. In the StorageReview lab, we deployed the four storage and compute nodes, domain controller and switches as diagramed below.
Build and Design
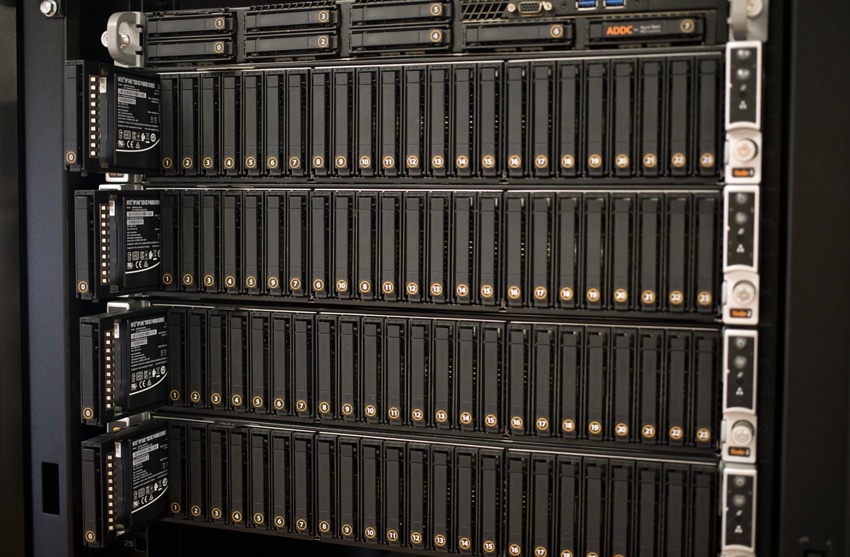
The Microsoft Azure Stack HCI cluster we reviewed is built on the DataON HCI-224 All Flash NVMe platform. These servers are 2U in size with 24-NVMe bays up front, offering plenty of expansion in the rear for PCIe-based components. The labeling is high in contrast to the matte-black drive caddies, making it easy to spot specific drives if the time comes to swap out. Everything is labeled, which isn’t that uncommon, but the extent of the labeling is. Our deployment has each node labeled (1 through 4), as well as a number of other items that make it easy to deploy and manage in the datacenter.
Our configuration came equipped with 48 NVMe SSDs, or 12 per node. These included four 375GB Intel Optane P4800X SSDs and eight Intel P4510 2TB SSDs.

In the back, we have two dual-port 100G Mellanox Connect-X 5 NICs, providing a fully redundant connection through two Mellanox 100G switches (SN2100) for cluster network traffic. Not shown in our studio photography are all the connections with complete labeling on each end of the appropriate network cable to allow for error-free cabling at the deployment stage.
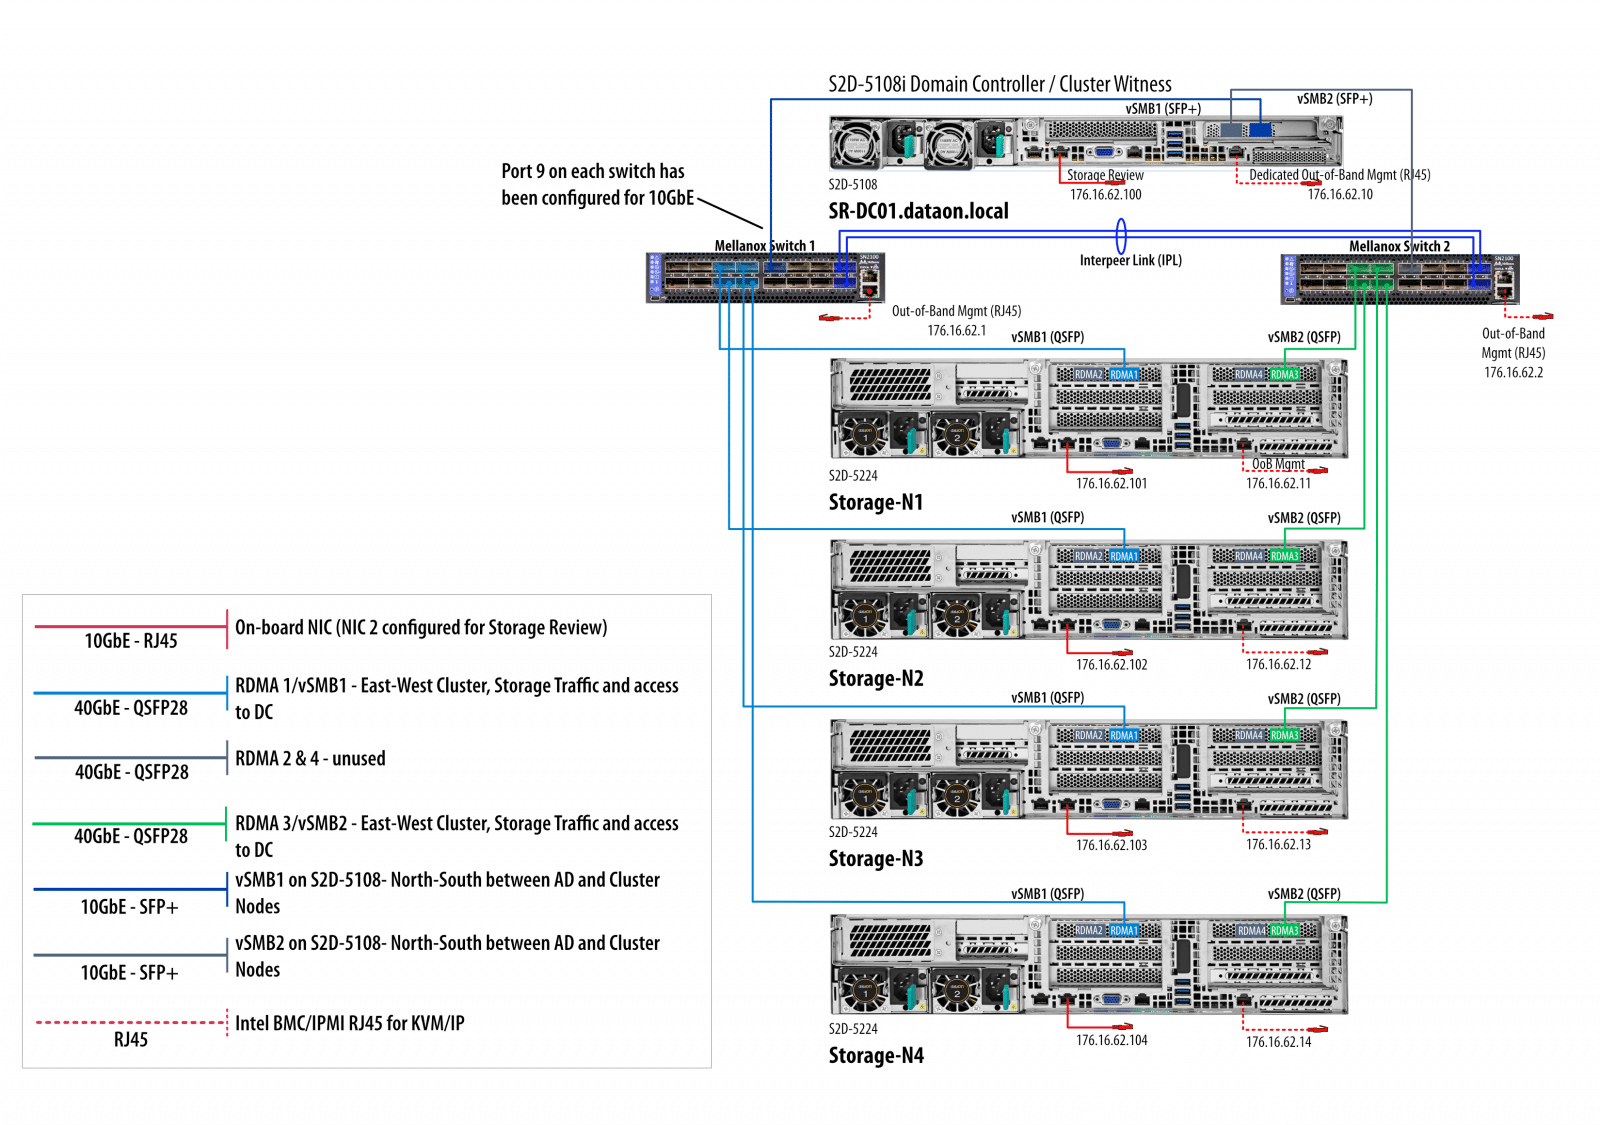
Prior to this, we’ve never had a solution arrive with this level of documentation into the label. Microsoft and DataON make deploying Azure Stack a painless process so customers can get operational immediately. Each cable is color coded to the specific use and labeled for where each end goes. Combined with the customized sheet DataON provides customers, it nearly guarantees an error-free deployment. In our deployment, the system was pre-configured with IP addresses prior to shipment, with the IP addresses for management and IPMI labeled.
Management and Usability
For buyers running a Hyper-V shop operating on Windows Server, the Microsoft Azure Stack HCI will be an easy transition. Many of the same management tools are in place, with many offering a more integrated and simple workflow. In our review process, we leveraged both the Windows Failover Cluster Manager to manage the DataOn HCI Cluster, as well as the Windows Admin Center to monitor workloads and see how they were performing.
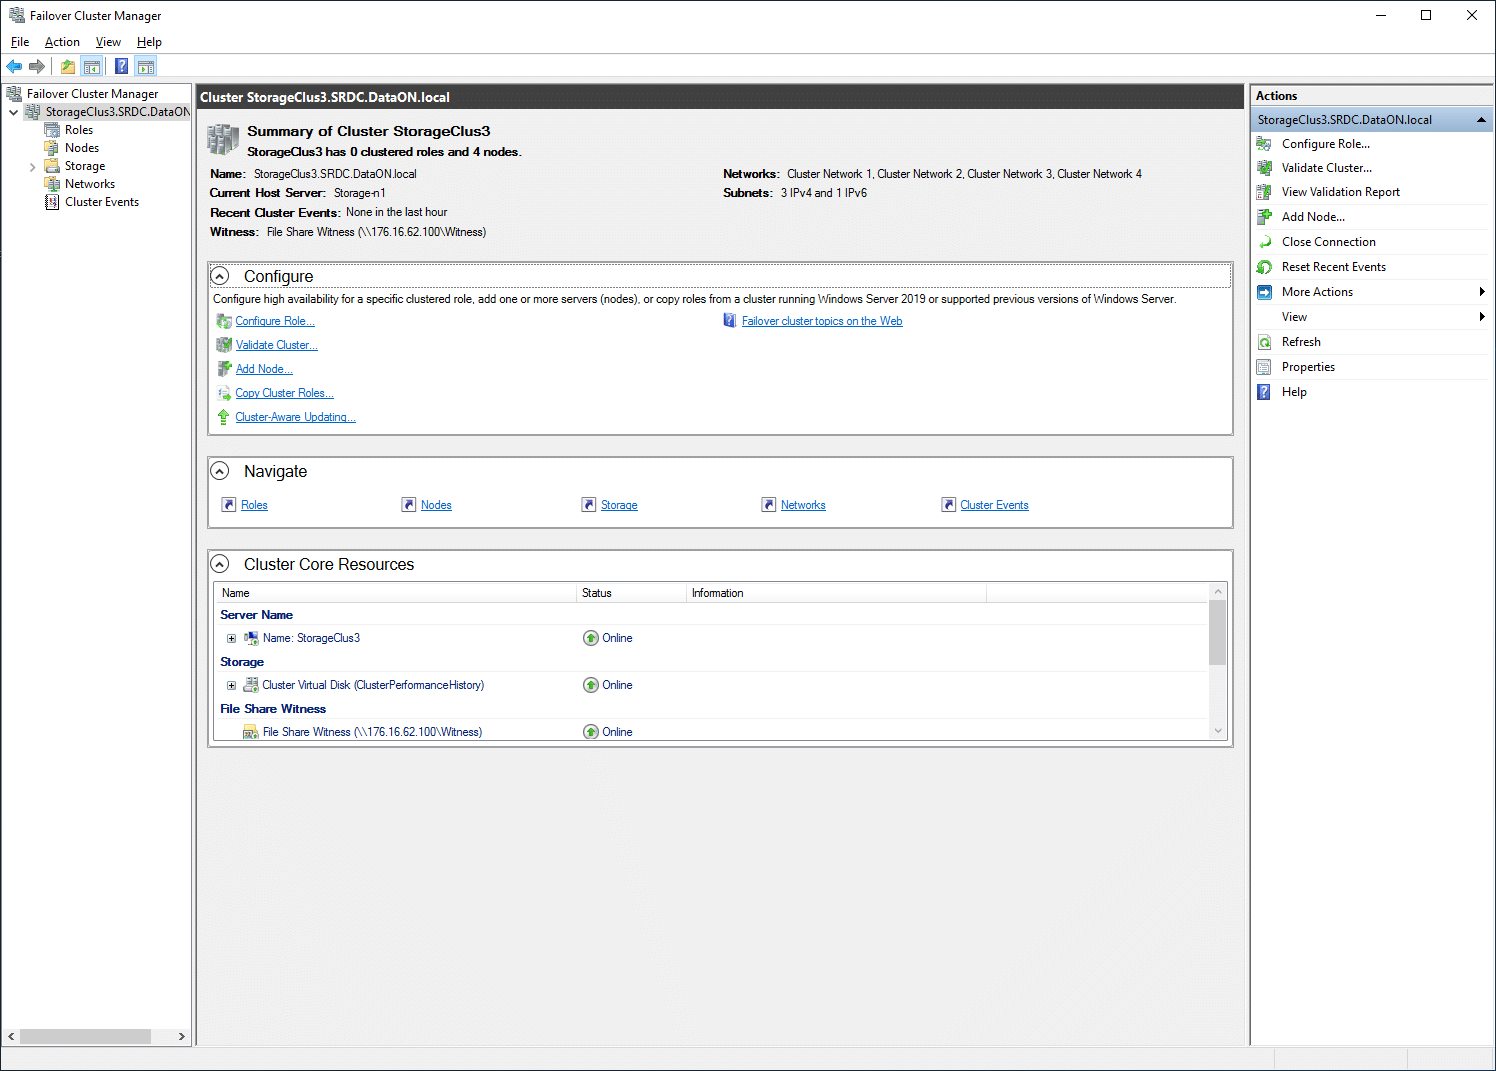
Looking at more of the node level first through a Microsoft Remote Desktop (RDP) session logged into one of the nodes, we looked at the Windows Failover Cluster Manager. This gives both node-level management capabilities as well as cluster-level visibility. This type of access would be more geared towards initial deployment, where day-to-day monitoring would take place from the Windows Admin Center.
First up, we click on our particular cluster and get general information about it, the ability to configure it, and a look into resources. This gives a summary view of the selected cluster, allowing you to see where problems are and start drilling into specific areas.
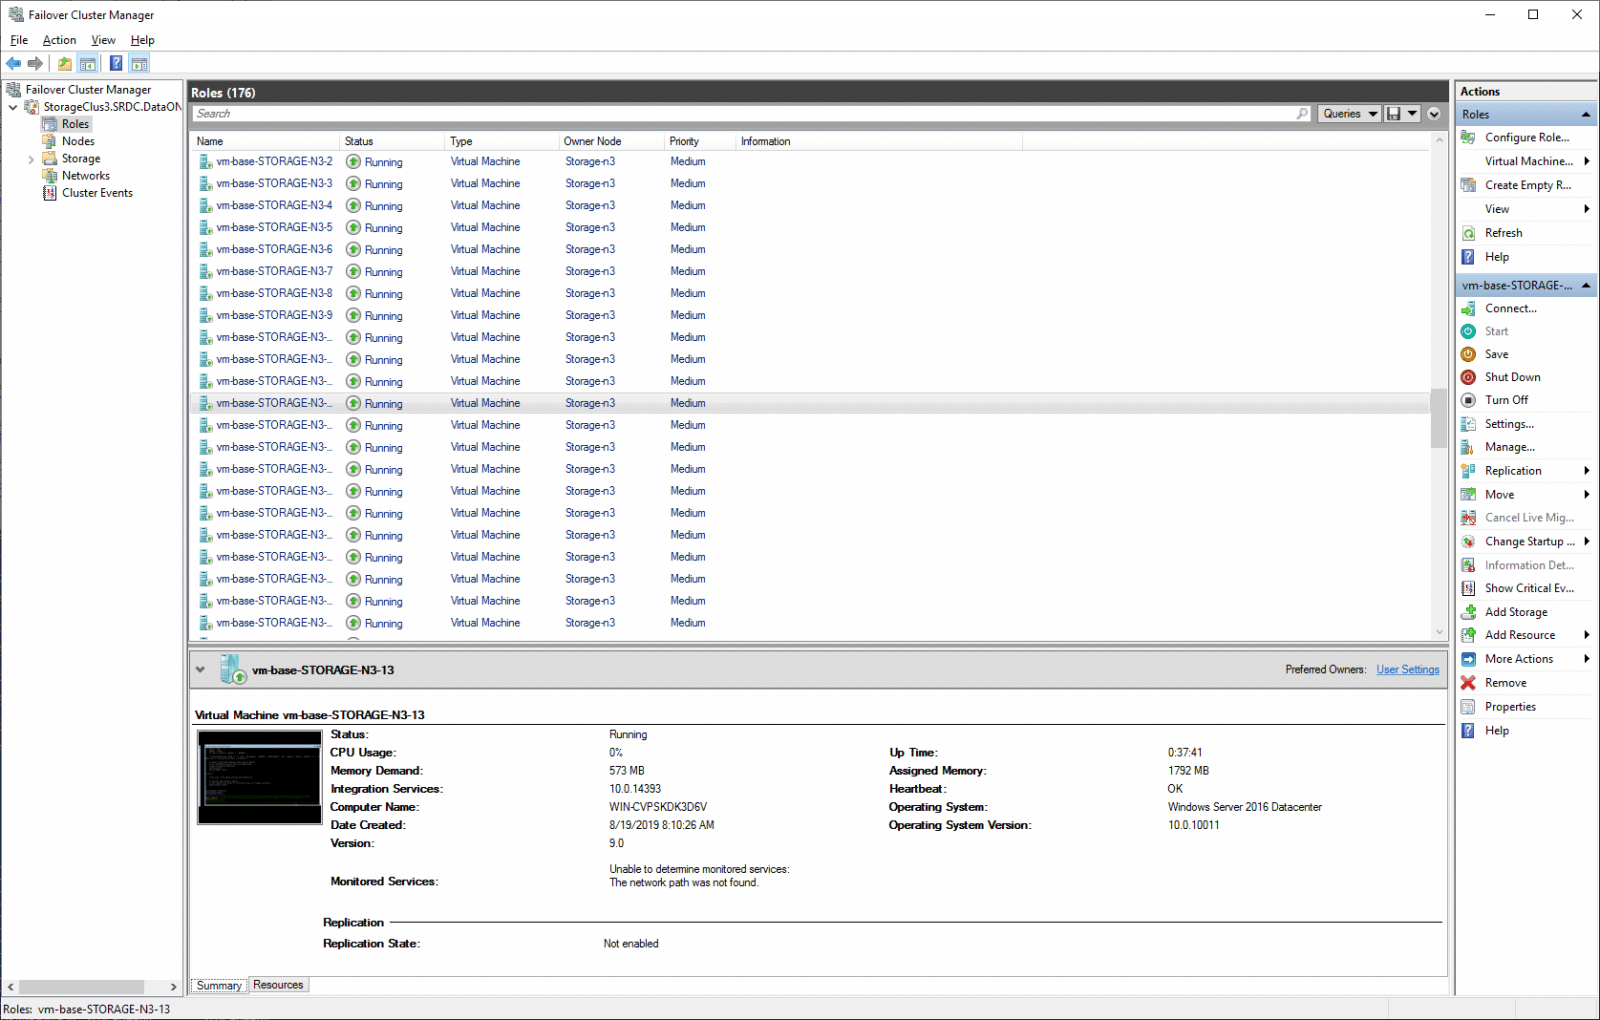
Next up is failover roles. Here we can see all of the Hyper-V VMs running on the cluster. Shown are the many vmfleet VMs we used for stress testing the cluster.
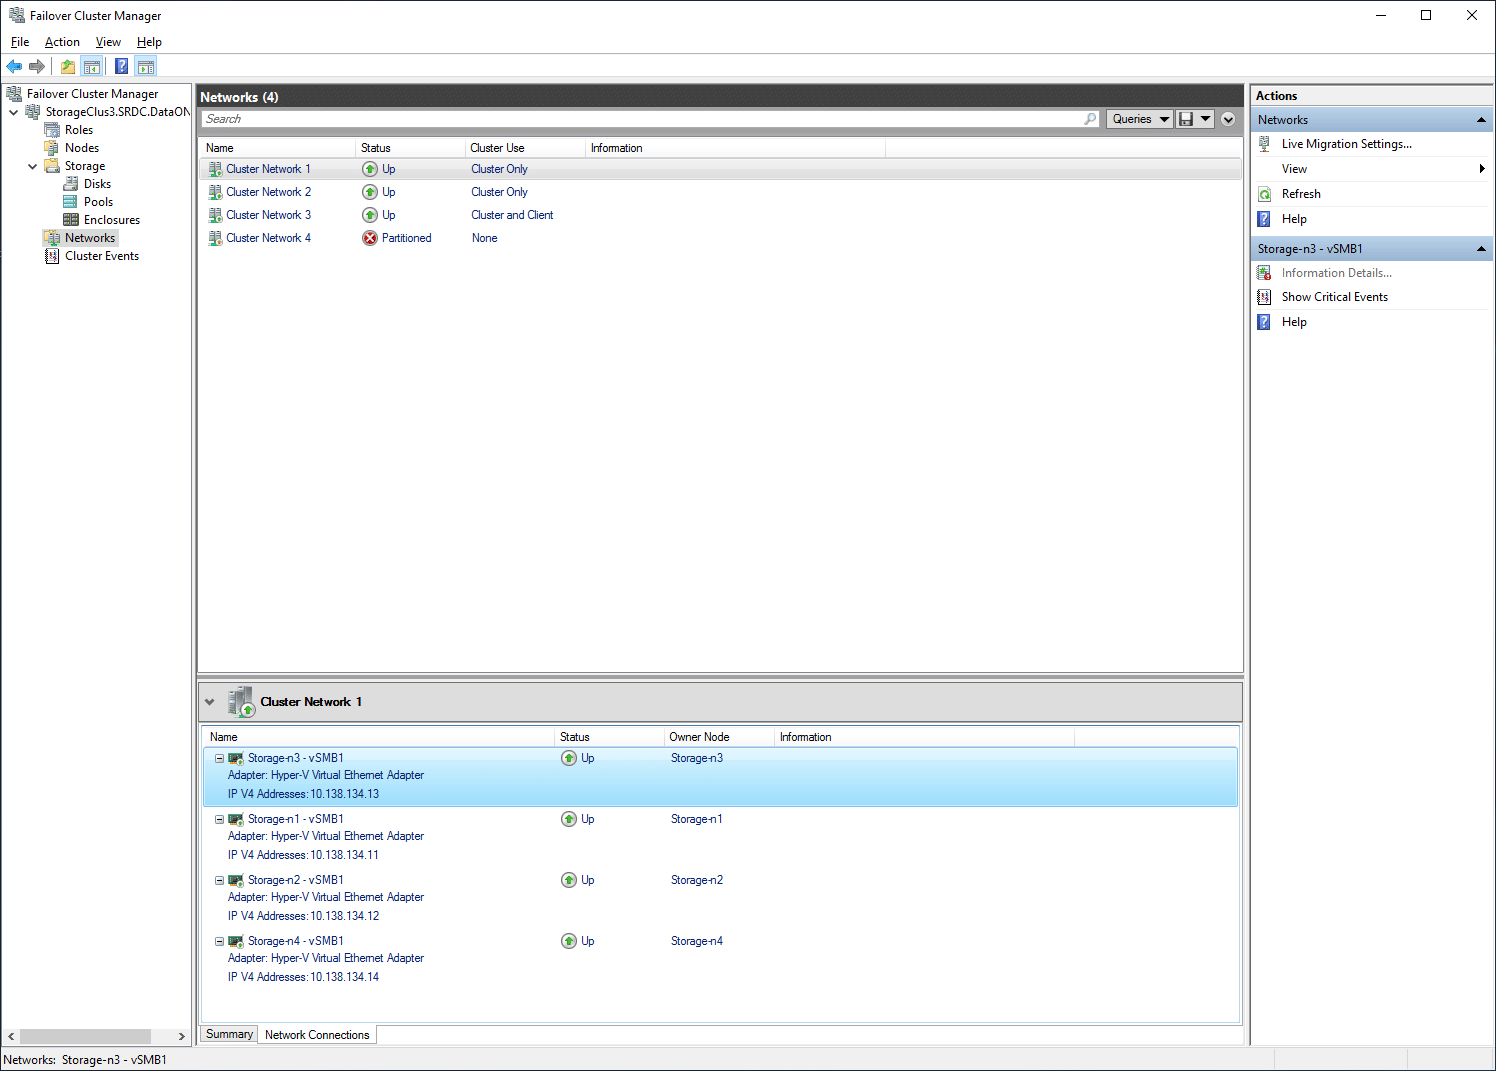
Networks allows us to see which cluster networks are available and the status of each. Selecting a cluster network lets you see the underlying network card associated with it, as well as its IP address.
Under the storage option is Disks, Pools, and Enclosures. For Disks, one can click on virtual disks and get information such as status, where it is assigned, the owner node, the disk number, partition style, and capacity. Users can drill down a bit deeper as well with even more information presented like Pool ID, name, and description–as well as Virtual Disk ID, name, and description, health and operational status, and resiliency.

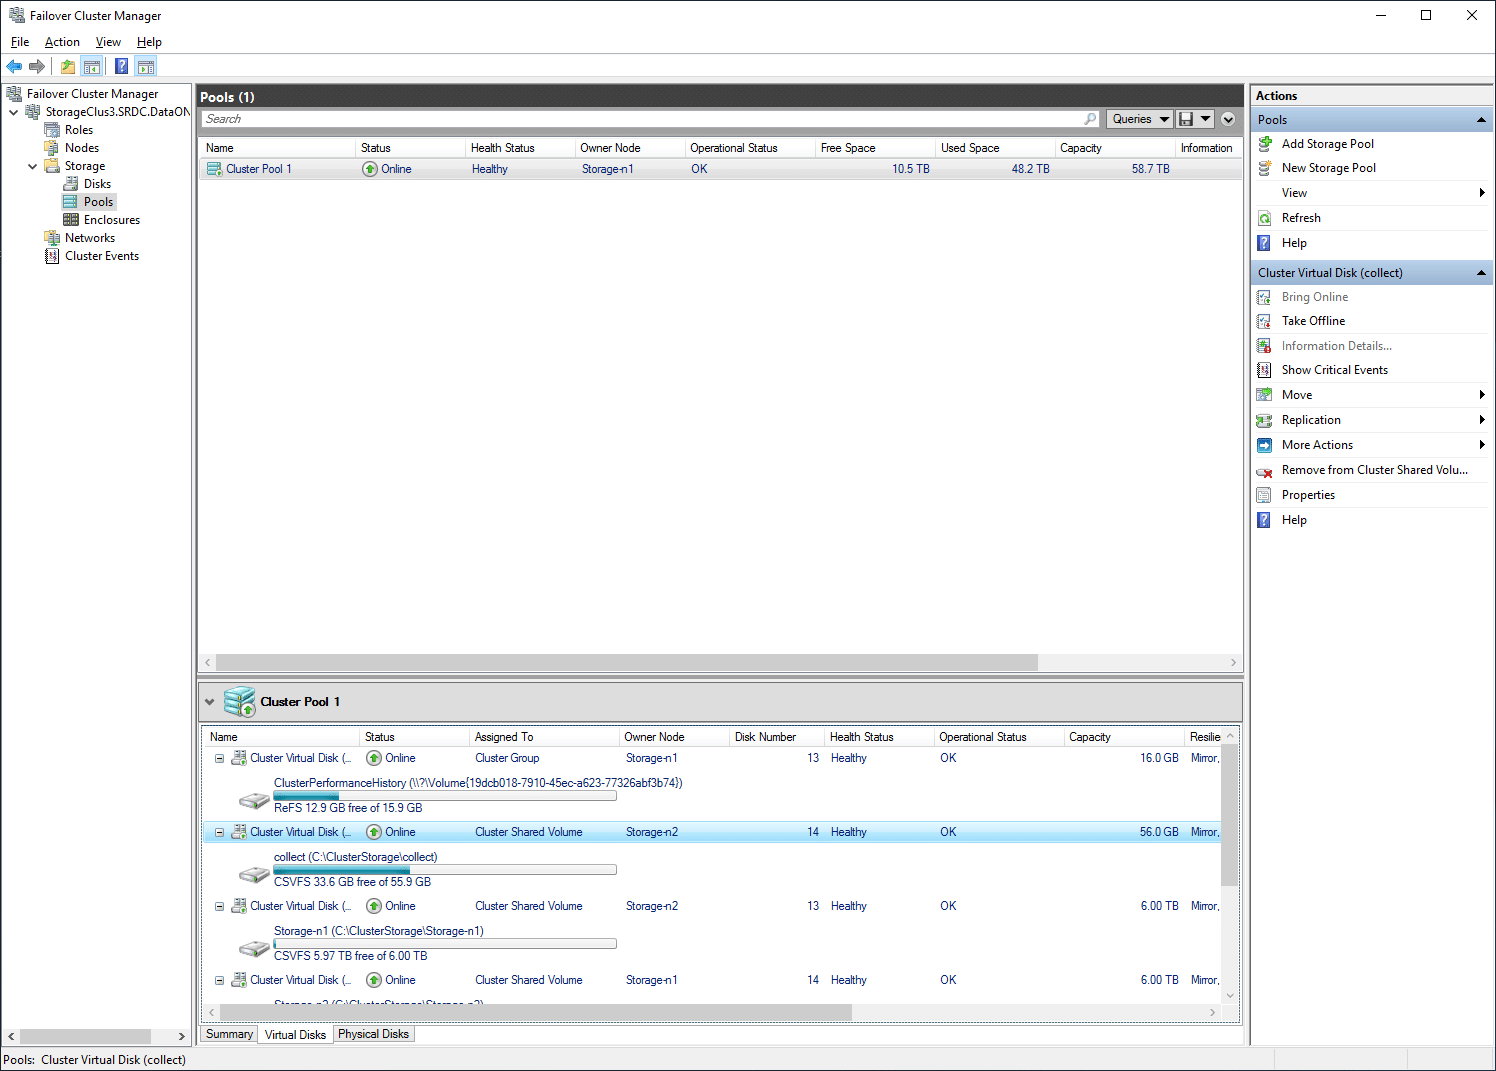
Pools are similar, with the information of certain storage pools such as status, health, owner node, operational states, and overall capacity, as well as free and used space.
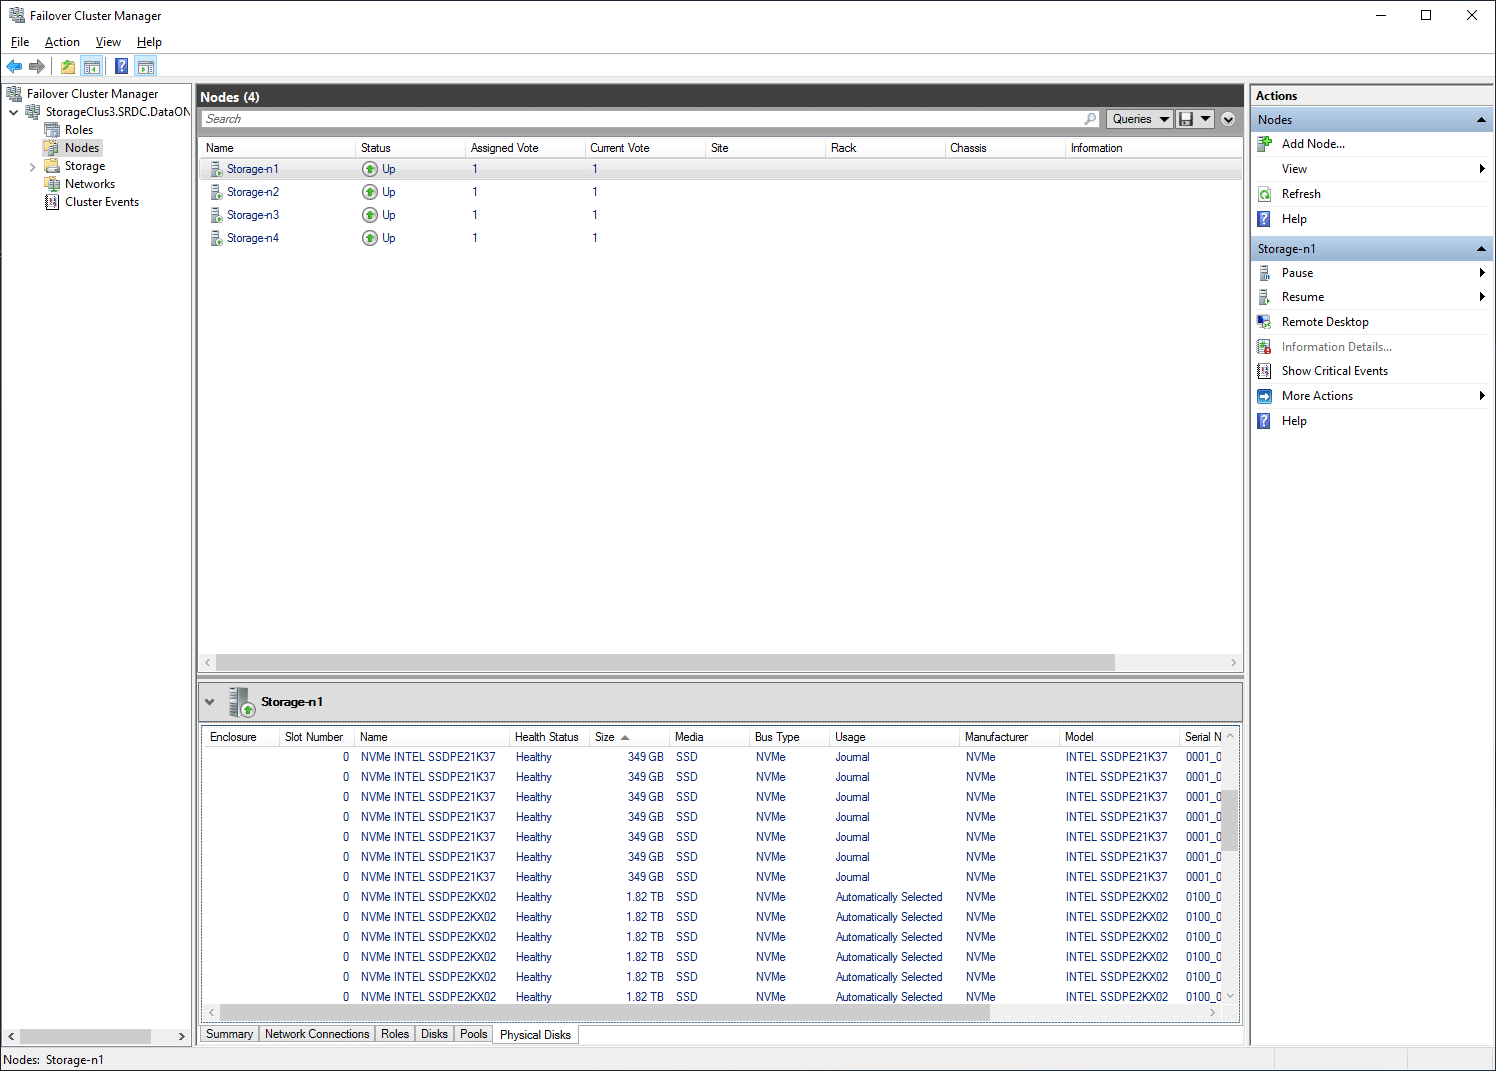
Under Nodes, one can easily see all the nodes in the cluster and their status.
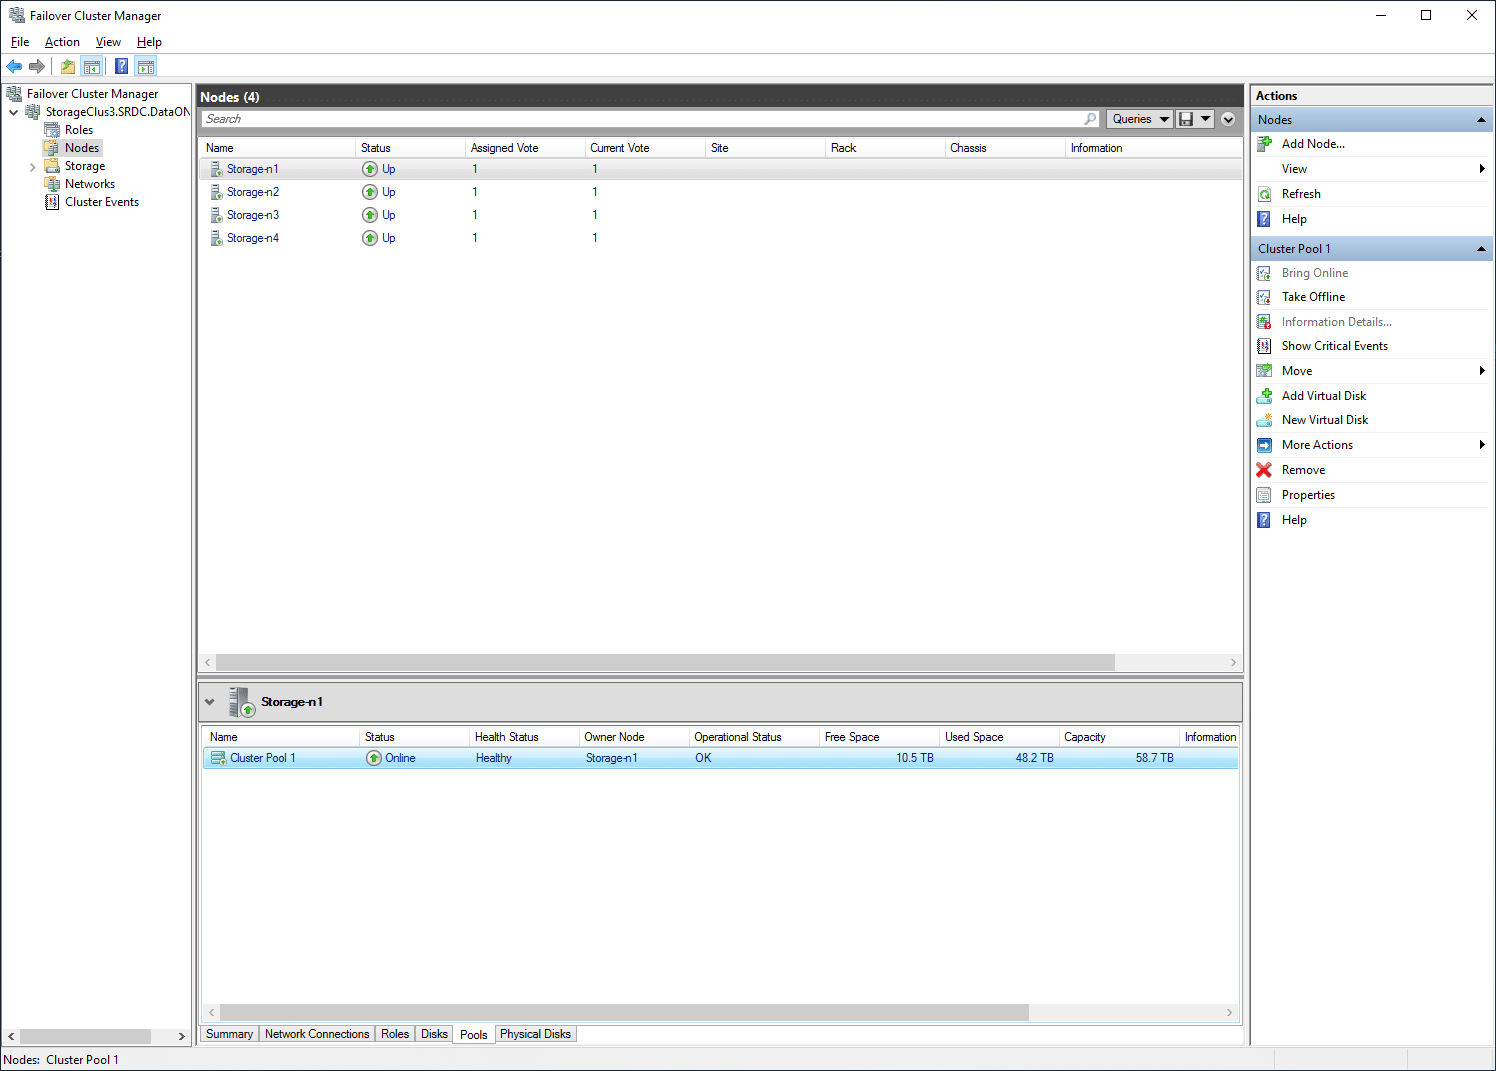
On the right, one can switch to failover disks and see the individual disk for a given node at the bottom.
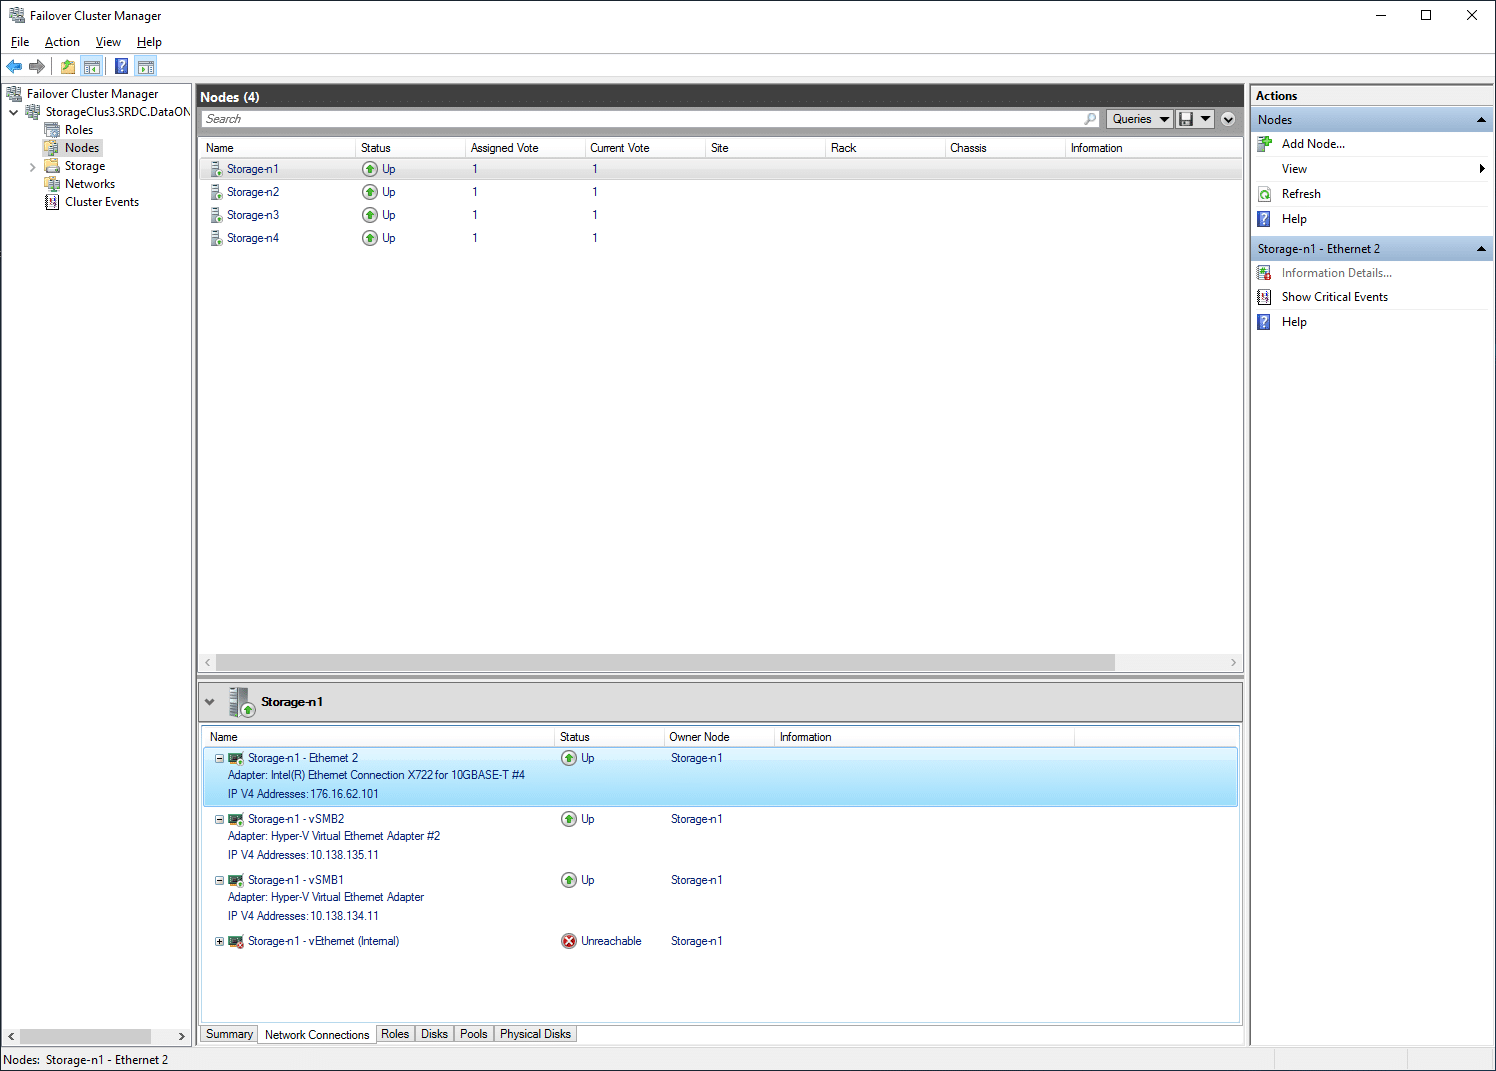
From the same sidebar, one can also look at the network for a given node.
While the Windows Failover Cluster Manager is a more “down to the details” management apparatus, it requires users to connect through Windows Remote Desktop to a server itself (or another server connected to that cluster) to work with it. While this management style is fine for many uses, Microsoft did make things easier with a new platform called Windows Admin Center. Unlike the Failover Cluster Manager, Windows Admin Center is completely Web Browser based, making it easier to connect to from any computer or tablet in the workplace. It also offers a modernized and aesthetically pleasing look and feel, making the day-to-day monitoring a more enjoyable task. It offers a look into much of the same information, with a stronger focus on activity monitoring that Failover Cluster Manager doesn’t offer to the same extent.
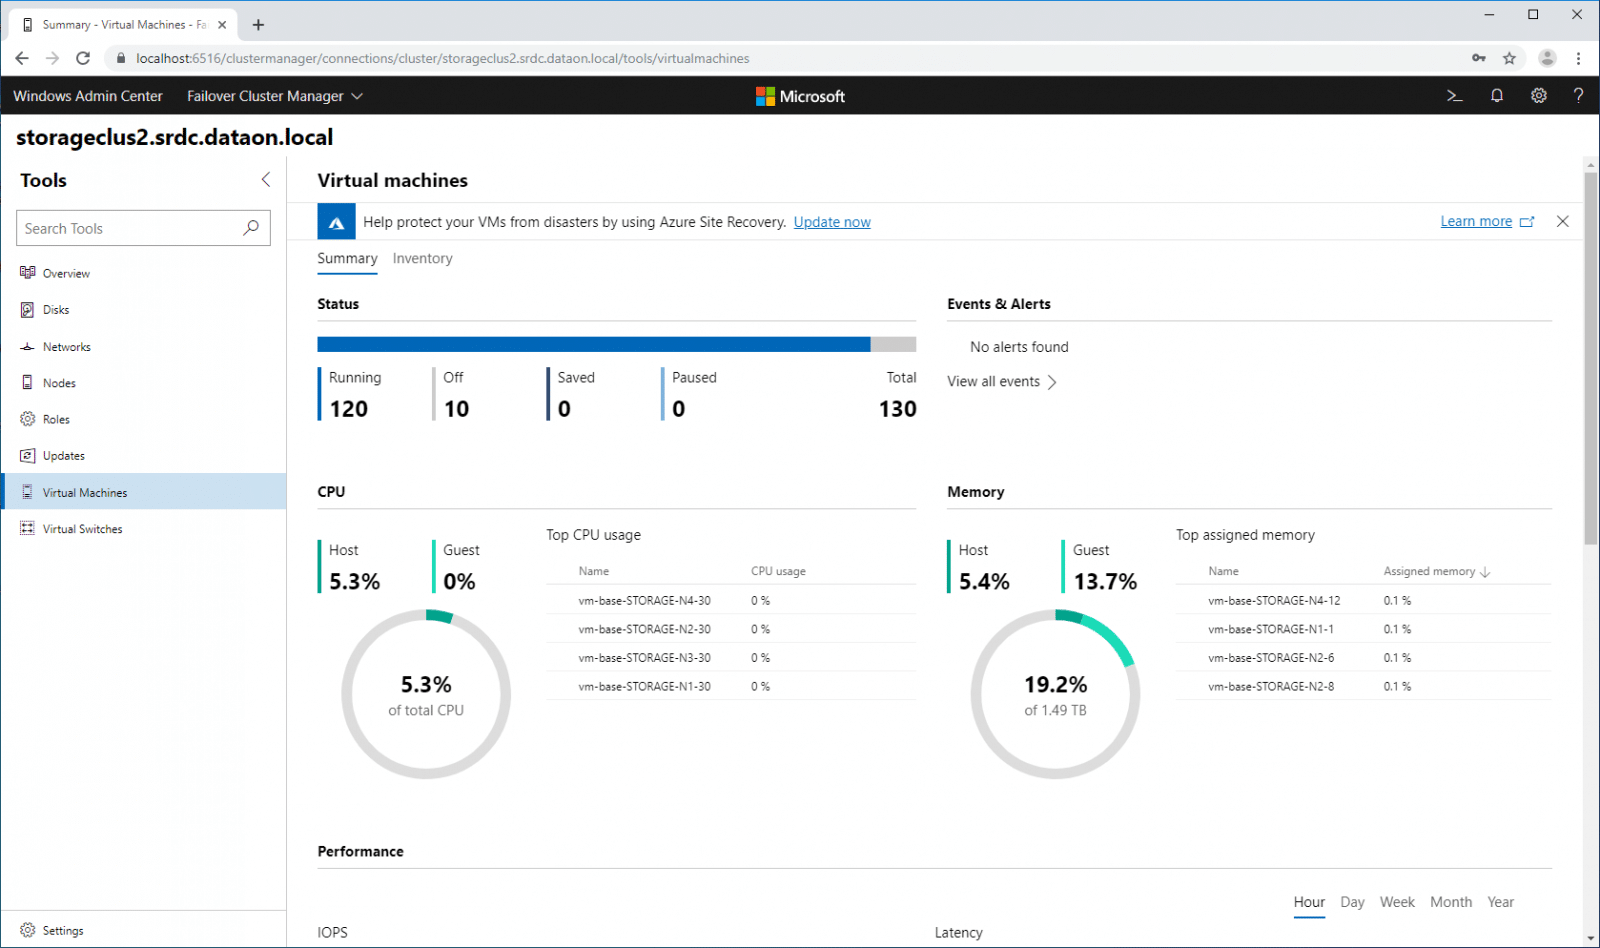
Once Windows Admin Center is associated with a cluster, you can drill down into specific areas to view and manage operations. Here we see overall cluster compute performance information, which keeps track of the overall resources the VMs are utilizing.
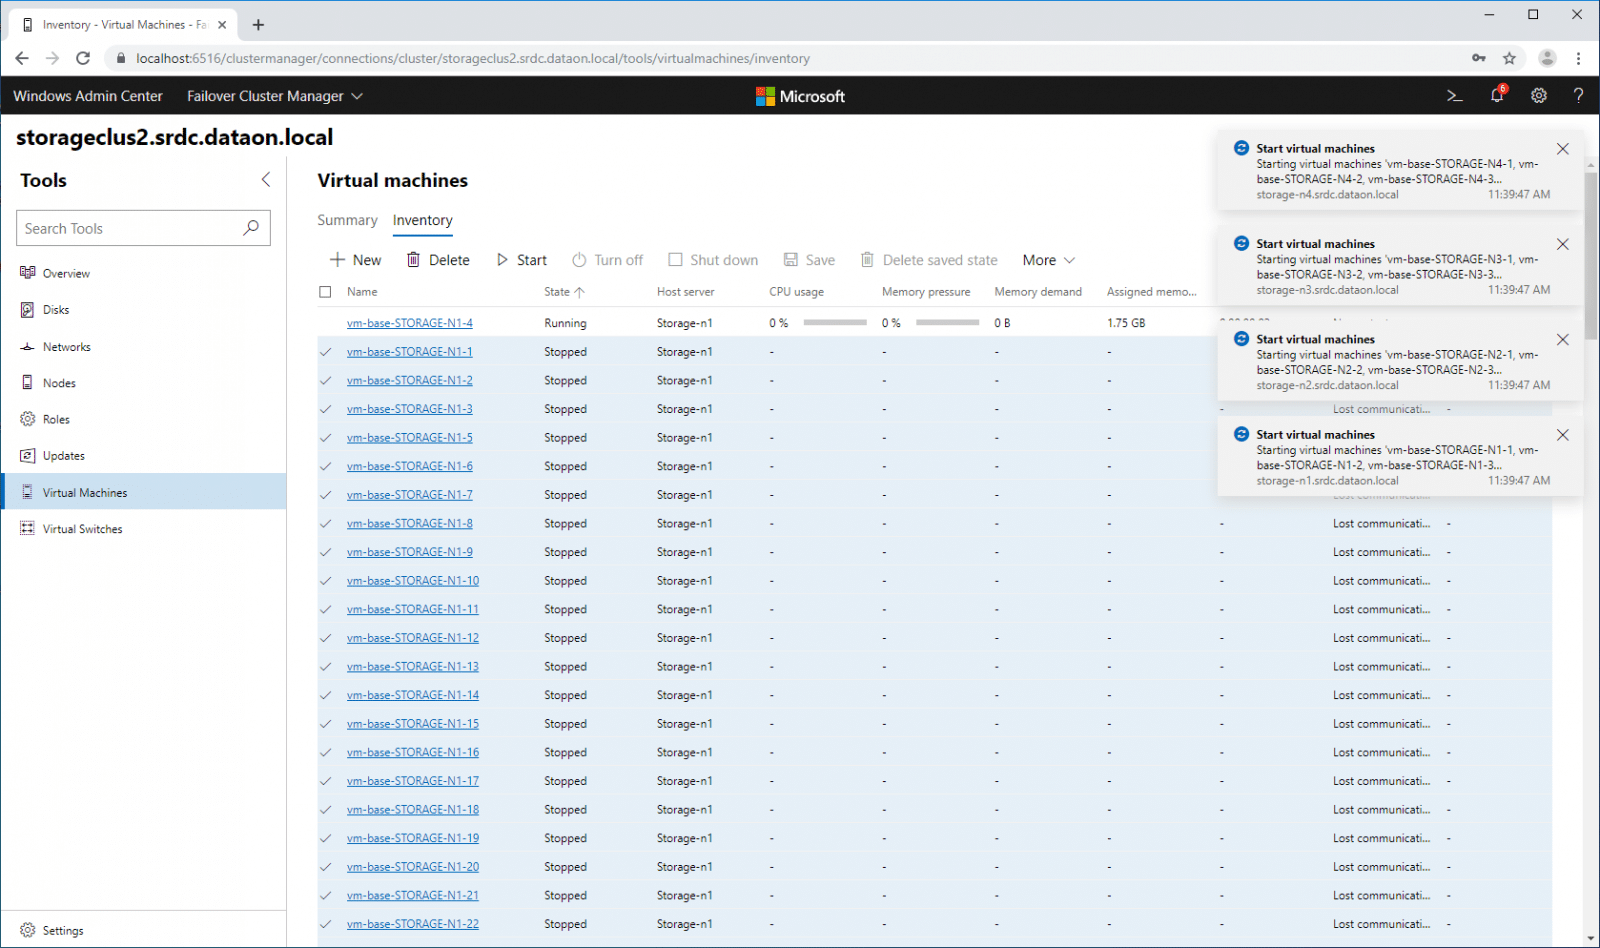
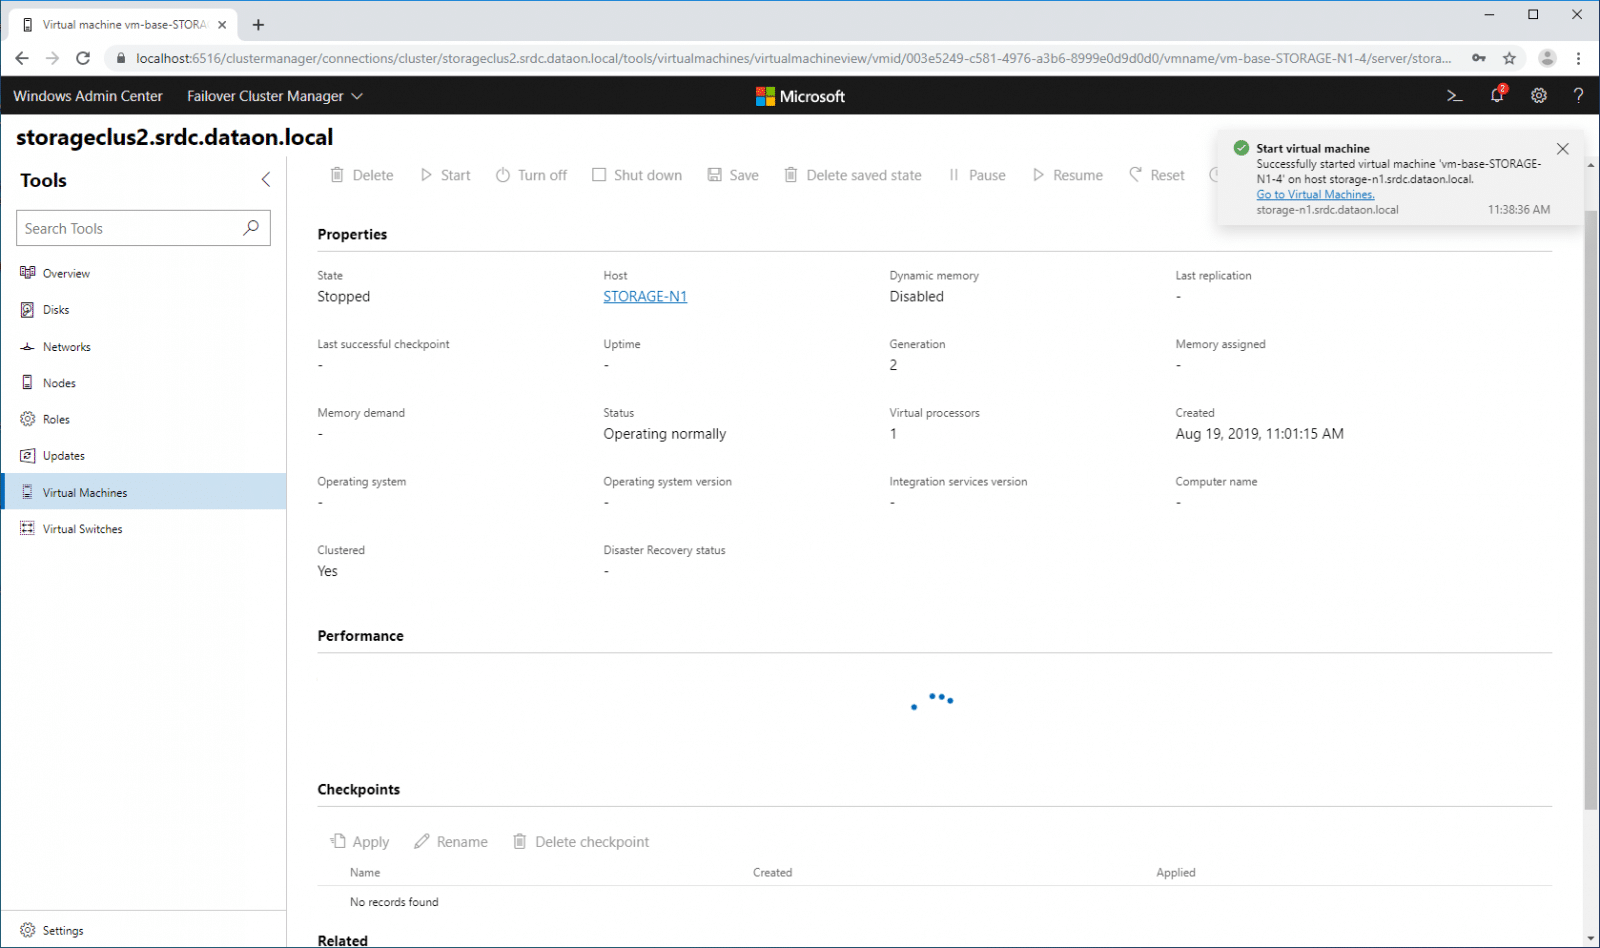
While the Windows Admin Center is great for viewing activity, you are still able to interact with VMs in your cluster. Below we are powering on a number of vmfleet VMs.
Users can also drill into information on specific VMs.
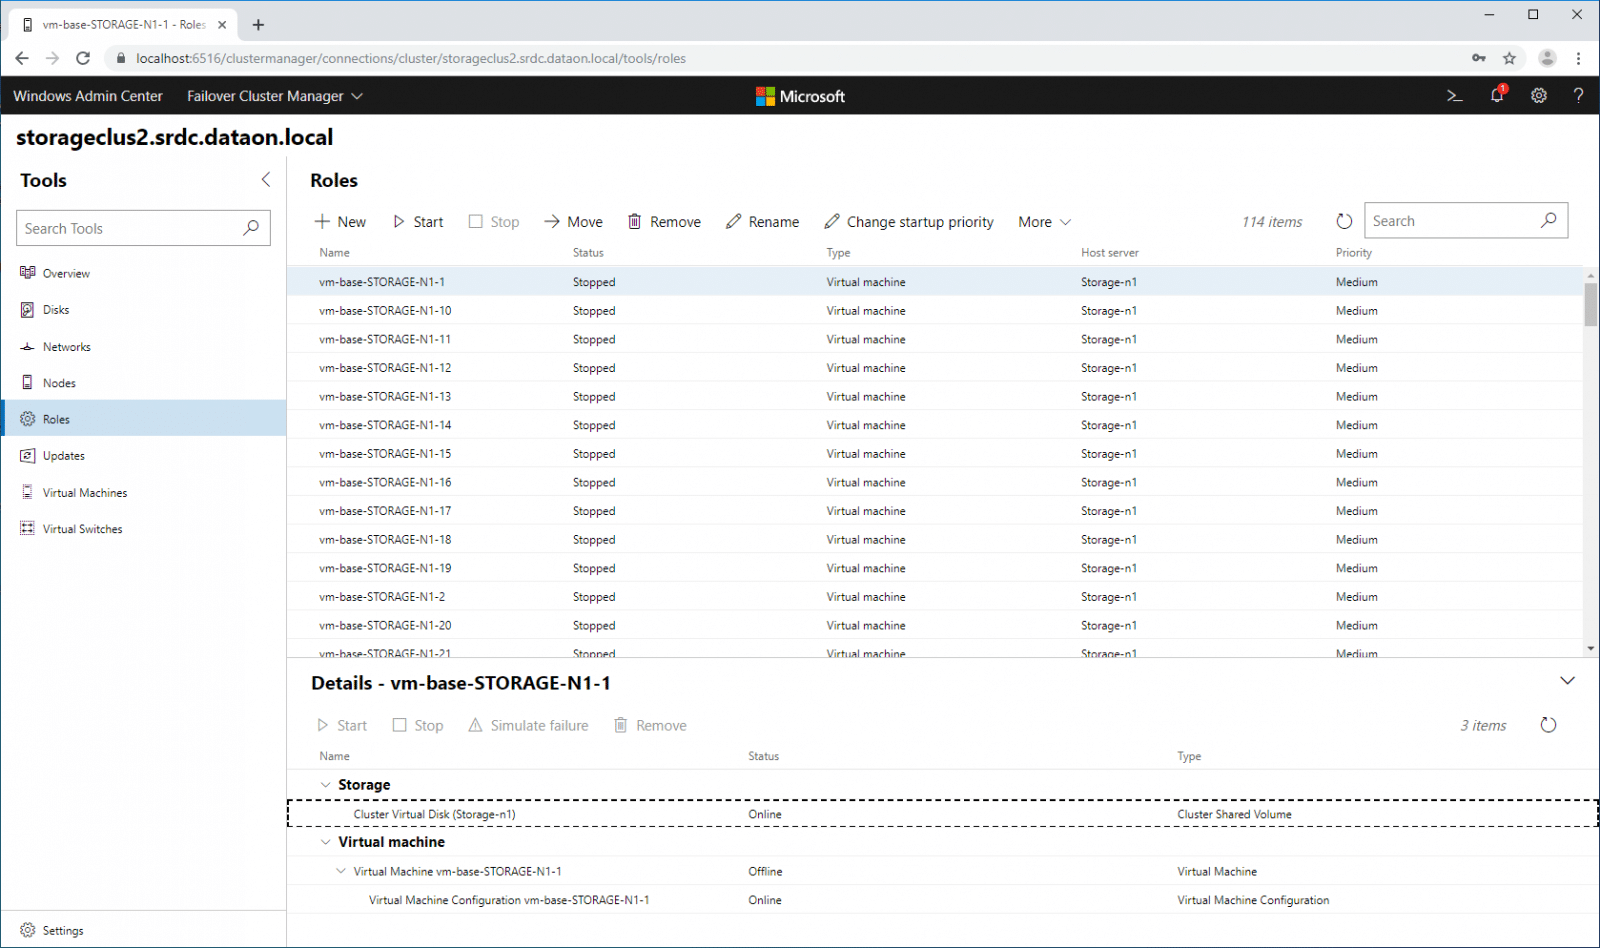
Under roles, we get a slightly different take on roles but most of the same key information.
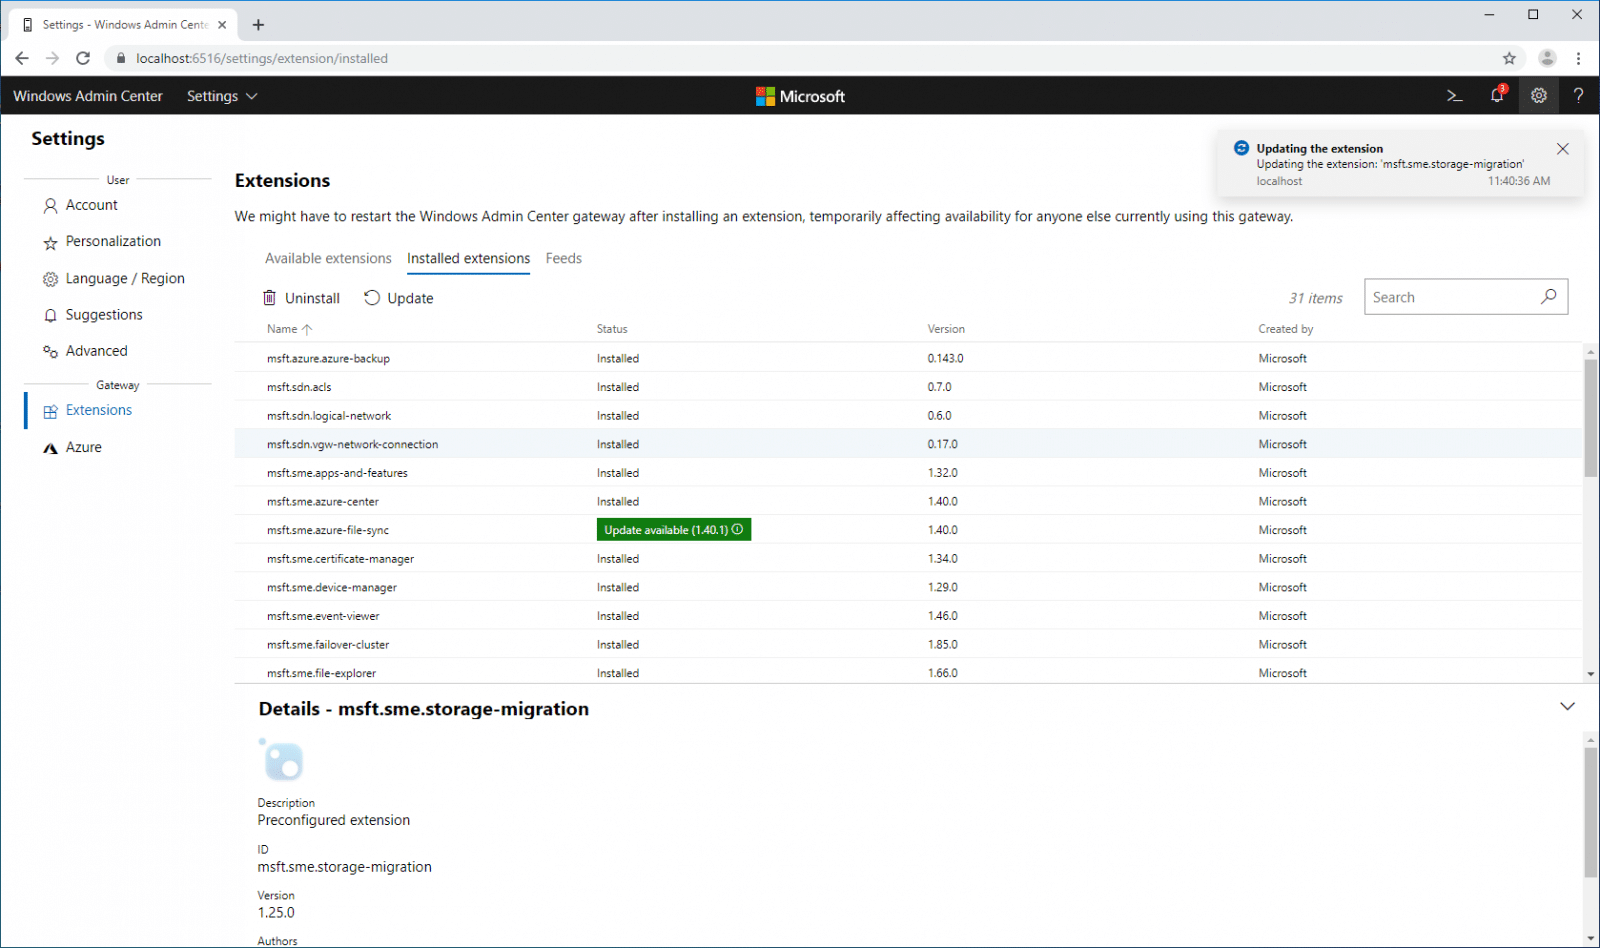
Under settings, users can download, install, and update extensions for Azure.
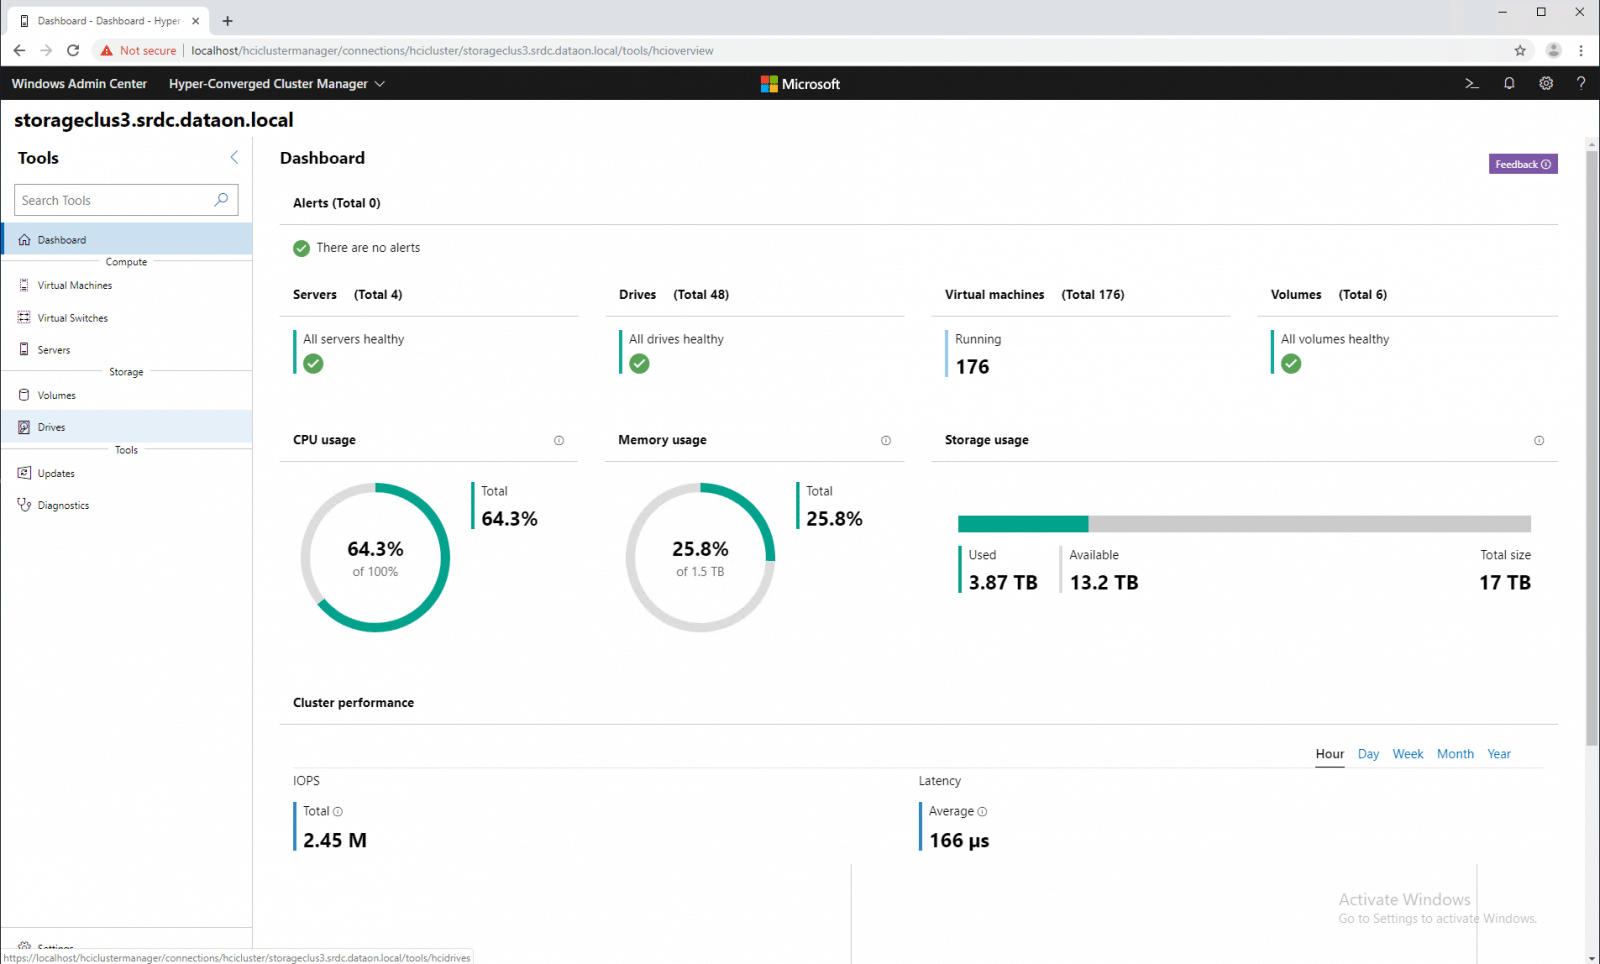
Through Windows Admin Center, we can also go into the Hyper-Converged Cluster Manager to look more closely at compute and storage. We open up to the Dashboard that has general information like the number of servers, drives, VMs, volumes, as well as the usage of CPU, memory and storage. Along the bottom of the dashboard is the cluster performance that is broken down into a specific time frame and IOPS and latency.
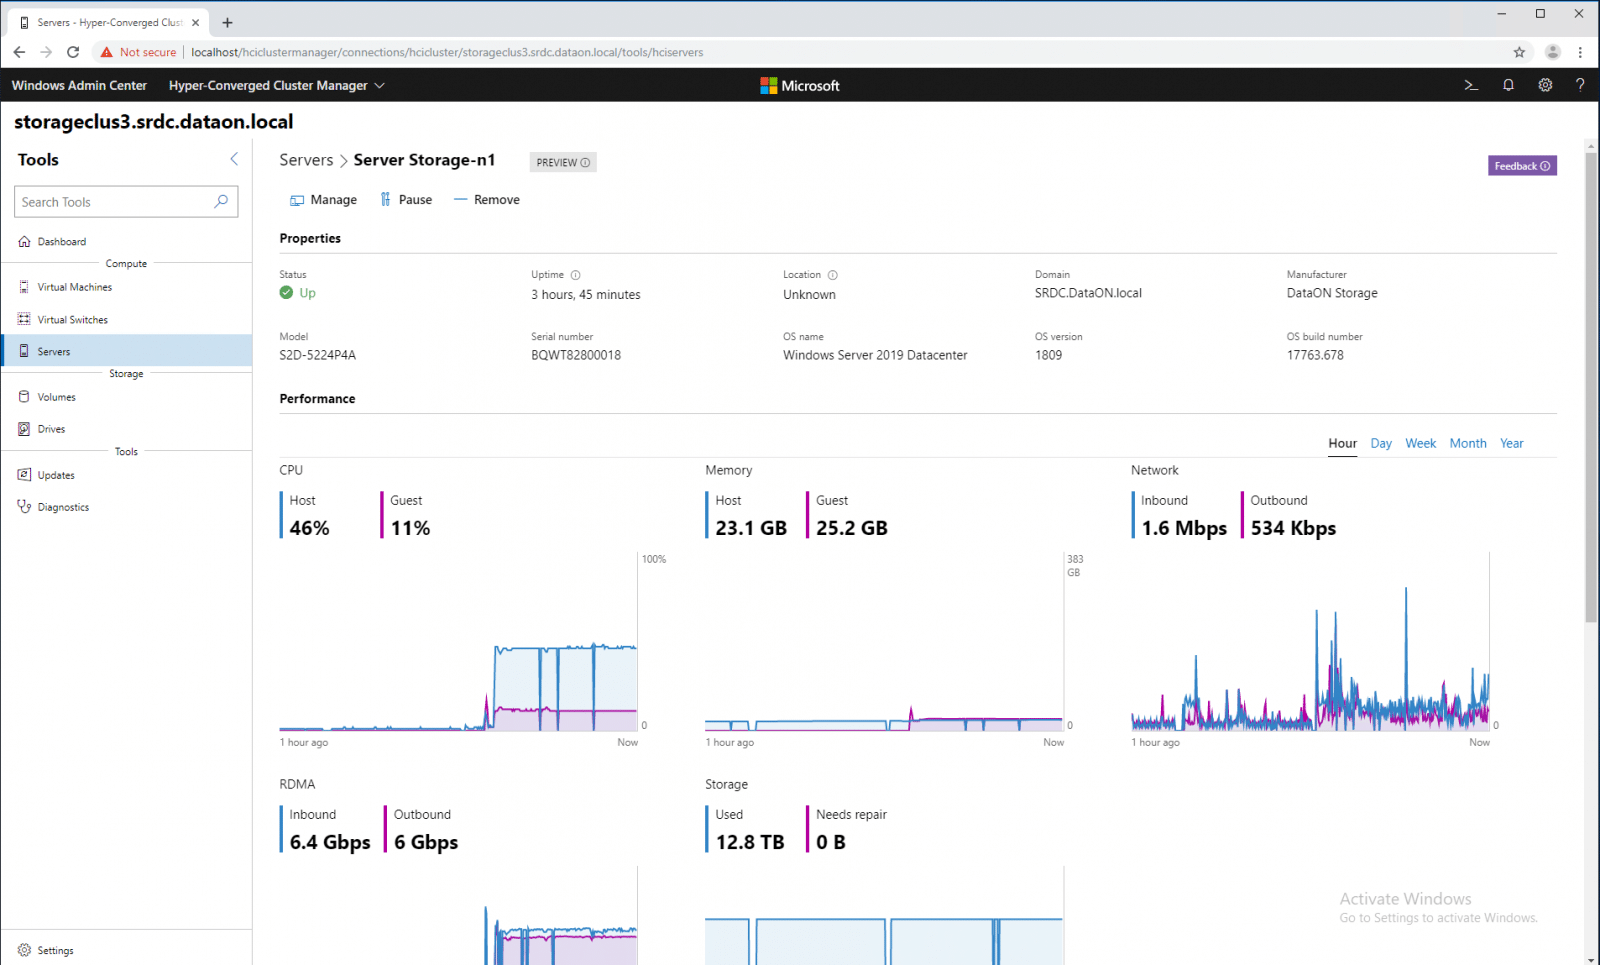
Under compute, admins can drill into the servers themselves for management including removal of the server from the cluster. Here, there is general information about the server used such as uptime, location, domain, manufacturer, model, serial number, OS name, version and build number. Also, users can look at performance specific to the server.
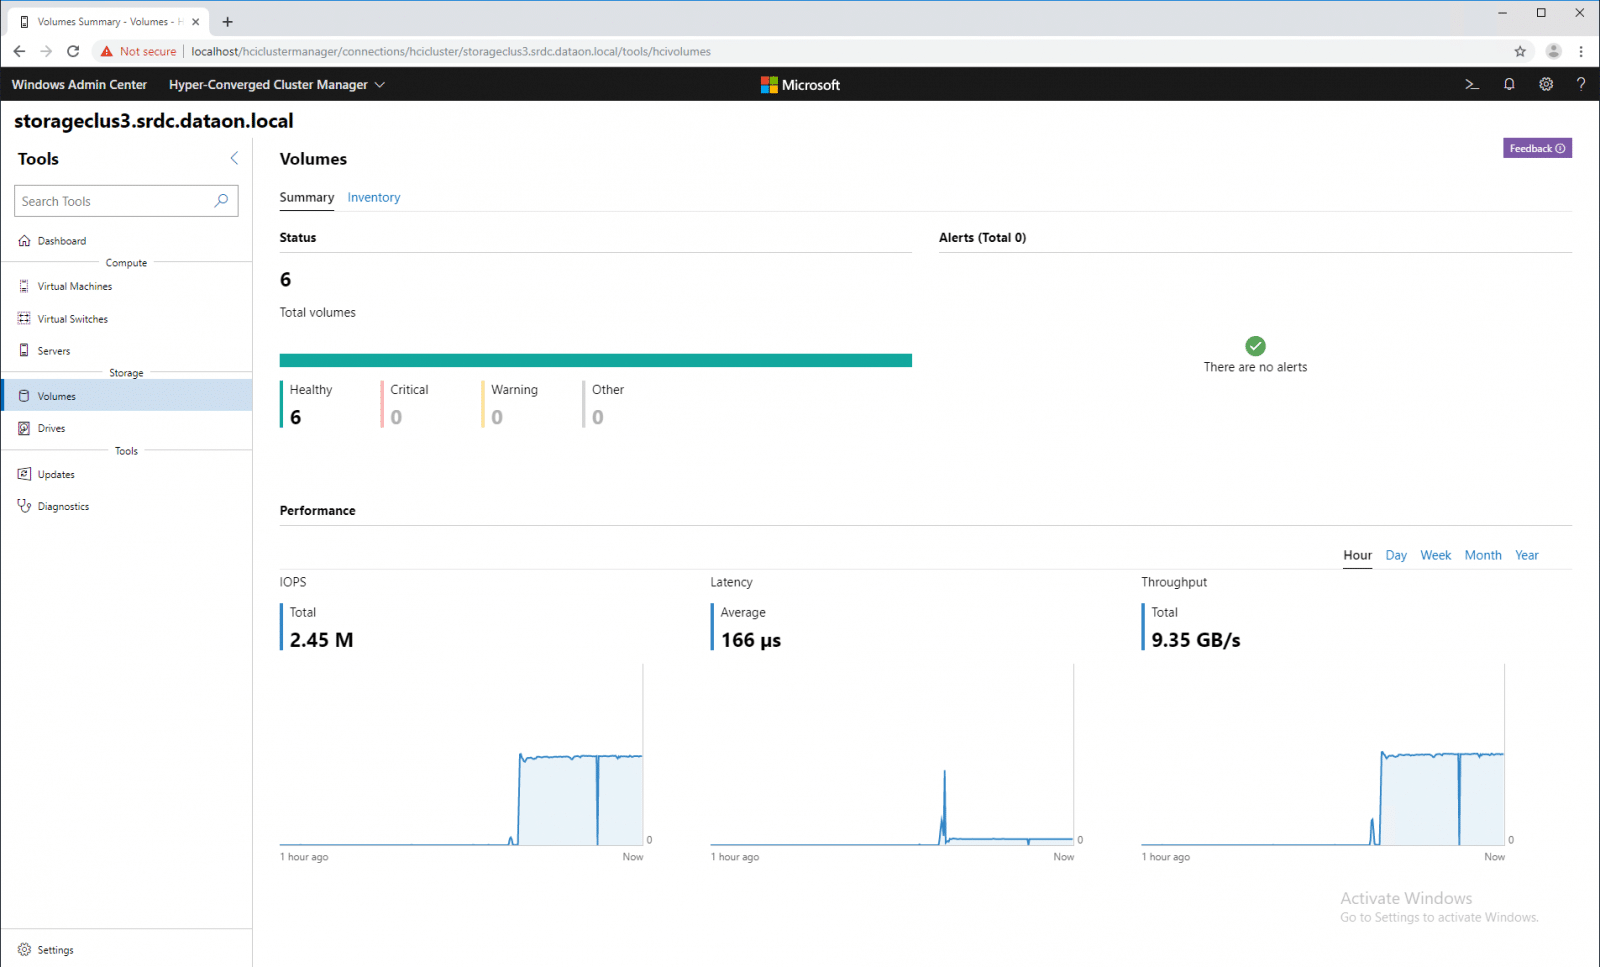
Clicking on the Volumes tab brings users to a summary of all the volumes on the cluster. The health of the volumes are color coded: green for healthy, red for critical, and yellow for warning. Performance is also tracked for all the volumes, broken down by time frame and into IOPS, latency, and throughput.
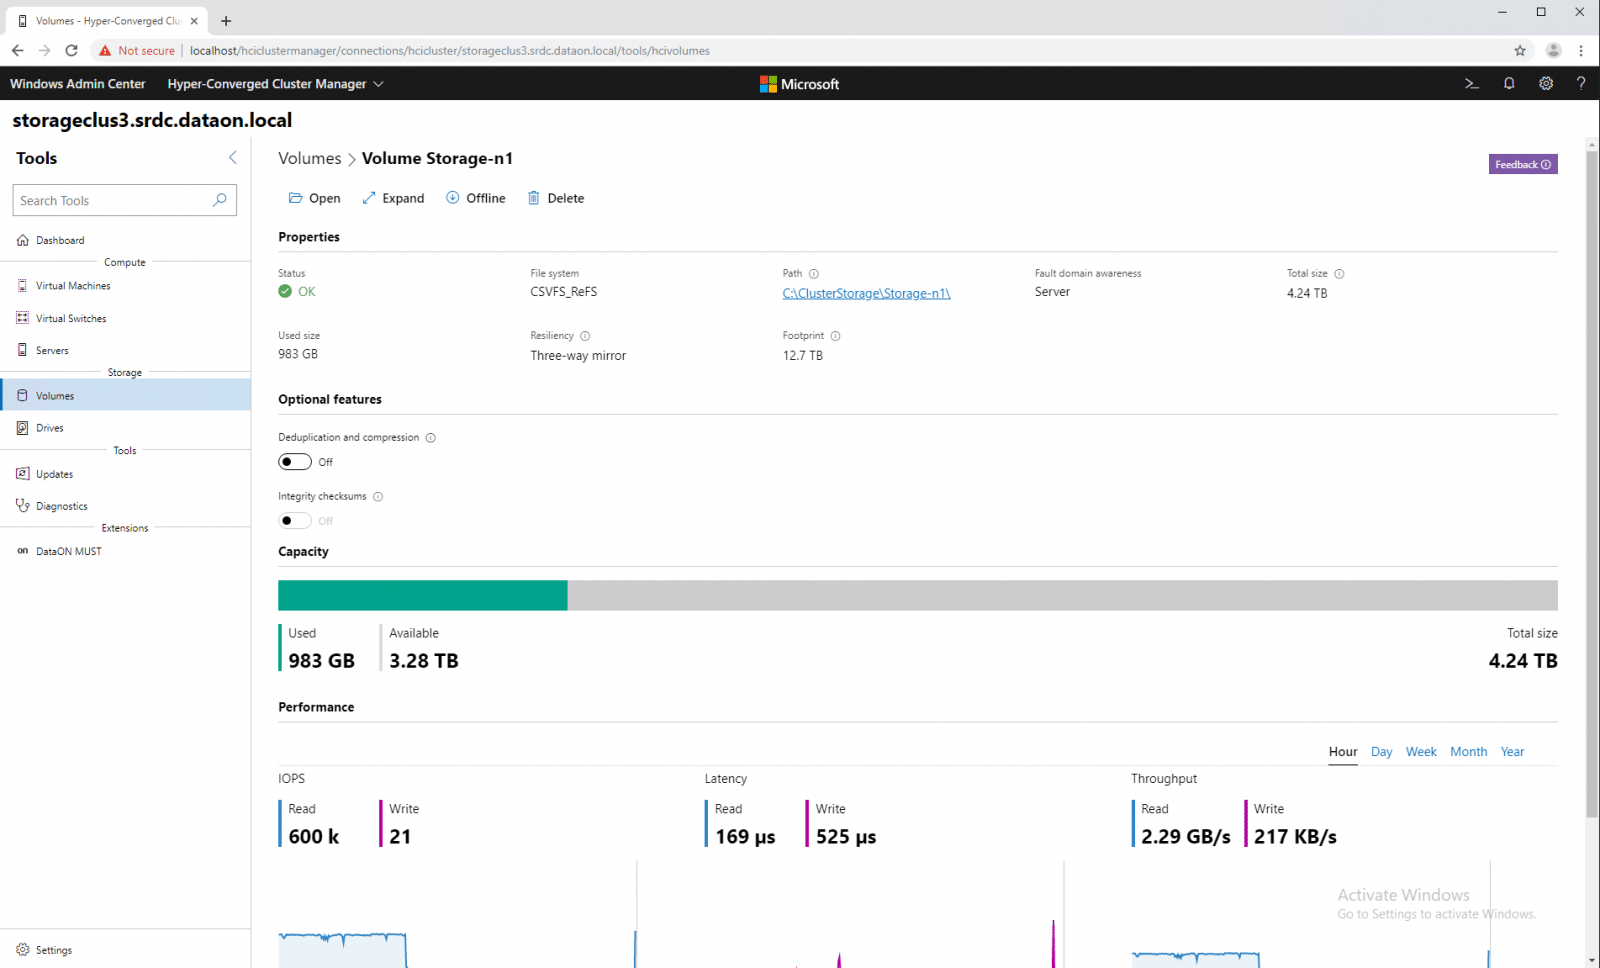
Drilling down into a single volume gives specific properties of the volume including status, file system, path, fault domain awareness, total size, used size, resiliency, and footprint. There are optional features (deduplication and compression as well as integrity checksums) that can be turned off or on here. The capacity is shown graphically, showing used versus available. And again, we see performance.
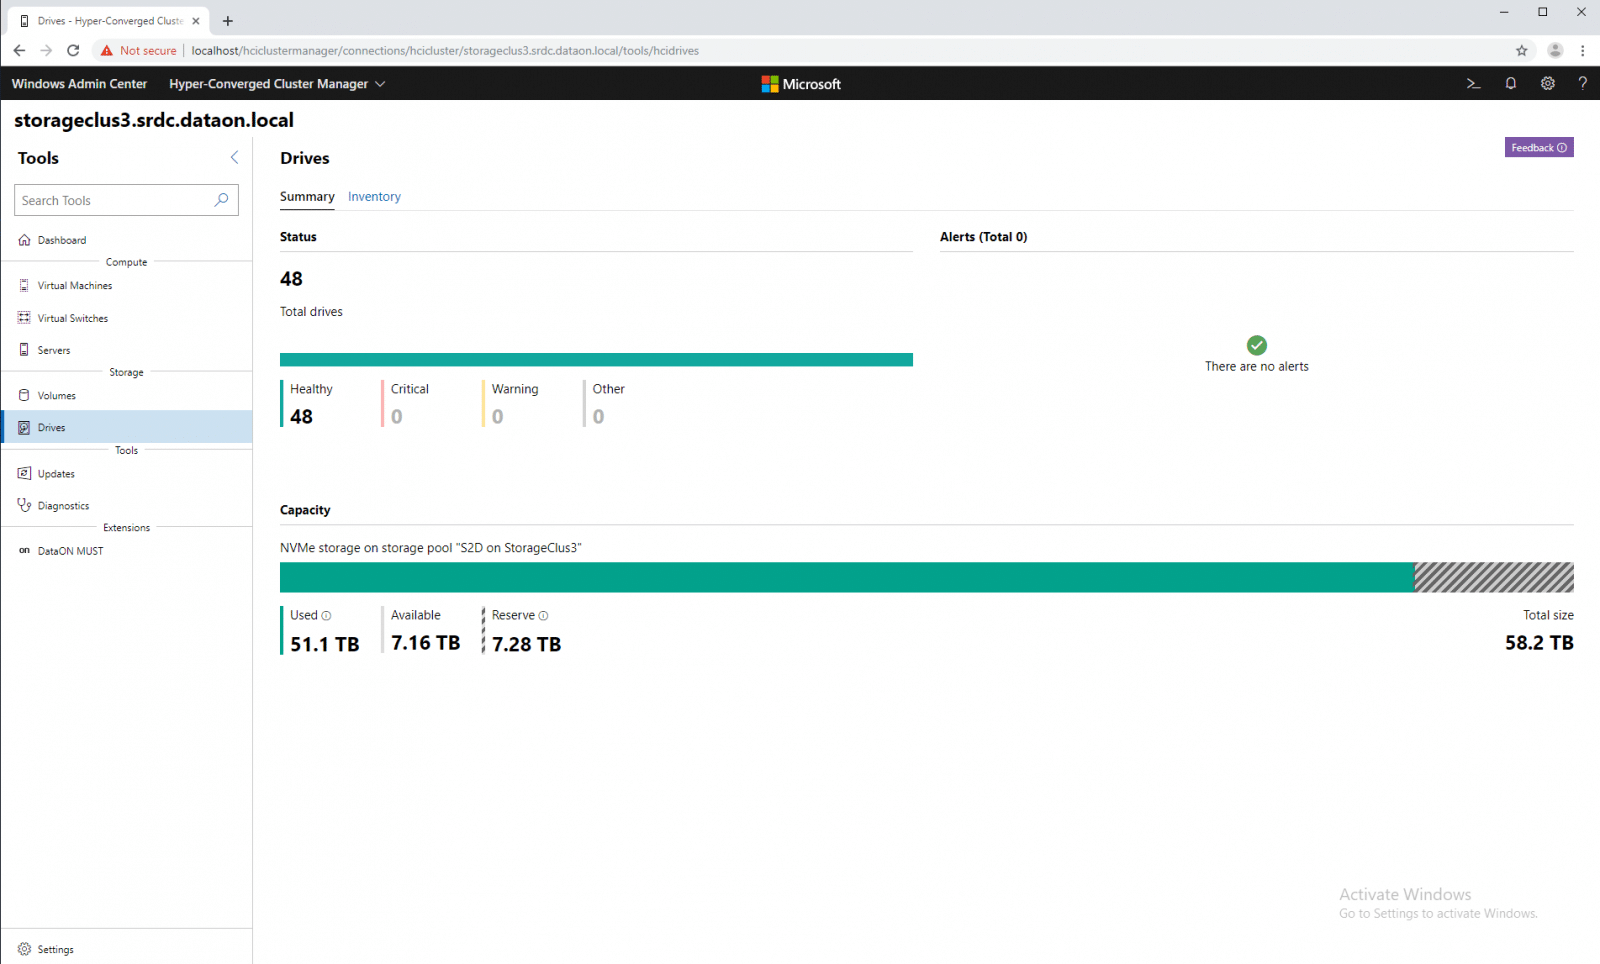
Under the Drives tab we get a summary of all the drives in the system. Here we see the total number of drives and whether or not there are any alerts with the same color coding as volumes. We can also see the capacity: used, available, and reserve.
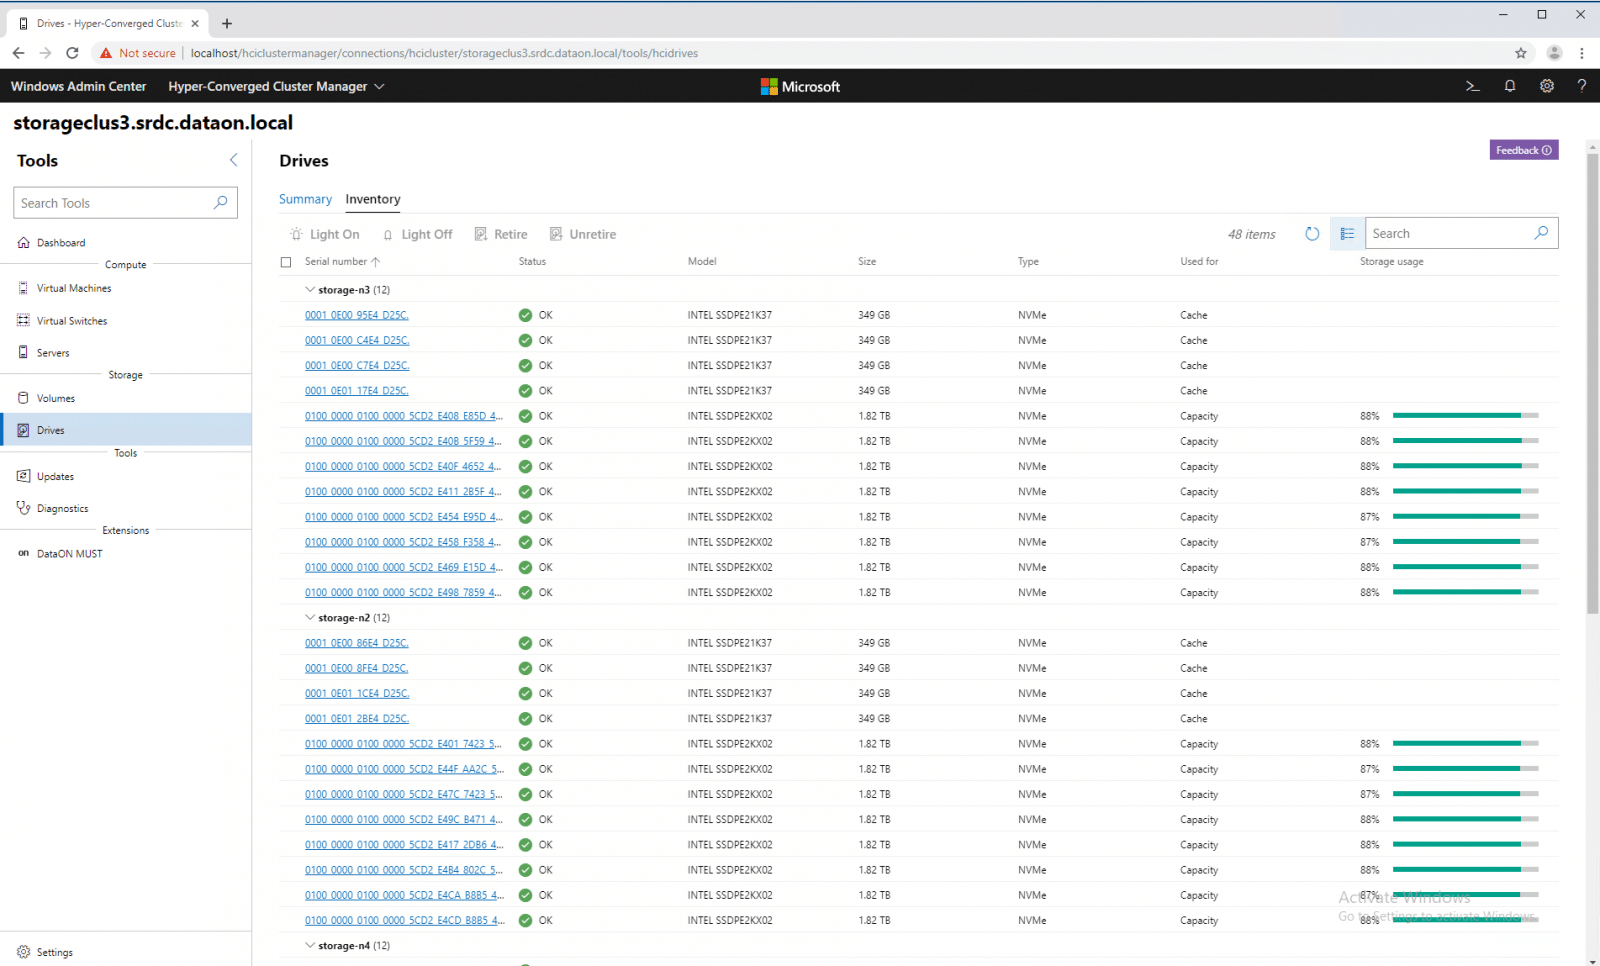
Clinking on Inventory, we get a list of all the drives and several details. The details include the status of the drive, its model, the capacity size, the type, what it is used for, and the amount of storage used.
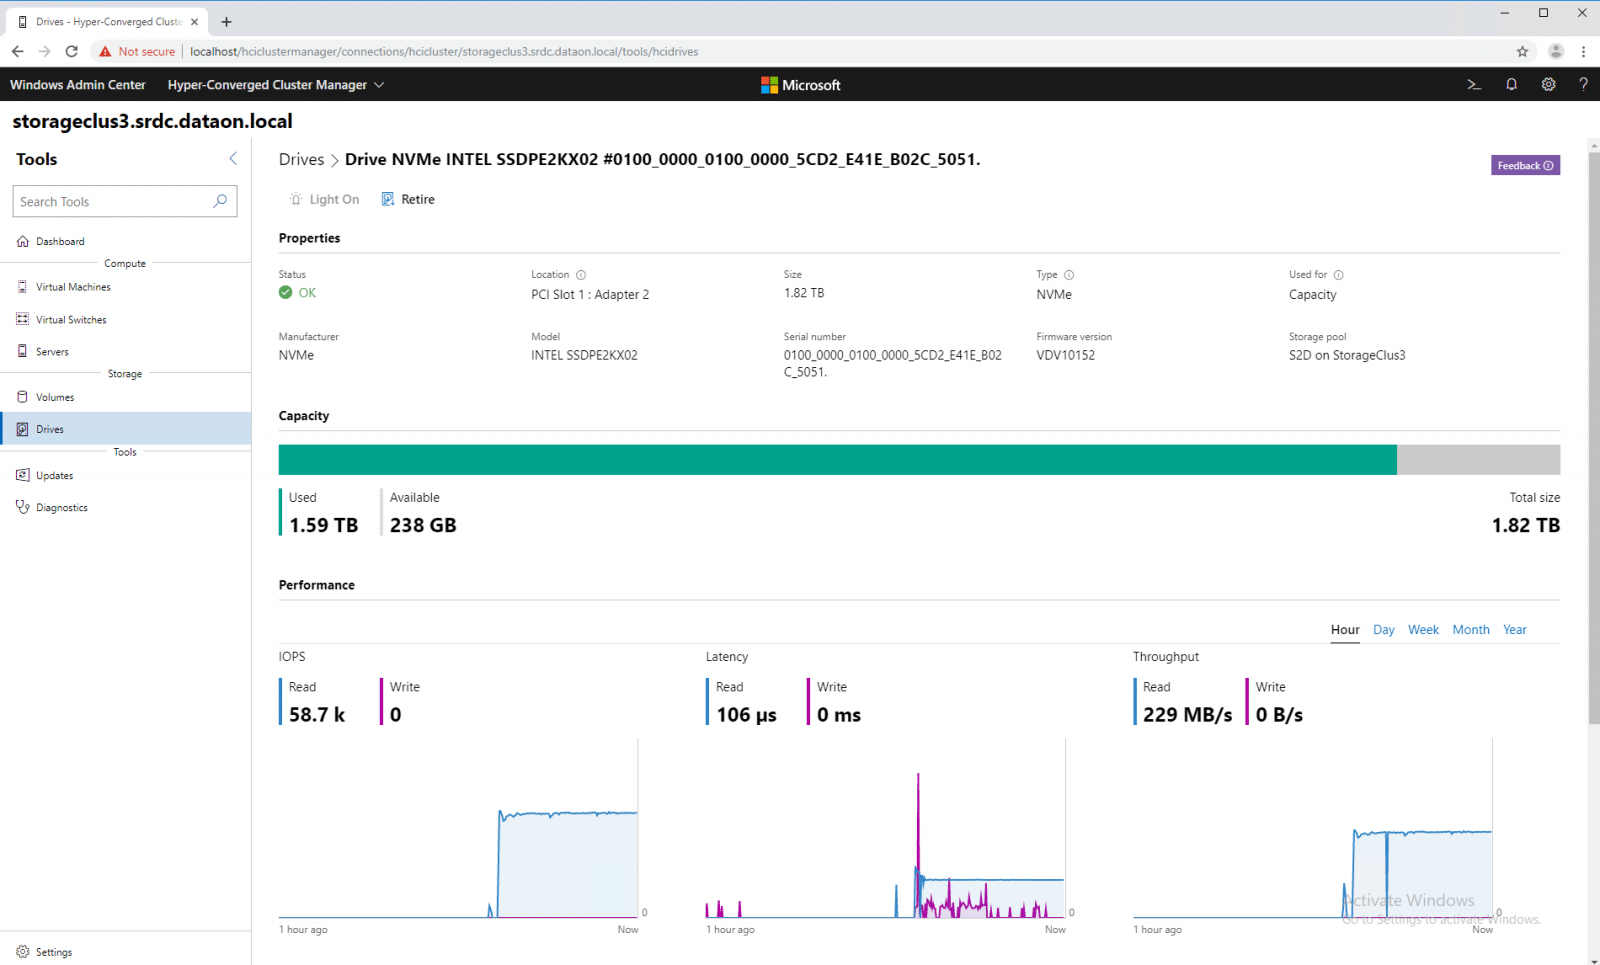
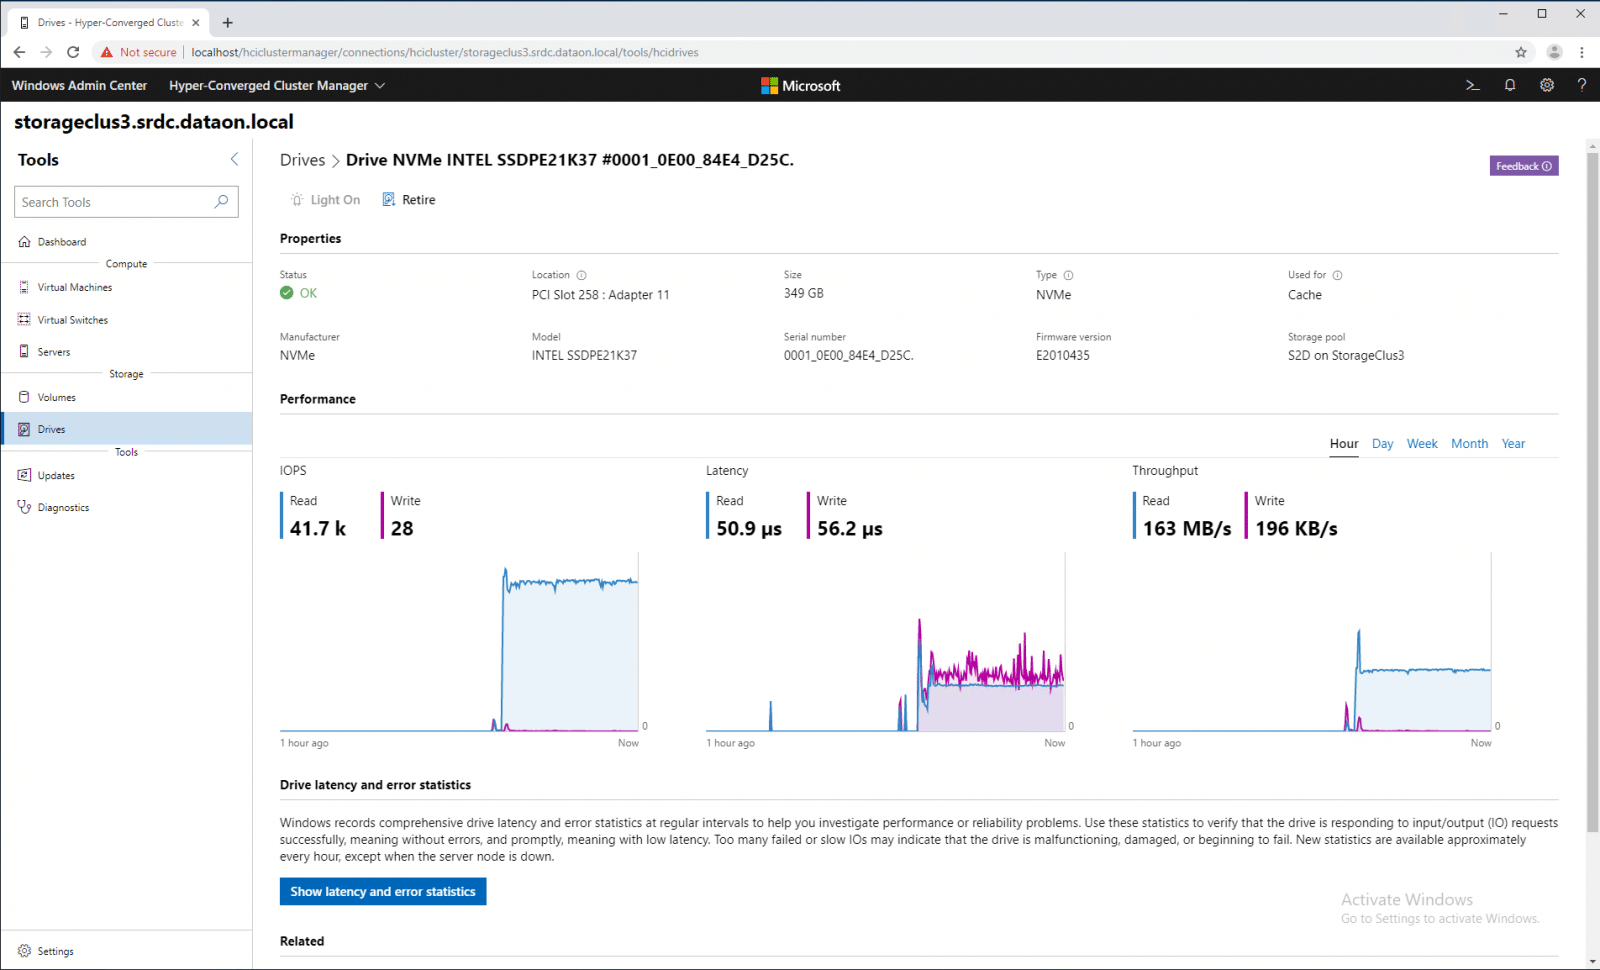
We can drill down into a single drive and see properties such as status, location, size, type, used for, manufacturer, model, serial number, firmware version, and the storage pool it is in. We can see the amount of capacity used versus available for the individual drive and its performance in IOPS, latency, and throughput.
Below the performance we can also see drive latency and error statistics.
Performance
Performance inside the Microsoft Azure Stack ecosystem has always been great, a strong-suit that has made its way through from the Storage Spaces days. With that in mind, we looked at some common benchmarking workloads in this review to allow users to see how well this platform compares to other HCI solutions in the market. With that in mind, we used workloads to stress random small-block sizes as well as large-block transfers to show what potential this Microsoft solution can offer. In our Azure Stack HCI review, we leveraged vmfleet for performance benchmarks, while on VMware or bare-metal Linux, we used vdbench.
For the performance here, we tested the system with both 2-way mirror and 3-way mirror. The mirror refers to the method of data protection (either two copies or three copies). Obviously with more copies, users will lose some capacity. From a performance perspective, 3-way should lead to better reads through the increase in parallelism and 2-way is better for write performance with a third less network traffic.
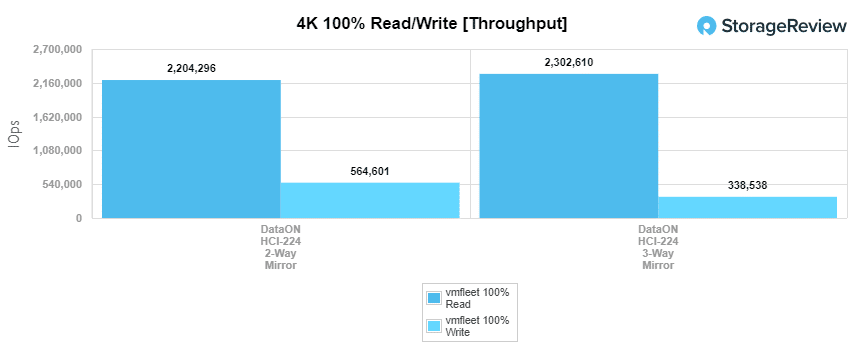
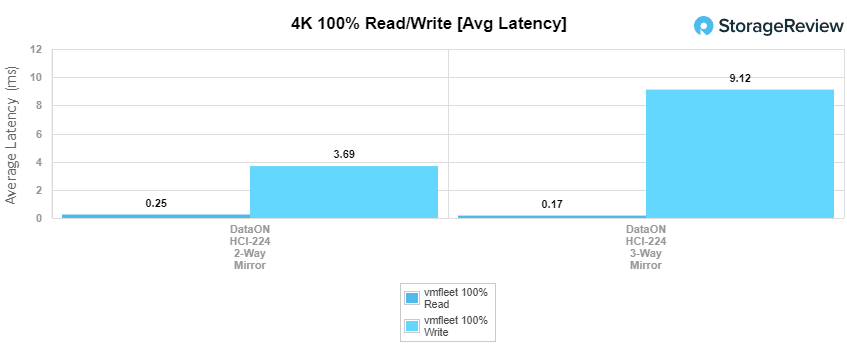
For our 4K random test, the 2-way mirror saw a throughput of 2,204,296 IOPS read at an average latency of 247µs and a write throughput of 564,601 IOPS at an average latency of 3.69ms. The 3-way saw a read throughput of 2,302,610 IOPS read at an average latency of 170µs and for write, it was a throughput of 338,538 IOPS at an average latency of 9.12ms. To put some of this into perspective, VMware’s vSAN offering using two Optane SSDs and four NVMe Capacity SSDs per node measured 521K IOPS 4K read at its peak and 202K IOPS write.
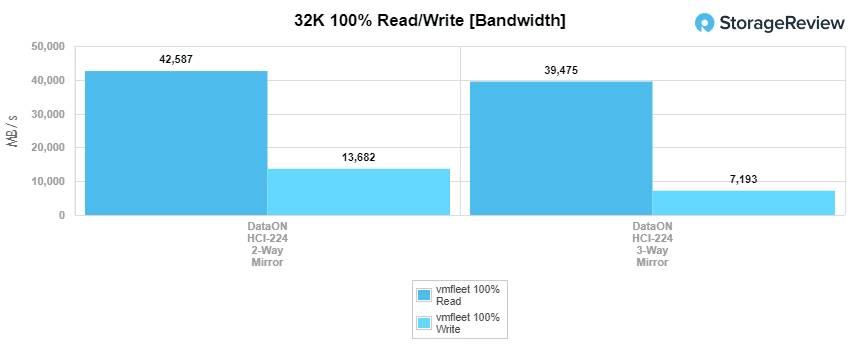
Next up we look at our 32K sequential benchmark. For reads, we saw the 2-way hit 42.59GB/s and the 3-way hit 39.48GB/s. For writes, the HCI gave us 13.8GB/s for the 2-way and 7.19GB/s for the 3-way.
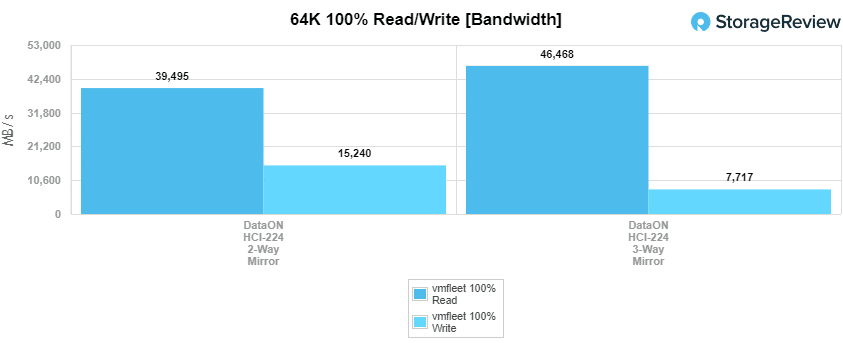
Continuing on with our sequential work, we move on to our 64K tests. Here the 2-way hit 39.5GB/s read and 15.24GB/s write and the 3-way hit 46.47GB/s read and 7.72GB/s write. Compared to vSAN, read bandwidth differences don’t even come close, where bandwidth in its tests topped at just over 5.3GB/s with a 64K blocksize. Write bandwidth had a similar difference, where vSAN topped out at 2.55GB/s.
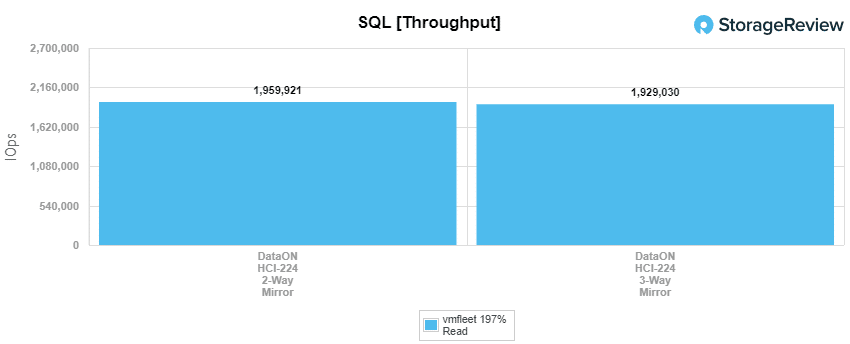
Our next benchmark is SQL with mixed read/write performance. Here the 2-way had a throughput of 1,959,921 IOPS at an average latency of 324µs. The 3-way hit 1,929,030 IOPS with an average latency of 185µs. The SQL workload is another area where Azure Stack HCI is able to show its strength, measuring just under 2 million IOPS, whereas VMware’s vSAN in the same workload profile measured 321k IOPS.
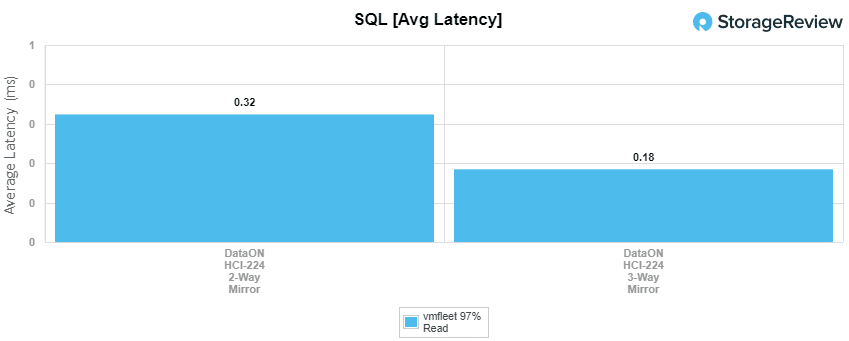
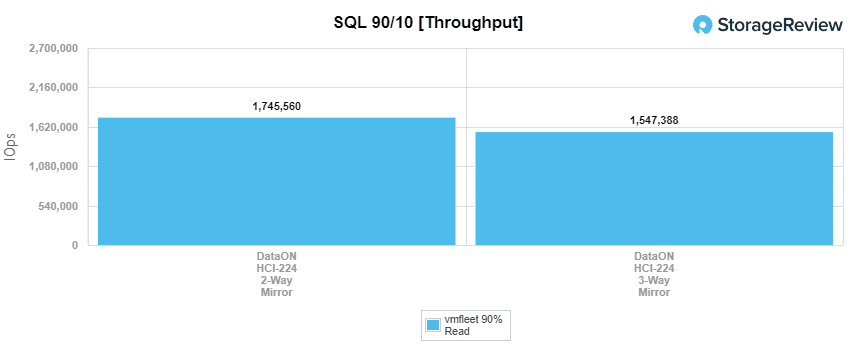
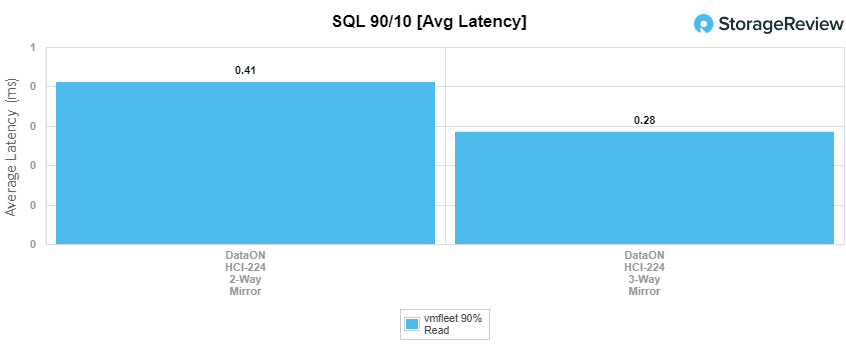
With SQL 90-10, the 2-way hit 1,745,560 IOPS with an average latency of 411µs and the 3-way had 1,547,388 IOPS and 285µs for latency.
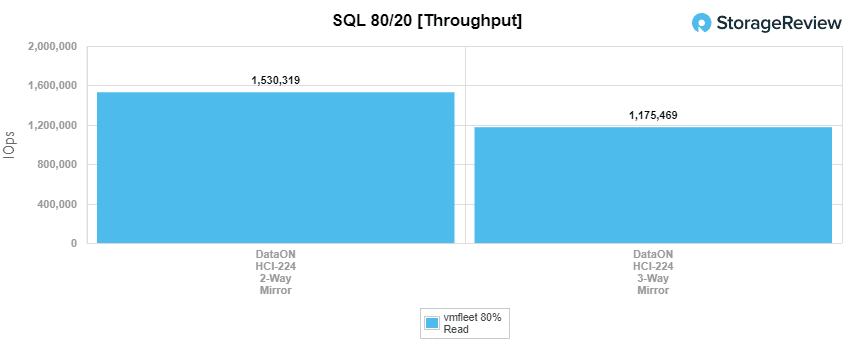
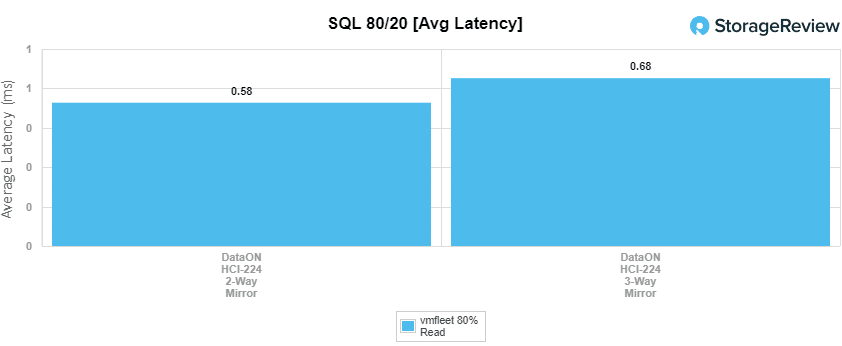
For SQL 80-20, the 2-way had a throughput of 1,530,319 IOPS at 581µs for latency. The 3-way hit 1,175,469 IOPS and 681µs for latency.
SPECsfs
Next up is our SPECsfs 2014 SP2 benchmark–a new test for us here. The SPECsfs is a benchmark suite that measures file server throughput and response time. The benchmark gives us a standardized method for comparing performance across different vendor platforms. The benchmark operates by setting a scale and incrementing up until the point latency is too great for the specifications of the benchmark. Here we look at the scale that can be done until 11ms is breached, as well as the bandwidth the server hits when it fails the latency number.
We will look at latency first here as it will shed more light on why the bandwidth stopped where it did in the second part. The scale and their latencies for both the 2-way and 3-way are in the table below:
| SPECsfs Latency (ms) | ||
|---|---|---|
| Scale | DataON HCI-224 2-Way Mirror | DataON HCI-224 3-Way Mirror |
| 100 | 0.243 | 0.262 |
| 200 | 0.329 | 0.371 |
| 300 | 0.466 | 0.499 |
| 400 | 0.636 | 0.699 |
| 500 | 0.753 | 0.896 |
| 600 | 0.953 | 1.083 |
| 700 | 1.113 | 1.314 |
| 800 | 1.326 | 1.557 |
| 900 | 1.501 | 1.826 |
| 1000 | 1.88 | 2.167 |
| 1100 | 2.061 | 2.807 |
| 1200 | 2.323 | 4.64 |
| 1300 | 2.749 | 8.557 |
| 1400 | 5.47 | 10.449 |
| 1500 | 8.616 | 11.285 (fail) |
| 1600 | 10.485 | 11.414 (fail) |
| 1700 | 11.069 | |
| 1800 | 11.697 (fail) | |
| 1900 | 12.51 (fail) | |
As one can see, both configurations started near 250µs, the 2-way slightly under and staying that way throughout. At a scale of 1500, the 3-way failed going to 11.285ms giving it a range of 262µs to 10.45ms. The 2-way failed at a scale of 1800 hitting 11.7ms, giving it a range of 243µs to 11.07ms.
The next table shows the bandwidth for each configuration at each build, with the failure listed above in latency.
| SPECsfs Bandwidth (KB/s) | ||
| Scale | DataON HCI-224 2-Way Mirror | DataON HCI-224 3-Way Mirror |
| 100 | 300897 | 300880 |
| 200 | 600372 | 600857 |
| 300 | 901672 | 902964 |
| 400 | 1202779 | 1203106 |
| 500 | 1504492 | 1503394 |
| 600 | 1805952 | 1806455 |
| 700 | 2105973 | 2108432 |
| 800 | 2408183 | 2406171 |
| 900 | 2710895 | 2707106 |
| 1000 | 3007499 | 3009280 |
| 1100 | 3308648 | 3308168 |
| 1200 | 3608244 | 3610219 |
| 1300 | 3910414 | 3888303 |
| 1400 | 4212976 | 4026720 |
| 1500 | 4513454 | 4000079 (fail) |
| 1600 | 4587183 | 4229678 (fail) |
| 1700 | 4621067 | |
| 1800 | 4630352 (fail) | |
| 1900 | 4569824 (fail) | |
For bandwidth, both configurations ran neck-in-neck with 300MB/s intervals up until the 3-way failed the latency with its final passing bandwidth of 4.02GB/s, and the 2-way having a final passing bandwidth of 4.62GB/s.
Conclusion
It’s been some time since we’ve been this deep with anything in the Microsoft storage-centric stack; and boy, are we glad to be back. With the rebranded Microsoft Azure Stack HCI solution, Microsoft has done something that’s so basic and fundamental, it’s easy to under appreciate. Microsoft has made their HCI solution dead simple to operate without overlaying anything to dampen performance. As seen in our numbers, the DataON cluster we’ve been testing has posted tremendous numbers, the fastest we’ve seen in a mid-market 4-node HCI cluster. To be fair, we’re not even testing the latest and greatest hardware from DataON either. While this config is clearly no slouch, complete with Intel Optane DC SSDs, DataON offers faster solutions that take advantage of Intel Xeon 2nd Generation CPUs, persistent memory and faster networking. The fact that there’s even more performance available in an Azure Stack HCI solution is exciting, but it’s also important to remember the solution can scale down as well to deployments as small as two node HCI that can be configured switchless for a low-cost edge or SMB solution.
Drilling in through the performance numbers, the Microsoft Azure Stack HCI cluster was able to offer an incredible amount of I/O and bandwidth. In the four-corners realm, we measured in excess of 2.3M IOPS 4K random read with a 3-way mirror configuration, and 338k IOPS 4K random write. If you require greater write performance, a 2-way mirror configuration was able to boost the 4K random write speeds to 564k IOPs. Looking at bandwidth, though, is where the Microsoft Azure Stack really shines. In our 64K block sequential transfer workload, 2-way mirror measured 39.5GB/s read and 15.24GB/s write, while 3-way mirror measured 46.47GB/s read and 7.72GB/s write. This far exceeds what we’ve measured from past HCI clusters.
Overall, Microsoft’s Azure Stack HCI solution proved to be both simple to deploy, easy to manage and exceptionally performant, all things you want. DataON, as a solution’s partner, excelled in providing a turn-key build, offering built-to-spec hardware with clear instructions that is ultimately sold in a configuration that can be up and running in no time. Customers can even skip the wiring in many cases, so it really comes down to the specific need. In either way, though, Azure Stack HCI combined with Intel Optane, Intel NVMe SSDs and Mellanox 100G networking proved itself a force to be reckoned with.


 Amazon