
Early this year, Microsoft released a free built-in Windows File Recovery tool for Windows 10 users. This command-line app is available in the Microsoft Store, and it allows Windows 10 users to recover files that have been deleted from local storage devices and can’t be restored from the Recycle Bin. Local storage devices include internal drives, external drives, and USB devices.
Early this year, Microsoft released a free built-in Windows File Recovery tool for Windows 10 users. This command-line app is available in the Microsoft Store, and it allows Windows 10 users to recover files that have been deleted from local storage devices and can’t be restored from the Recycle Bin. Local storage devices include internal drives, external drives, and USB devices.
Losing valuable data from your drive can be annoying and a pain in the neck if you are not an experienced user. This ache can be worst when you realize you don’t have a backup. Critical information can disappear in a blink of an eye due to hardware failure or human error. There are existing third-party tools that can be installed into Windows and help recover essential files. Now, with the release of the Windows File Recovery tool, Microsoft makes this frustrating process a little bit easy. Windows File Recovery can help you with different scenarios, such as accidentally deleting important files, getting your hard drive wiped clean, unsure what to do with corrupted data, and others.
This tool supports many file types to help ensure that your data is not permanently lost, including photos, documents, videos, and more. However, Microsoft points out that recovery on cloud storage and network file shares is not supported.
Recovery Modes and Key features
There are three modes you can use to recover files: Default, Segment, and Signature. Each recovery mode attempts to recover deleted files from a storage device in a different way, and it is important to note that each mode uses a modified command line. Also, there are several file systems supported by Windows that vary depending on the storage device or operating system. Recovering files from non-NTFS file systems is only supported in Signature mode.
The three modes work in the following way:
- Default mode: This mode uses the Master File Table (MFT) to locate lost files. Default mode works well when the MFT and file segments, also called File Record Segments (FRS), are present.
- Segment mode: this mode does not require the MFT but does require segments. Segments are summaries of file information that NTFS stores in the MFT such as name, date, size, type and the cluster/allocation unit index.
- Signature mode: this mode only requires that data is present, searches for specific file types, and doesn’t work for very small files. For non-NTFS storage devices, only Signature mode is supported. For more information on file systems, see the “About modes and files systems” section.
Supported Files systems:
- FAT and exFAT: SD cards, Flash or USB drives (< 4GB)
- ReFS: Windows Server and Windows Pro for Workstations
- NTFS: computers (HDD, SSD), external hard drives, flash or USB drives (> 4GB)
Depending on your file system and the incident, you need to decide which recovery mode you should use. For example, if you are using NTFS, and a file was deleted recently, you should use the Default mode. Or if you are using NTFS, but a file was deleted or lost a while ago, after formatting a disk, or due to corrupted disk, you should use try first Segment mode, then Signature mode. If, on the other hand, you are using FAT, exTAF, or ReFS, you should use the Signature mode.
Here are the extension groups the different supported file types for each group:
- ASF: wma, wmv, asf
- JPEG: jpg, jpeg, jpe, jif, jfif, jfi
- MP3: mp3
- MPEG: mpeg, mp4, mpg, m4a, m4v, m4b, m4r, mov, 3gp, qt
- PDF: pdf
- PNG: png
- ZIP: zip, docx, xlsx, pptx, odt, ods, odp, odg, odi, odf, odc, odm, ott, otg, otp, ots, otc, oti, otf, oth
As a practical example, if you are trying to recovery from a camera or SD card, you should try Signature mode, which expands beyond NTFS recovery and caters to your storage device needs. Depending on the disk’s size, it may take some time to recover the file, especially if you are using Signature mode.
Key Features
The Windows 10 File Recovery Tool has some useful key features promoted by Microsoft’s Appstore.
- Target file names, keywords, file paths, or extensions in your recovery
- Recovers JPEG, PDF, PNG, MPEG, Office files, MP3 & MP4, ZIP files and more
- Recover from HDD, SSD, USB, and memory cards
- Supports NTFS, FAT, exFAT and ReFS file systems
How to use the File Recovery Tool
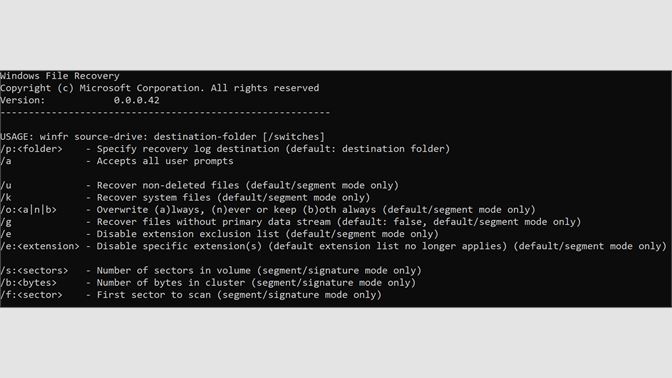
This app can be quickly launched and downloaded from the Microsoft Store for free, and in order to run it, you will require Windows 10 build 19041 or later. After you allow the app to work in your device, you can run it from the Command Prompt window. You need to enter the command in the following format:
winfr source-drive: destination-drive: [/switches]
The source and destination drives must be different. When recovering from the operating system drive (often C: ), use the /n <filter> and /y:<type<(s)> switches to specify the user files or folder. Depending on the size of your source drive, this may take a while. To stop the recovery process, press Ctrl+C. Microsoft automatically creates a recovery folder for you called, Recovery_<date and time> on the destination drive.
Microsoft provides some typical examples of how to use the different modes:
Default mode examples
Recover a specific file from your C: drive to the recovery folder on an E: drive.
winfr C: E: /n \Users\<username>\Documents\QuarterlyStatement.docx
Recover jpeg and png photos from your Pictures folder to the recovery folder on an E: drive.
winfr C: E: /n \Users\<username>\Pictures\*.JPEG /n \Users\<username>\Pictures\*.PNG
Segment mode examples (/r)
Recover PDF and Word files from your C: drive to the recovery folder on an E: drive.
winfr C: E: /r /n *.pdf /n *.docx
Recover any file with the string “invoice” in the filename by using wildcard characters.
winfr C: E: /r /n *invoice*
Signature mode examples (/x)
When using the Signature mode, it’s helpful first to see the supported extension groups and corresponding file types.
winfr /#
Recover JPEG (jpg, jpeg, jpe, jif, jfif, jfi) and PNG photos from your C: drive to the recovery folder on an E: drive.
winfr C: E: /x /y:JPEG,PNG
Recover ZIP files (zip, docx, xlsx, ptpx, and so on) from your C: drive to the recovery folder on an E: drive.
winfr C: E:\RecoveryTest /x /y:ZIP
Conclusion
This article presented a quick overview and walkthrough on the Windows File Recovery Tool. This recovery solution is available in Microsoft Store as an app but is used in Windows as a command-line tool. It’s Command-Line Interface friendly, so that even non-advanced Windows users can use it. Besides, Microsoft provides a user guide with practical examples and using various scenarios.
Microsoft states Windows File Recovery can recover data not only from the local hard drive on your computer but also from external storage. This flexibility means you can use the tool on USB drives, external SSDs, memory cards, and other storage devices. The tool comes with three modes to attempt to recover deleted files from a storage device, Default, Segment, and Signature. It supports drives formatted in different file systems and various file extensions.
Engage with StorageReview
Newsletter | YouTube | Podcast iTunes/Spotify | Instagram | Twitter | Facebook | RSS Feed