

Recently we wrote a piece (and created a video) highlighting the ease of deployment of Scale Computing’s tiny HCI cluster. The three-node cluster is very simple to set up, making it a favorite for edge use cases like retail. But we got to thinking, what about using these nodes at an edge that’s a little more remote? Like deep in the Arizona desert, paired with a couple of portable power stations and a powerful telescope rigged to photograph the skies overhead. Read on to learn more about how Scale Computing enables scientific research at the extreme edge.
Astrophotography in the Desert
Overkill? Yes, this is a bit like bringing a battleship to a fishing competition and using the depth charges to get the fish to the surface. However, this is more of a test to see how quickly and how rapidly we could process large photographs as they come in.
The telescope is extremely fast in that it has a large aperture, F/1.9, which means that we don’t have to spend much time on targets, and our exposure times can be much shorter. This means that in an entire night of Astrophotography, I can capture more data and do more targets than I could process in real-time on the local controller laptop (a moderate spec 7th gen i7, 7820HQ with the stock m.2 SATA SSD).
I also prefer to subdivide the task of control into the guidance of the telescope and processing of the images so as not to overload the system or run into any sort of IO limitations. We are dealing with 120MB-150MB per frame, which gets aggressive on the Disk IO and CPU consumption very quickly when processing large datasets.
Simplified Astrophotography Explanation
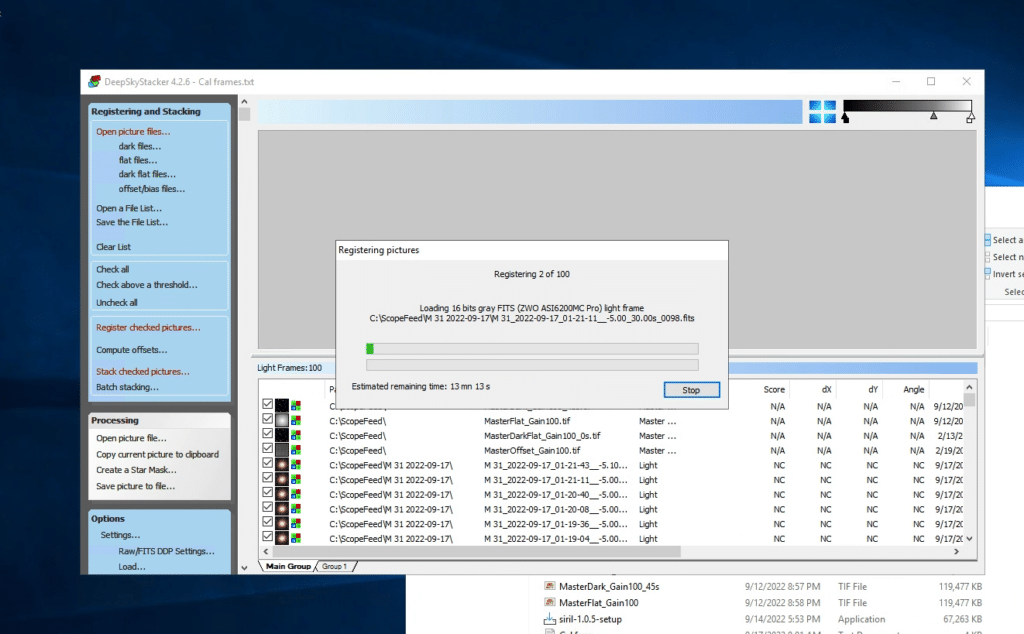
What do I mean by processing? The first step is the registration of the photos; this applies a general score of the quality and creates a text file that arbitrarily lists where all the stars are in each image. As we take more and more photos of the same target, these registration files are used to help align all of the images in the final image stacking process.
Once the files are all registered, we stack them together using various methods. For simplicity’s sake, we can say we average the values of each pixel, which, as the image size increases, the longer this takes. Afterward, you head to post-processing, which can be as simple as Photoshop editing. More complex operations use dedicated software that can leverage GPUs and AI to remove the stars and much more. Post-processing is where the art comes in.
With this telescope, I can shoot 30-second exposures and get incredible results, so I generally like to take between 100 and 200 shots of each target and get to as many targets as I can in an evening.
The software that I use is called Deep Sky Stacker and Deep Sky Stacker Live. Deep Sky Stacker Live gives you a live (who would have guessed), uncalibrated preview of your current targets image set, and it registers the images as they come in from the camera, saving time down the line.
For this particular test, I was curious if we could register, stack, and process the images as quickly as we could take them. This is rather computationally taxing as these images are 62 megapixels each, and I’m taking between 100 and 200 frames per target. This means it generated somewhere between 15GB and 20GB of information per hour; the entire evening generated 178GB of data that I was able to process on the Scale Computing HCI Cluster. Oh, and because we’re very remote, we’re doing all of this on battery power only.
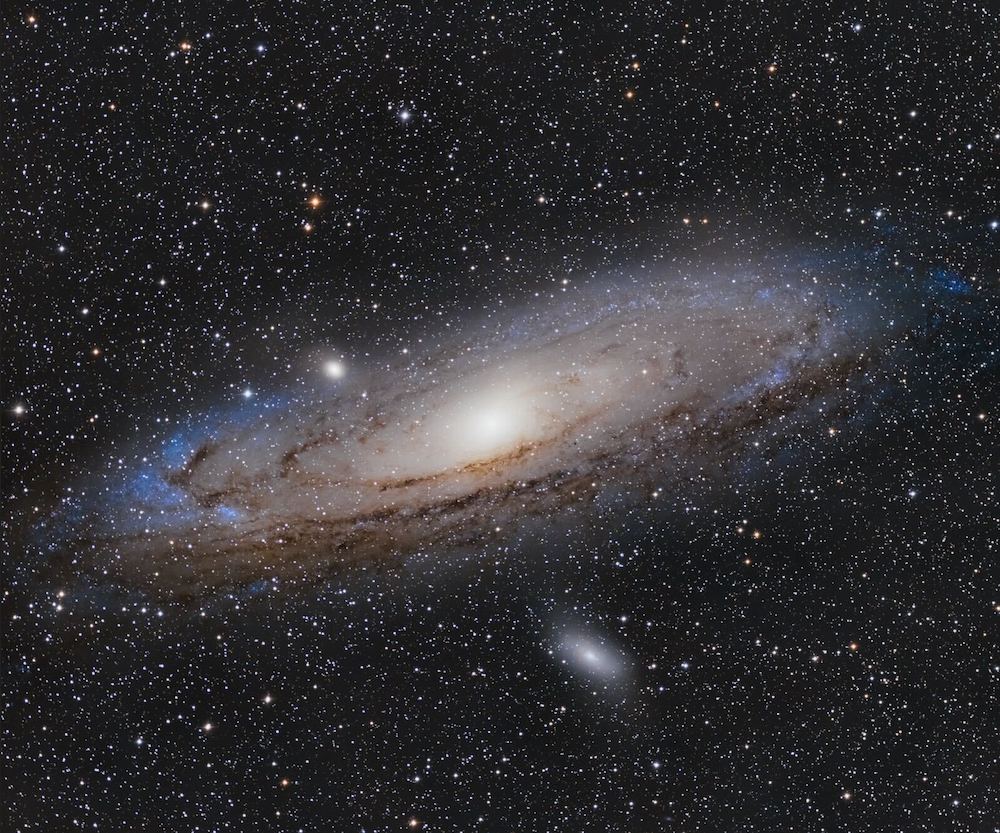
Andromeda, 40 minutes of integration time.
Stacking time for each target, using an averaging method, including a full set of calibration frames, took between 25-35 minutes to complete fully. This is a surprisingly impressive performance from the Scale Computing Cluster and on par with my desktop workstation and dedicated Astro Server back home.
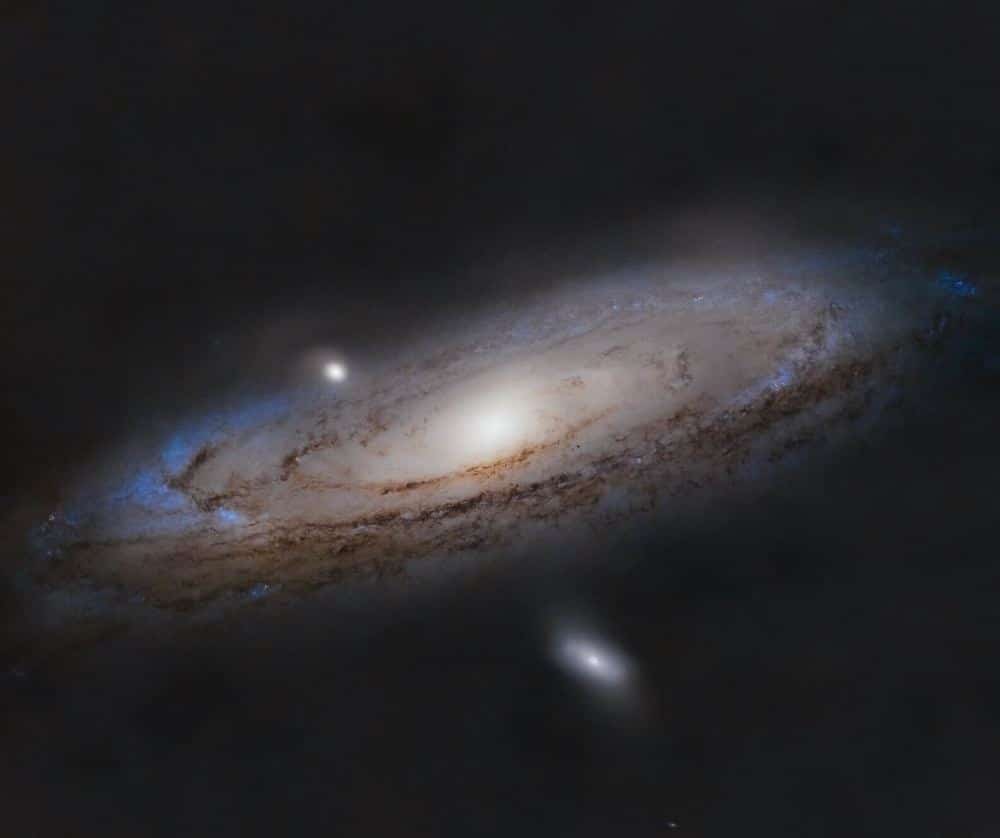
Andromeda with the stars removed.
I have conducted extensive research, and this lines up with what I have discovered, it is less important to throw massive amounts of RAM and CPU and more important to get the absolute best Disk IOPS and Read/Write speeds you can get for this process to be as quick as possible(more on this later in another article). The Scale Computing Cluster’s all-flash M.2 NVMe drives fit great by providing high performance for this particular workflow with low power consumption.
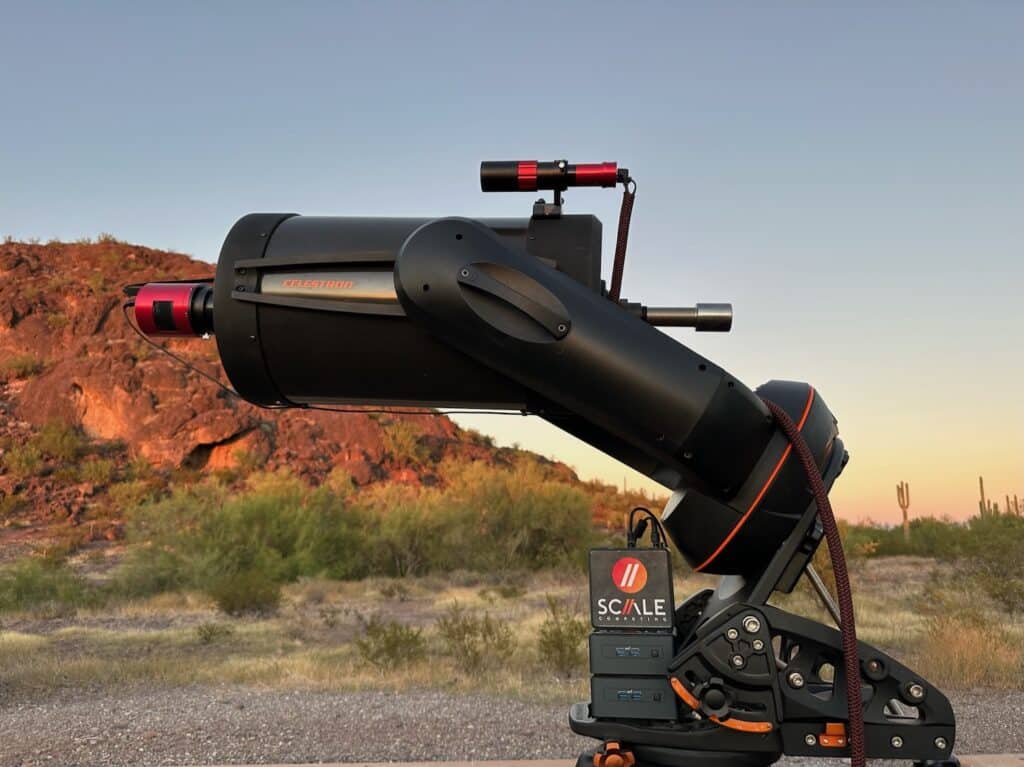
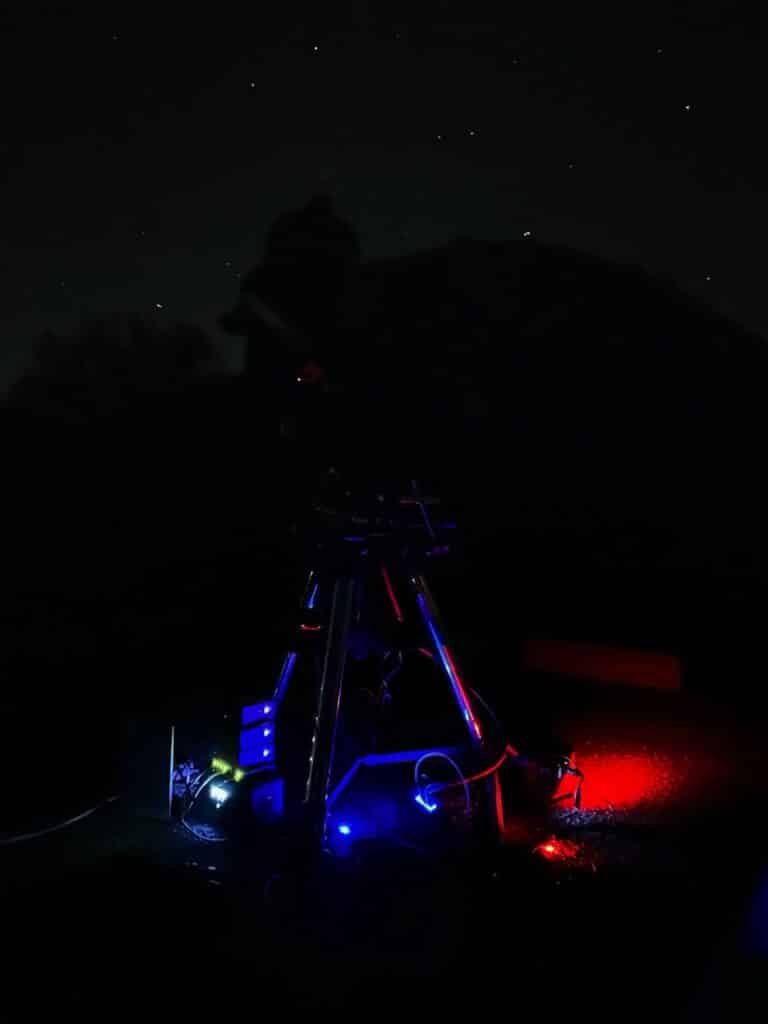
Astrophotography Rig
The telescope, IT infrastructure, and site location information for the test:
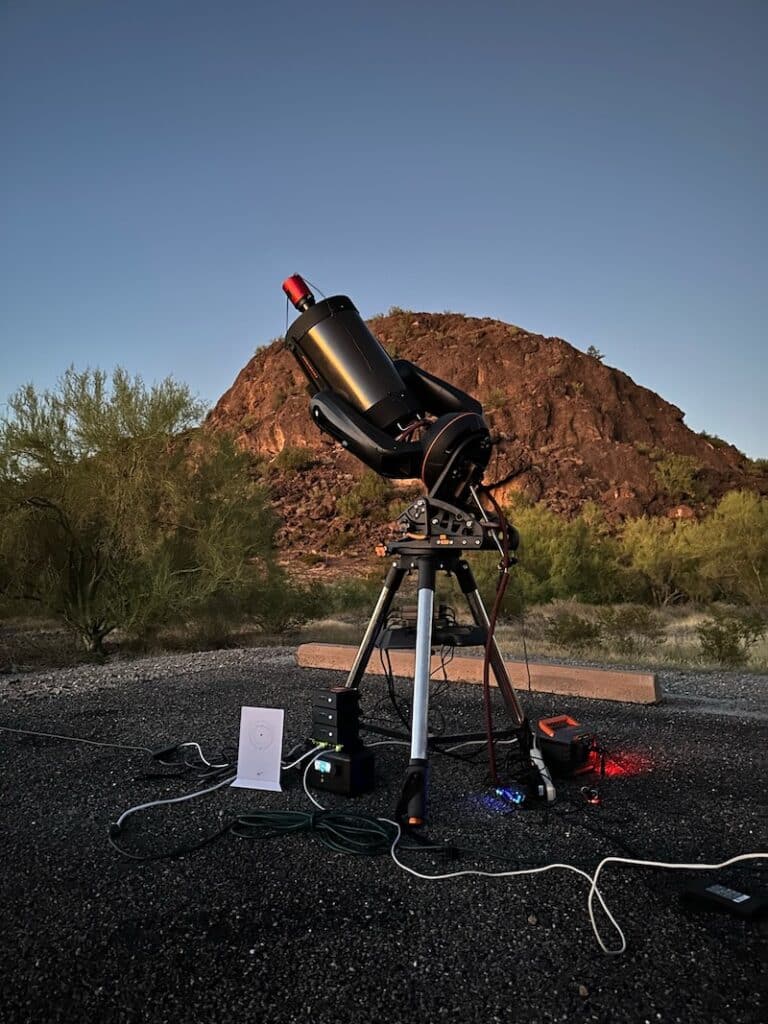
- Celestron Nexstar GPS 11″ on an HD Wedge and HD Tripod
- Starizona Hyperstar11v4
- 540mm Focal Length
- F/1.9 Aperture
- Starizona Hyperstar11v4
- ZWO ASI6200MC Pro One Shot Color Camera
- Generic Enterprise Dell Laptop with 7th Gen i7 for control and capture
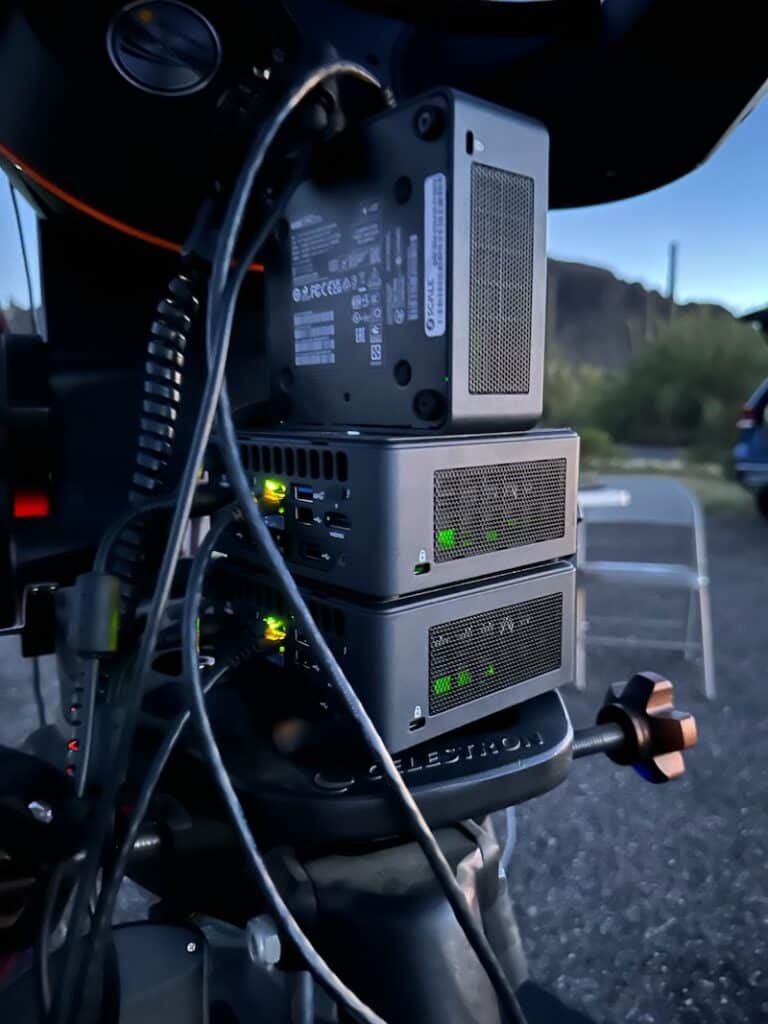
- Scale Computing Cluster
- Unmanaged eight port Netgear 1G Switch
- 2x EcoFlow River Mini Batteries
- Starlink V2
- Picacho Peak State Park, Bortle 2 site.
- Software
- N.I.N.A
- PHD2
- Deep Sky Stacker
- Starnet
- Photoshop
Extreme Edge HCI
The general setup was pretty straightforward; I set up a table, an 8-port switch, the control laptop, the Scale Computing HCI cluster, and Starlink for Internet access. Everything was networked together through the switch, which despite being only a 1GbE switch, same as the speed on the Scale cluster, was not an issue in this workflow thanks to the rate of data coming in, roughly 300 megabytes per minute.
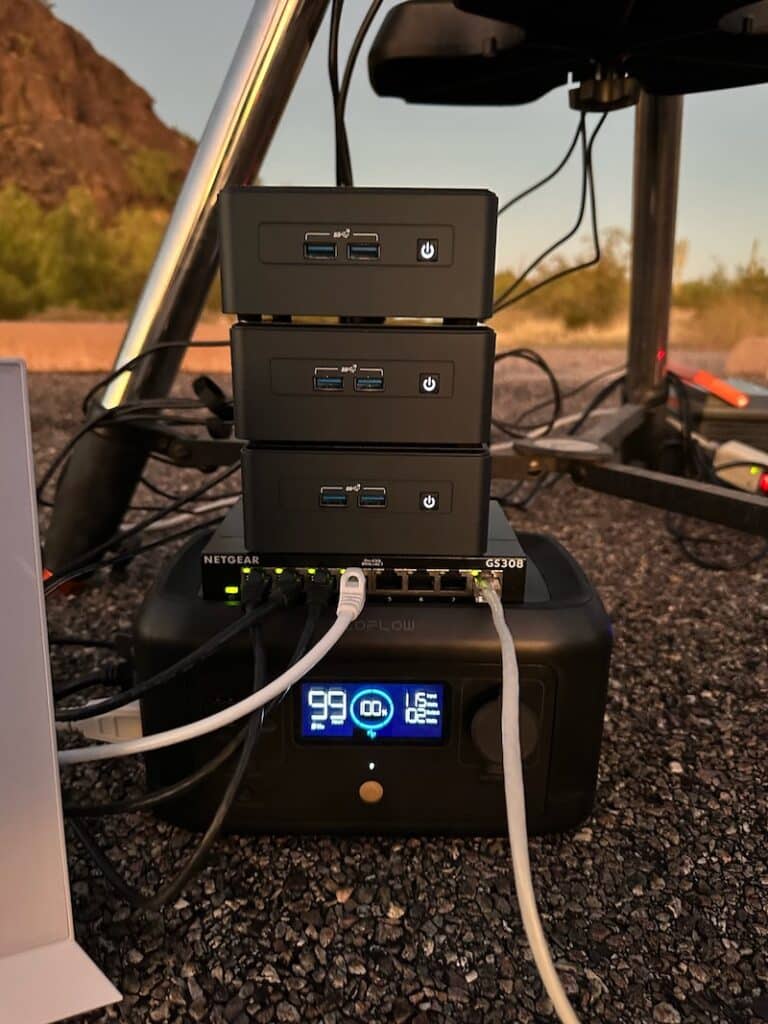
All power for the Scale Cluster and Control Laptop went to one Ecoflow River Mini, with the telescope and camera being powered off the other. The telescope and camera accept 12 V power off the car lighter port, one input for the telescope mount to power the motors for pointing and tracking, and another to run the Peltier element for the cooler on the camera.
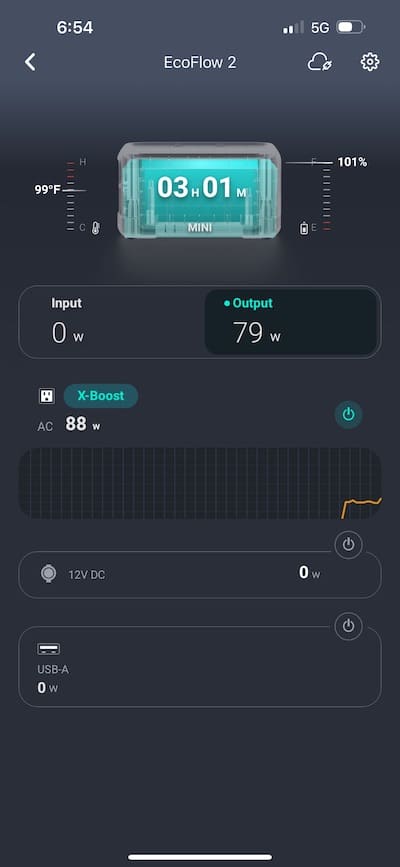
The camera sensor is cooled’ to -5°C. The cluster and laptop (with screen and minimum brightness) deplete the EcoFlow River Mini in just shy of 2 hours and 30 minutes, while the one dedicated to the telescope was able to power it for two whole nights in the preliminary testing.
The control laptop is connected to the telescope and camera via USB 3.0 and a USB 3.0 Hub. In my setup, I like to only run the bare minimum on the control laptop, and the pictures are then usually stored remotely, either over to a NAS if I have it available (which, in this case, I did on the Scale Cluster) or to external flash storage if I don’t have networking.
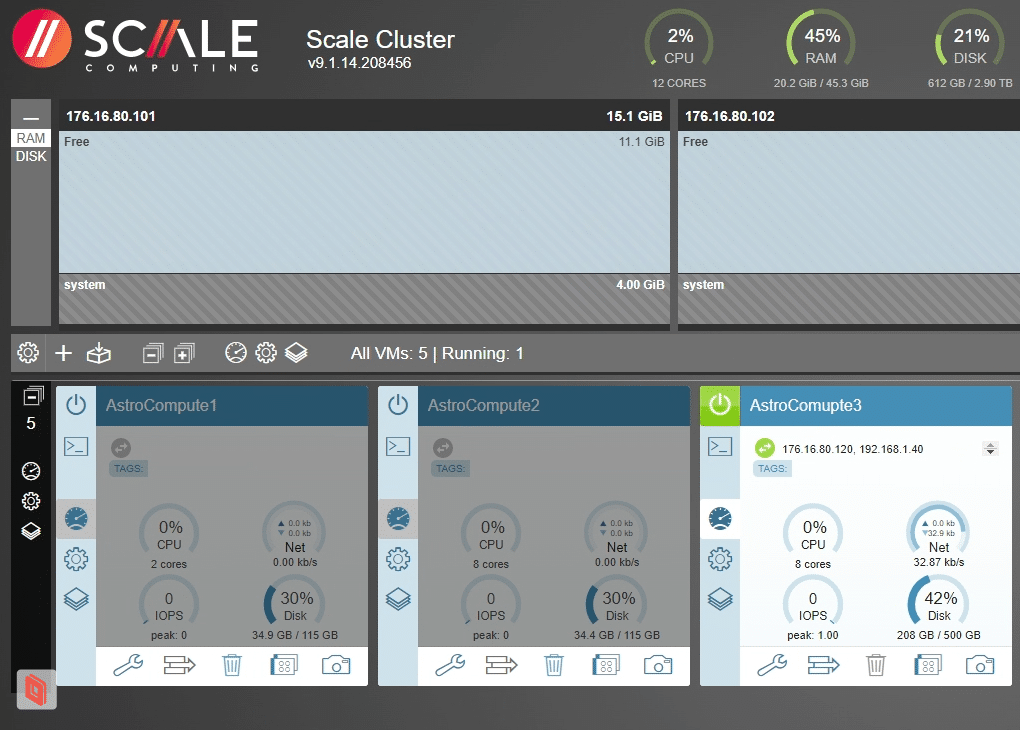
I set up three virtual machines on this cluster for this test, two for stacking and one for storing the image files as a network share. The control laptop for the telescope dumped its files directly from the camera over the network to the cluster. Then each stacker was responsible for alternating the job of processing each target as the files came in. Thanks to the massive amount of computing power available with the cluster, we could more than keep up with the workload.
On normal excursions to dark sky sites, with just the control laptop, I am unable to field process due to the sheer volume of data that comes in. I also couldn’t upload them directly to the home servers for processing due to limited internet connectivity, meaning I don’t know until a day or more later the results of the time spent on target. Starlink solves this to a degree, but it is on the edge of being a reliable solution, especially if you have multiple users/telescopes, as the 5-20Mbps upload speeds would quickly become a bottleneck.
This test overall was a great proof of concept to show that if you had two, three, or even more dedicated Astrophotography rigs set up at a permanently installed remote observatory, you could very easily deal with all of your stacking on site and then upload the stacked file back to base for final editing at home.
I also would suggest that you could take a smaller cluster out to a star party and be able to field process as well since you would have the ability to rapidly deploy a VM for each user to be able to utilize for their own personal workflows. To validate this concept, I sat across the campground on my laptop tethered to my phone on 5G and remote desktop back over to the control laptop, where I could remotely stack and process images on the cluster with great success.
Final Thoughts
In this particular test, the Scale Computing 3-node cluster was undoubtedly overkill. That said, it also demonstrated that on a long weekend excursion, a larger star party, or with multiple telescopes capturing images, you could have rapid results, complete validation of the images, and check for issues in the data. Instead of packing up and heading home, only to realize that you had a smudge on a lens, or too much stray light from somewhere, or selected the incorrect filter, these can be addressed in near real-time in the field.
The benefits became apparent after I finished stacking my second target; I realized that there was too much stray light from the LEDs on the USB hub that I was using, creating some strange artifacts in the images. I was able to go back over to the telescope, cover them up and re-shoot the target, then restack with better results.
The Scale Computing solution would also fit in extremely well at a permanent installation, multiple user remote observatory that is 100% off-grid, thanks to its low power design and high performance. If I were able to get some additional power storage capability and a large enough solar solution, there would be no limit to run time, and having the ability to shut down excess nodes during the day to maximize the charge rate, I can see a lot of potential for these applications.
There were two big drawbacks that I found that I would think could be easily addressed, one with a software update, perhaps, and the other with a simple hardware upgrade. The first is the inability to pass through any USB devices; if this had a USB pass-through, I would 100% drop all of my current gear and put this in as primary for the workflow, even sitting at home in the backyard. I need to be able to pass the USB Hub to a guest operating system for direct control of the telescope and camera.
The second issue is the limited amount of storage. One terabyte per host is pretty decent; however, I would want to see somewhere in the order of 2 to 4 TB per host to make this a usable everyday option in my particular workflow. I am capturing at the higher end of data rates with the camera I am implementing though, so for those with lower resolution cameras, this may be less of an issue. Scale can configure these systems with more storage, so this is an easy fix if you need the capacity.
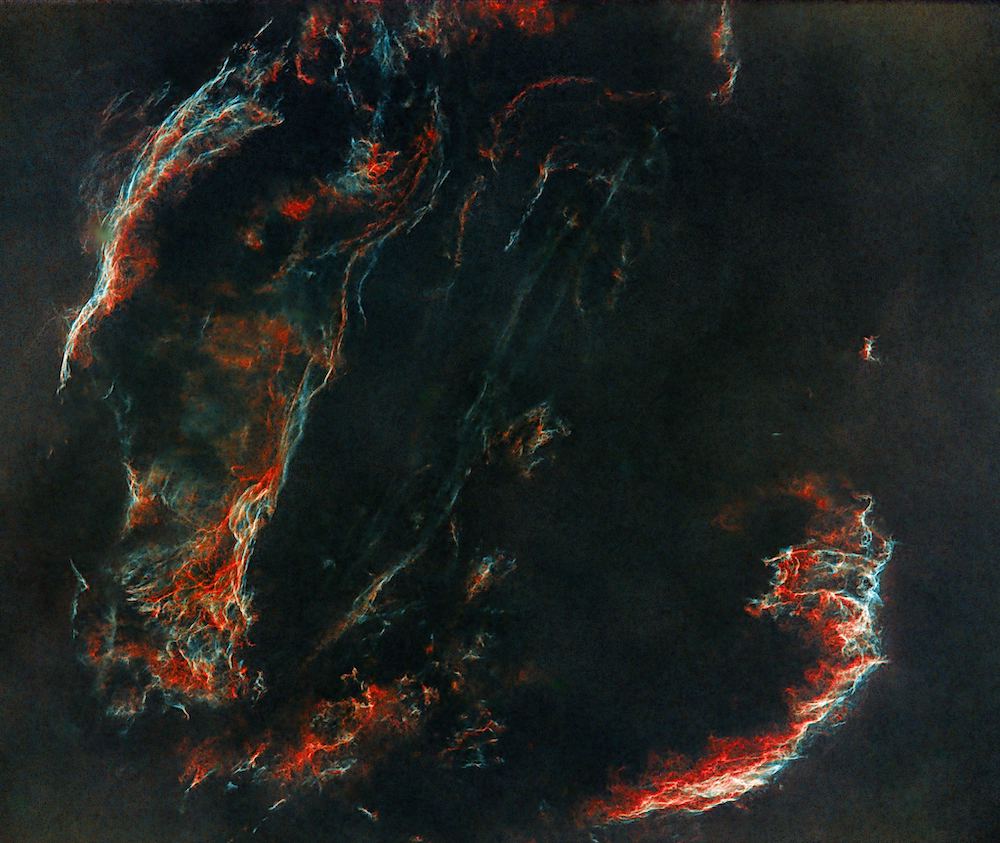
Veil Nebula
The Scale Computing tiny HCI cluster offers many business benefits thanks to the small size, easy-to-use software, and relatively low cost. For research use cases like Astrophotography, something like this can significantly accelerate scientific discovery. Anyone looking for a low-power cluster that’s also resilient and cost-effective would do well to give Scale Computing a try; they even have a free trial.
If you would like to have a try at editing the raw stacks, the tif files can be found at this google drive link


 Amazon