

In the first quarter of 2020, Intel released the NUC 9 Pro, their most powerful Next Unit of Computing (NUC) system to date. We had a chance to take an initial look at this new system in one of its variants, the NUC9VXQNX, which came with RAM, storage, and a graphics card. In our review, we looked at its hardware and ran our benchmarks on it. In this piece we take a deeper look at setting up the Intel NUC with ESXi.
In this article, we will go a step further and install ESXi on it. But before doing so, we will open the case and dig into the hardware a little deeper, and while we have the computer open, we will install more RAM and storage on the system. We will then remove the graphics card and rerun our original benchmarks. Finally, we will reinstall the graphics card, install ESXi, create a virtual machine (VM) that uses the graphics card as a passthrough device, and run our benchmarks once more this time on the VM and compare the results to those of running on bare metal.
We will be using the same NUC 9 Pro variant that we used in our prior review, the NUC9VXQNX. To give a quick overview, this version comes equipped with an eight-core Xeon processor, a discrete NVIDIA Quadro graphics card, 32 GB of RAM, 1TB of storage, and a license to run Windows 10 Home Pro. It also has multiple video outputs and USB connectors, two PCIe slots, two 1Gbps Ethernet ports, and 2.4Gbps Wi-Fi. Its complete specifications can be found in the article referenced above.
Intel NUC Hardware deep-dive
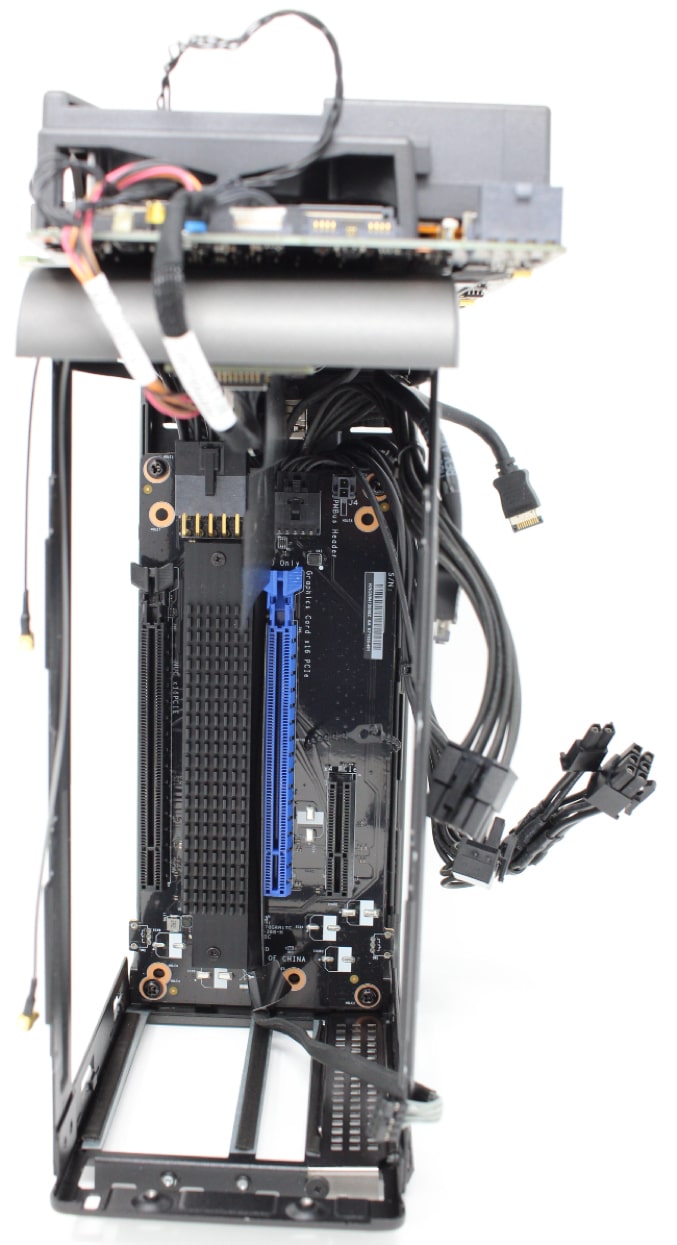
To get a better look at the hardware on the NUC, we removed the top cover of the case by removing the two Philips head screws and then pulling directly back on the cover. After the top was removed, we were then able to remove the sides of the device. On the right side we found the back of the Compute Element and the board that it is plugged into.
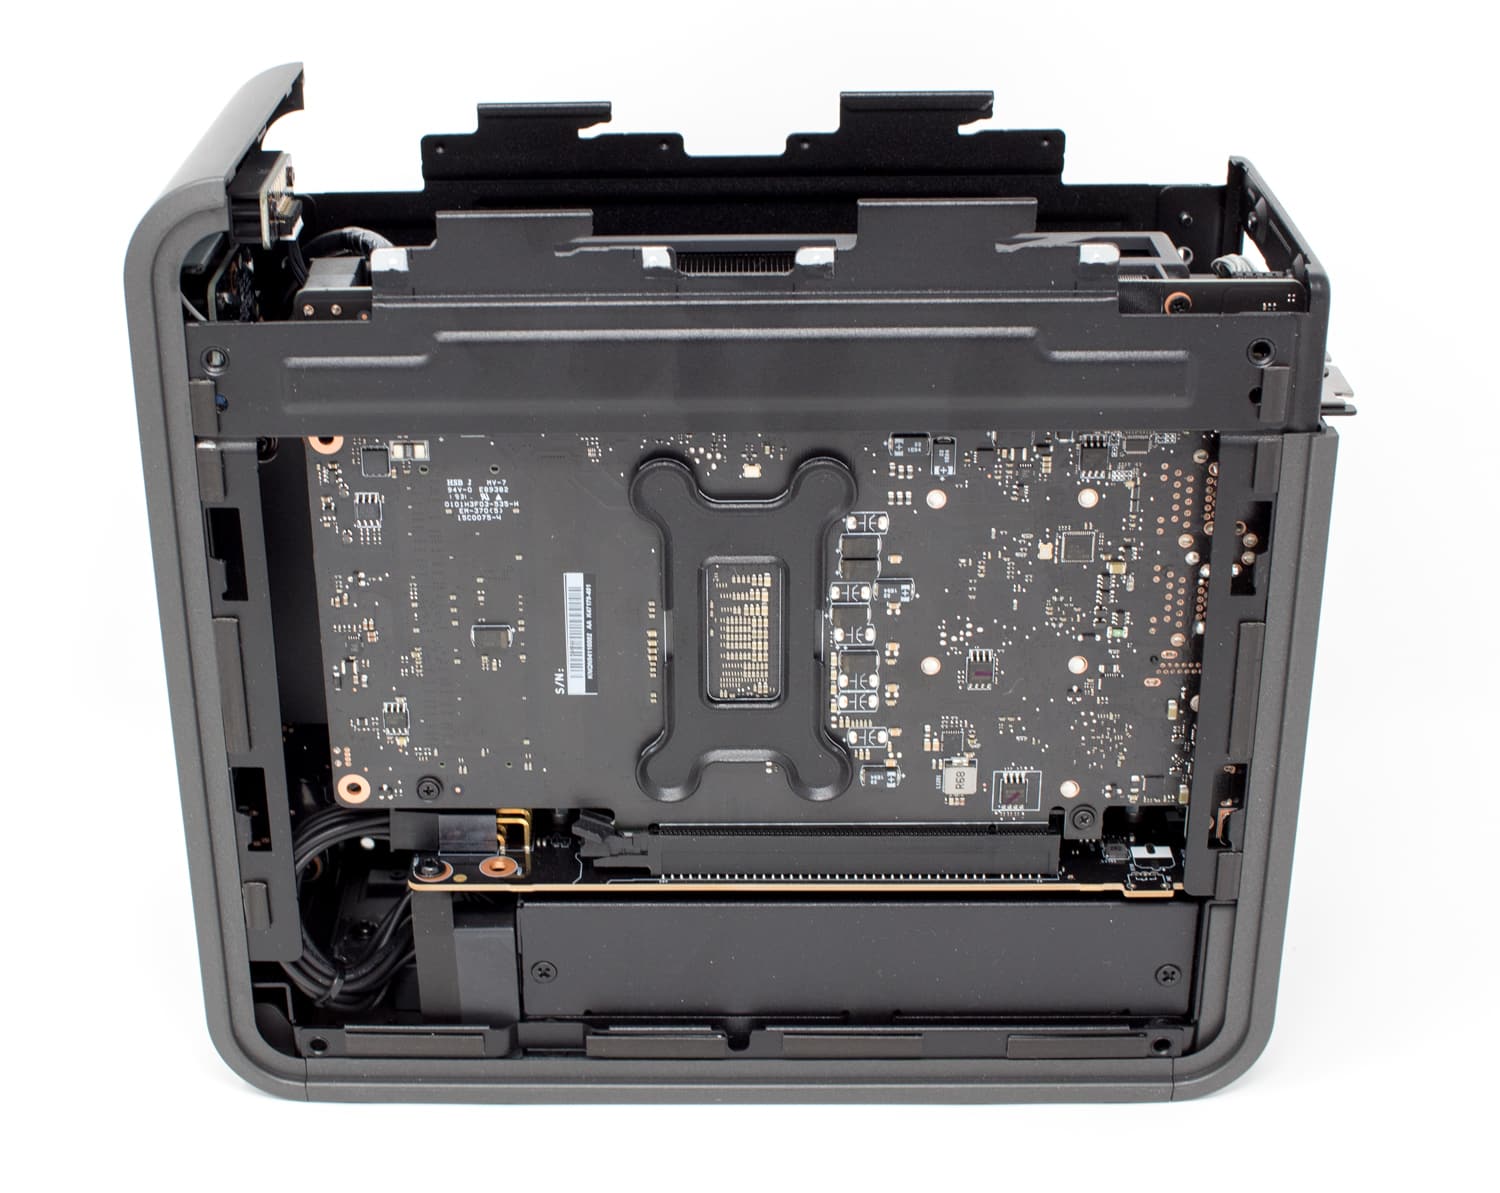
Not only is the Compute Element plugged into a PCIe connector, it also has two Wi-Fi antennas and other connectors.
 The Compute Element has USB ports, two RJ45 connectors, an HDMI connector, and a 3.5mm audio connector on it.
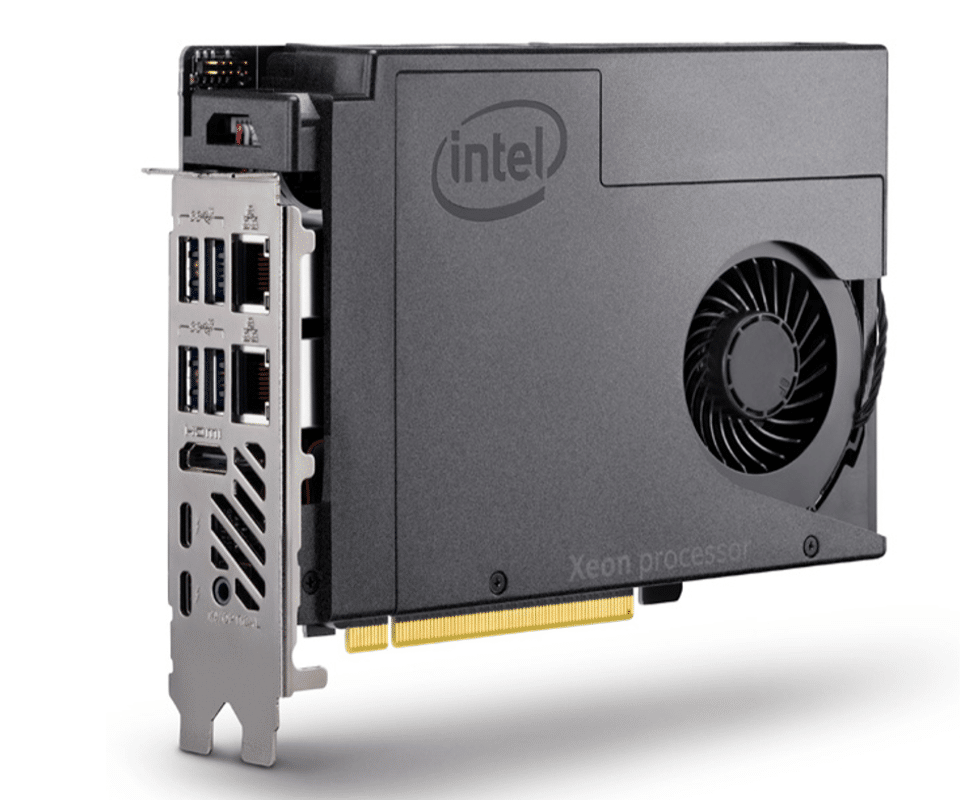
The unit is based on the NUC 9 Pro Compute Element (NUC9VXQNB). The Compute Element is basically a PCI Express card that contains a CPU and several major motherboard components; it allows the system to have a smaller footprint and easier to upgrade.
By removing the top of the Compute Element (which had a fan on it), we found a single Intel Xeon E-2286M processor. This CPU is a 64-bit eight-core performance workstation x86 microprocessor with 512 KiB of L1, 2 MiB, and 16 MiB of cache. It has support for hyper-threading, meaning that a total of 16 threads can be running at any given time. The processor operates at a normal speed of 2.4 GHz, with a Turbo Boost speed of up to 5.0 GHz. It also has a TDP (Thermal Design Power) rating of 45 W and 35 TPD down, supports up to 64 GB of dual-channel DDR4-2666 ECC memory, and has two M.2 slots.
The CPU has integrated Intel UHD Graphics 630 which operates at 350 MHz with a burst frequency of 1.25 GHz. The GPU has 24 Execution Units (EUs), and can support up to three 4K displays. The TDP and RAM are shared between the CPU and the GPU.
The WLAN module in the Compute Element is an Intel Wi-Fi 6 AX200 which is capable of transfer rates of up to 2.4 Gbps.
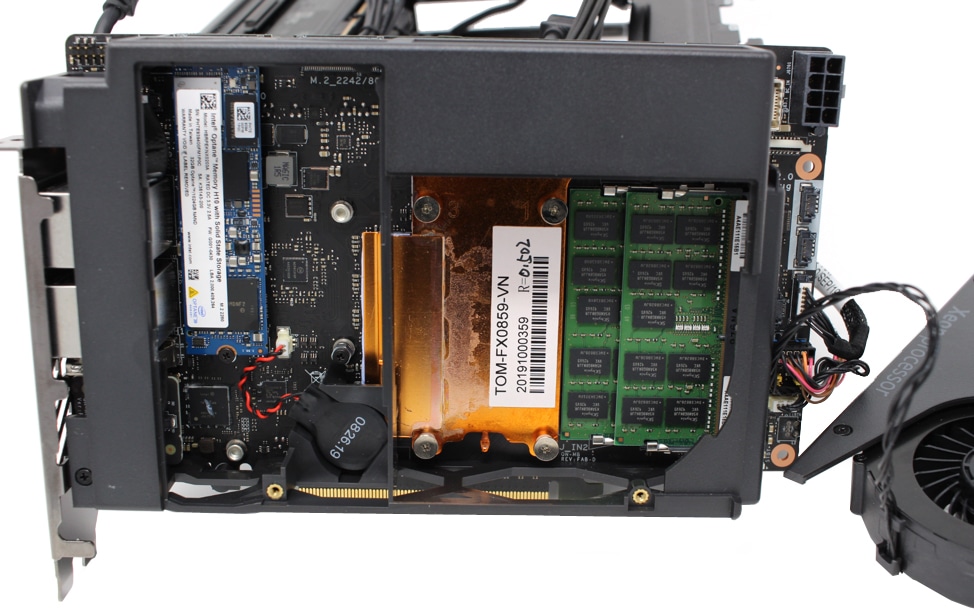
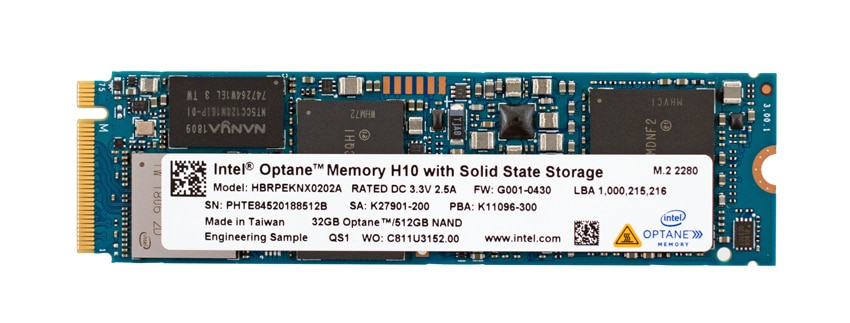
The Compute Element comes with 32GB of Kingston RAM, and an M.2 Intel 1TB Intel Optane Memory H10 with solid-state storage device. The second NVMe slot is not populated. The choice of H10 is very interesting because it’s a hybrid device that combines Intel Optane flash and Intel QLC 3D NAND on a single M.2 2280 form factor device. We did a complete write-up on this device earlier this year.
At the bottom of the device, and to the left of a blue PCIe x 16 slot, we found another M.2 slot with a heat sink on it.
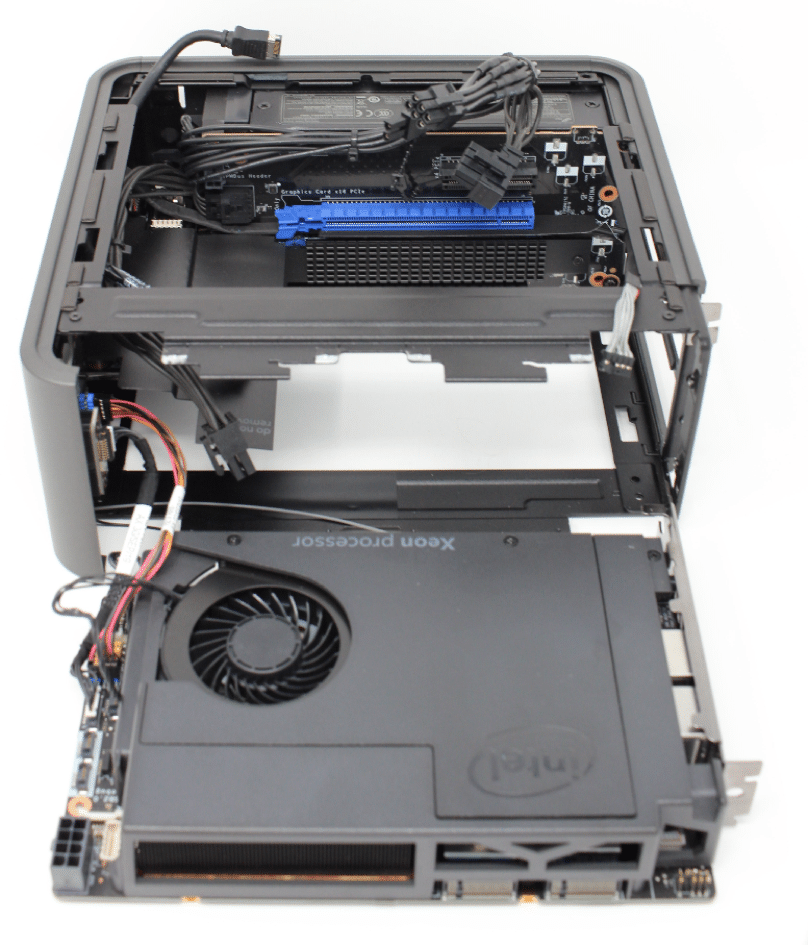
Removing the left side exposed the graphics card, and the top of the case has dual fans integrated into it.
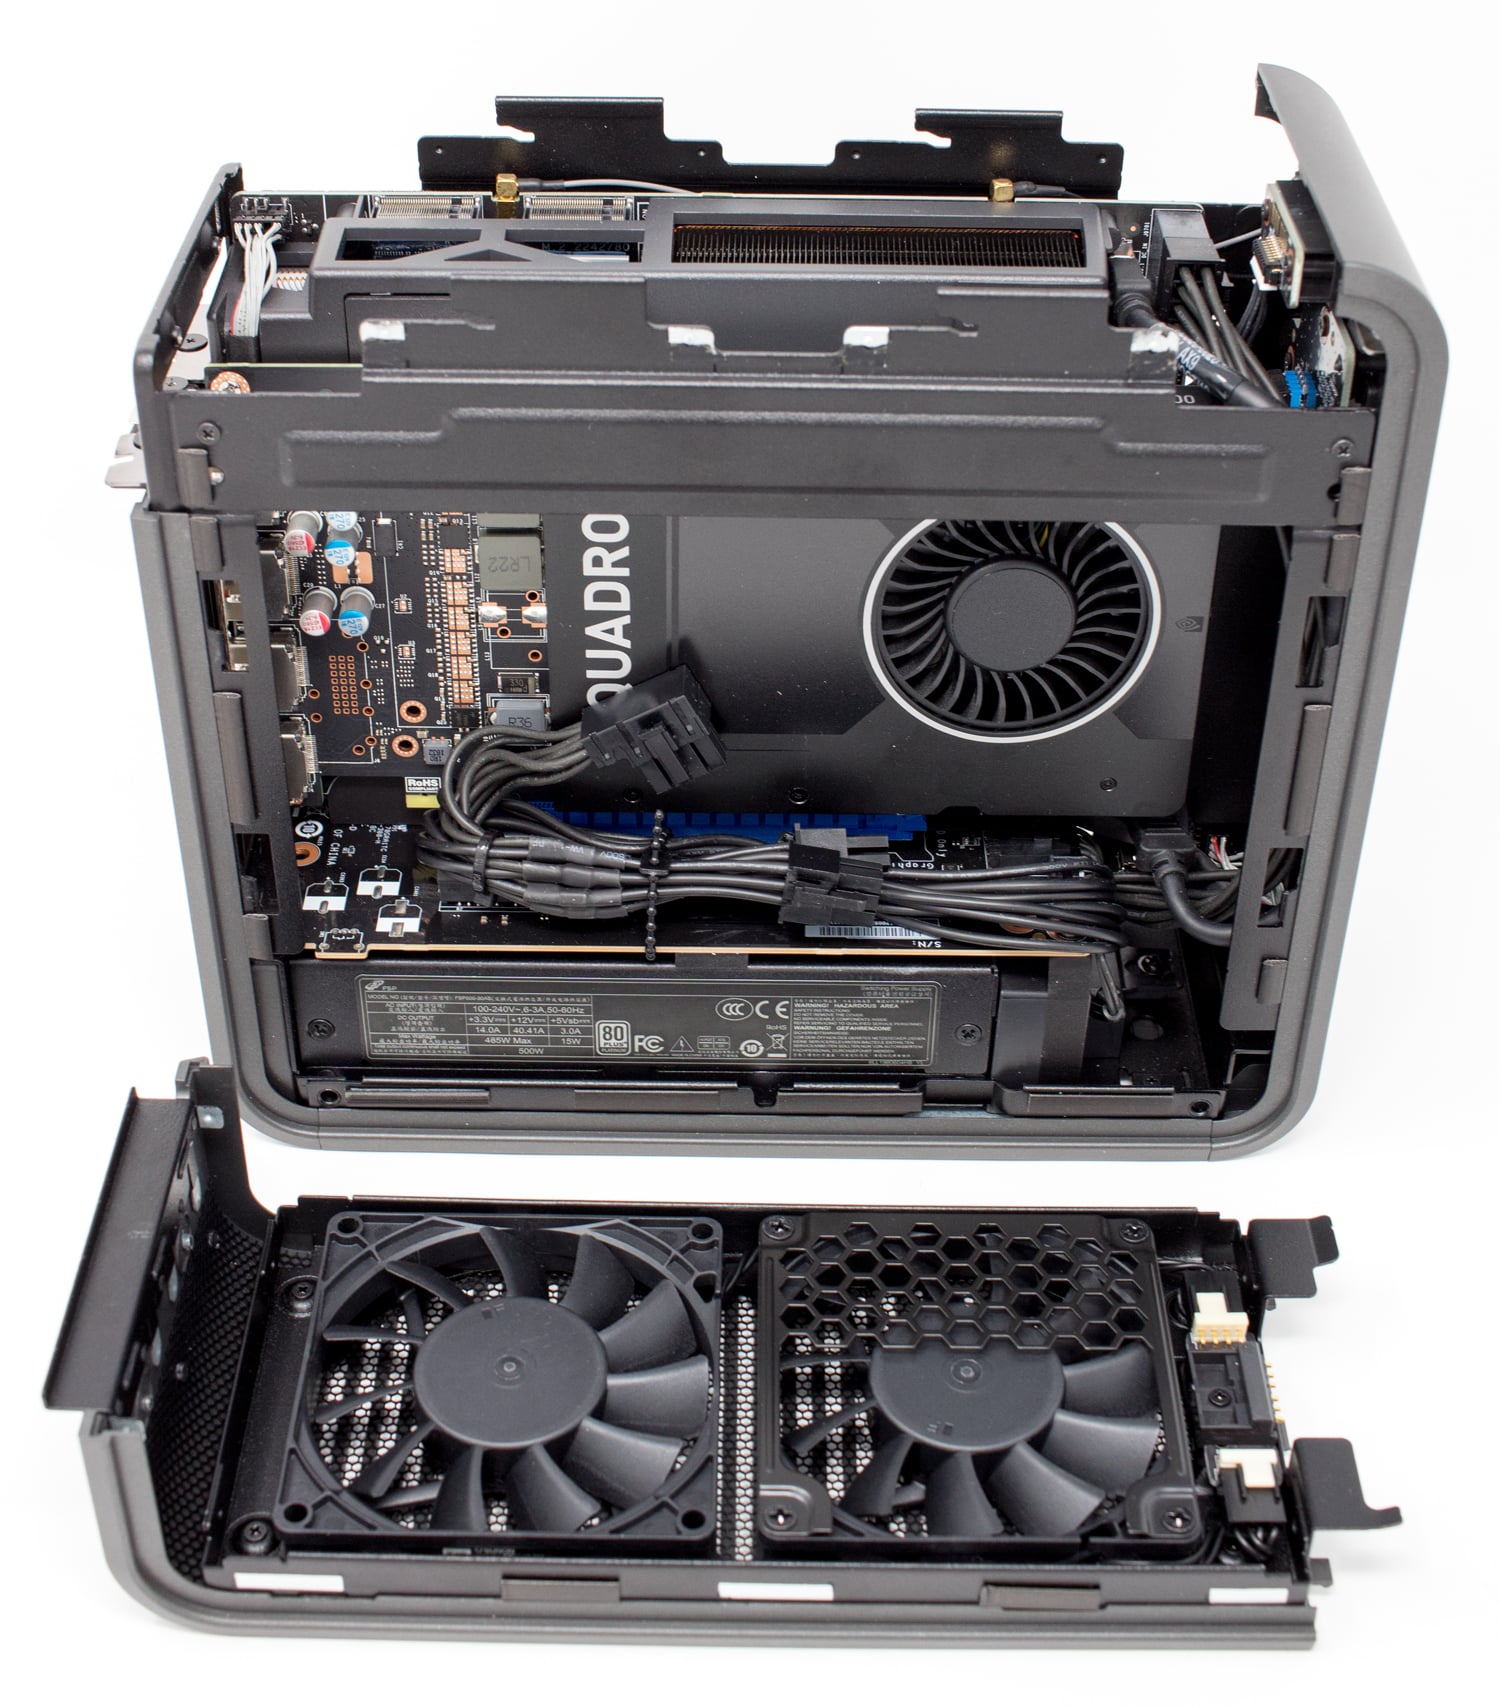
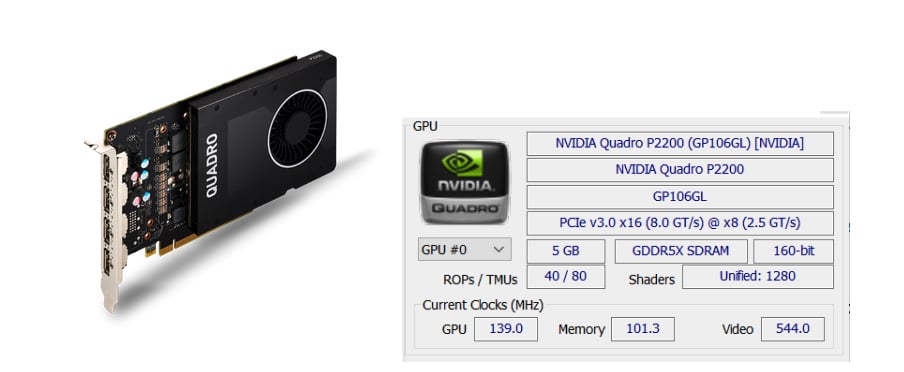
The graphics card in the system is an NVIDIA Quadro P2200. To remove the graphics card, we needed to first remove the Compute Element. The graphics card has a Pascal GPU with 1280 CUDA cores, 5 GB GDDR5X on-board memory, and support for four 5K (5120×2880 @ 60Hz) displays.
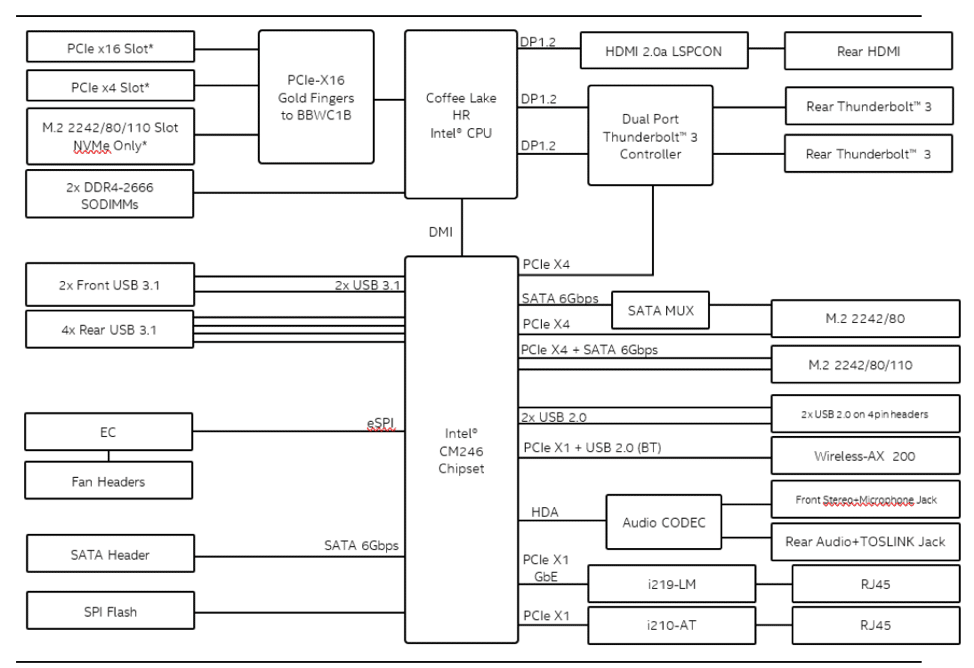
A block diagram of the device shows its connectivity and expansion capabilities.
When putting the computer back together, we replaced the 32 GB of Kingston RAM with 64 GB of Crucial RAM and added two KIOXIA (formally known as Toshiba memory) 1TB XG6 (KXG60ZNV1T02) devices into the empty NVMe slot. The XG6 is an M.2 Gen3 x4, NVMe 1.3a device that is rated at up to 3,180 MB/s and a 2,9960 MB/s sequential read/write speed. It also has an MTBF of 1,500,000 hours and is backed by a five-year warranty. We will use this storage in later testing. We liked this NVMe as it has very good performance per watt, and the sequential write speeds and the latency during sustained workloads is also very good.

Installing ESXi on the NUC
We will be installing and running ESXi off a SanDisk Ultra Flair USB 3.0 64GB flash drive. We like to use these as they are small but have a metal case for durability.
First, we created the bootable install image using the ESXi 6.7 U3 ISO using Rufus. Then, we inserted the USB drive into a USB port on the NUC 9 and powered on the computer. We pressed F2 to enter the BIOS and specified that the device was to boot off the USB drive. We also disabled secure boot, and then pressed F10 to save the settings and reboot. The system booted up successfully to the ESXi installer. We were able to install ESXi on the USB flash drive in less than 5 minutes on the NUC 9 using the defaults.
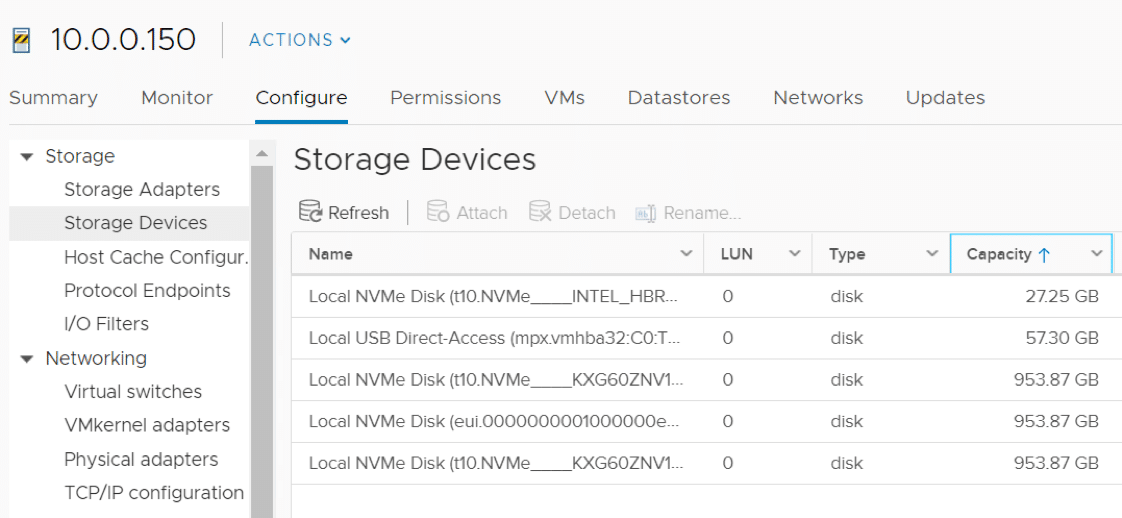
We then added the NUC 9 system to our datacenter with vSphere client. Both NICs as well as the NVMe storage devices on the NUC 9 were shown. The H10 device showed up as two separate devices because it has Optane memory as well as SSD storage. We left the H10 untouched so we could boot back into Windows 10 if desired, and we used the KIOXIA XG6 NVMe devices as datastores.
Intel NUC ESXi Ad-Hoc Testing
At the beginning of this article, we mentioned that we were unsure if the NUC 9 Pro was more valuable to us as an ESXi server or as a powerful graphics workstation. It then occurred to us that we could pass through the graphic cards to a VM and then use VMware Horizon to connect to it. To get an idea of how well a VM would perform with a passthrough graphics card, we did some ad-hoc testing on it, and then reran some of our tests on the VM.
We created a Windows 10 VM with 4 vCPU, 32 GB of RAM, and used the discrete GPU as a passthrough device.

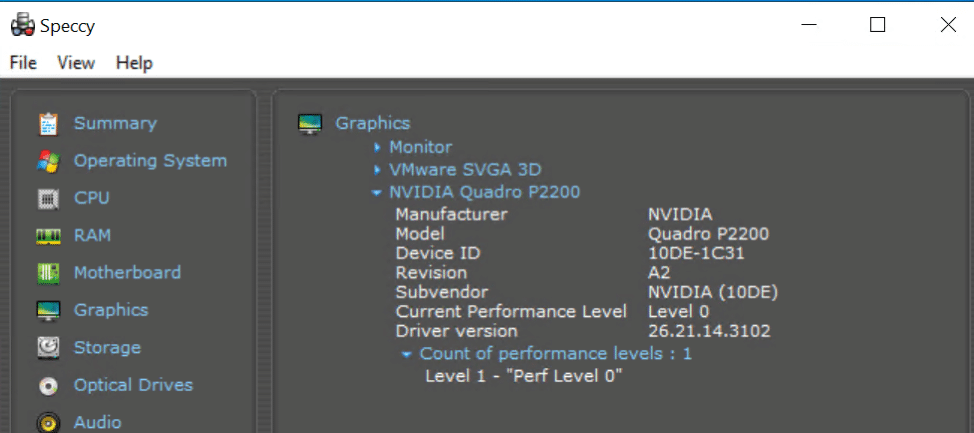
We then installed the Horizon agent, created a manual desktop pool in our Horizon environment, and added the VM to the pool. We logged into the Horizon client and ran Speccy to verify that the NVIDIA GPU did get passed through to the VM.
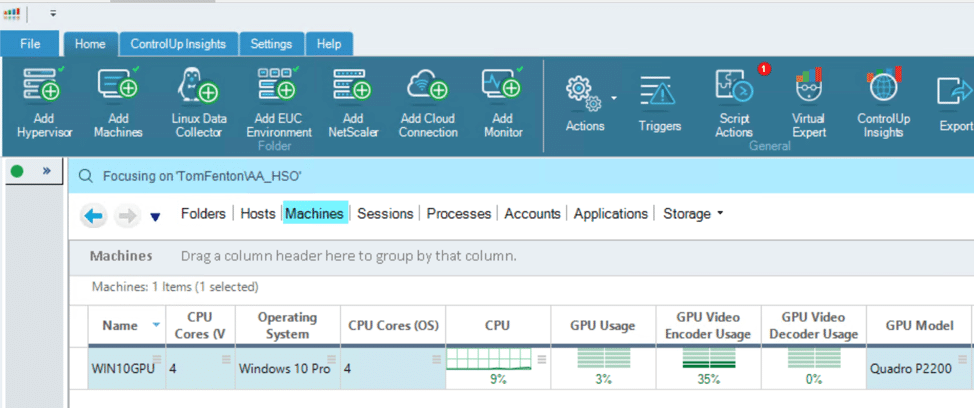
To test the performance of video playback on the device, we played a 4K (4096 x 1720 @ 24 fps) video using VLC in full screen mode on a single monitor. The audio and video played flawlessly.
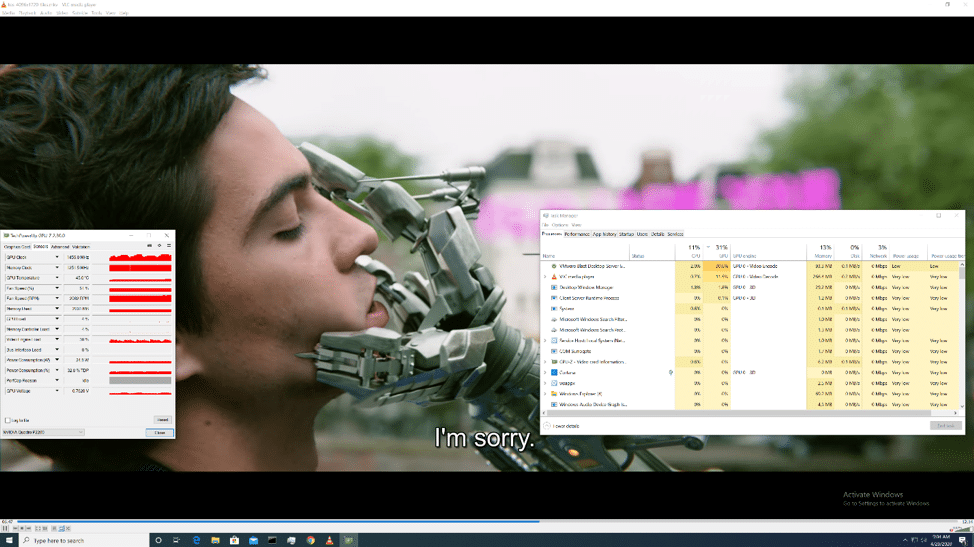
The ControlUp console showed that the GPU usage was ~3%, and the GPU encoder usage was 35%.
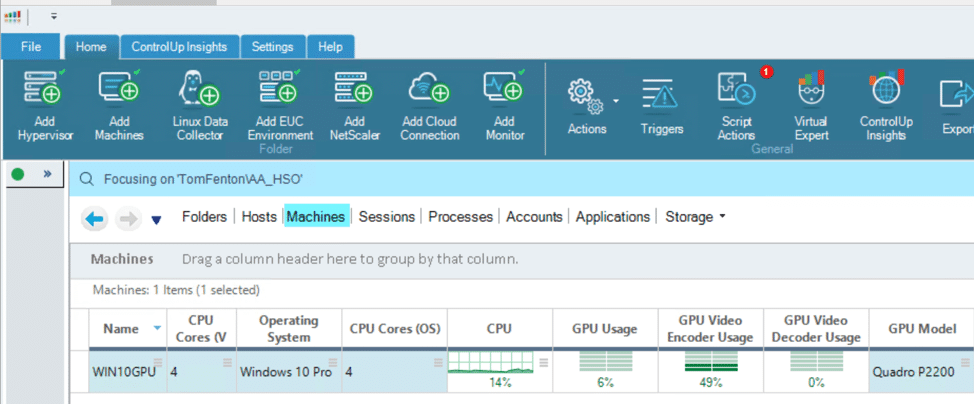
We then configured the Horizon client to display to two 4K monitors and played 4K (4096 x 1720 @ 24 fps) videos on both of the screens to stress the device. We played the videos in native resolution and in full screen without experiencing any jitter.

The ControlUp console showed that the GPU usage was ~6% and the GPU encoder usage was ~49% while playing 4K videos on each monitor.
Testing the GPU Enabled VM
In our previous article, we benchmarked the computer with and without the NVIDIA GPU. To get an idea of how well a VM would perform with a graphics card, we reran some of these tests to see how the results would compare.
SPECviewperf 12.1
First, we reran the SPECviewperf 12 benchmark on the VM. As shown in the table below, the VM was about 15% less performant as a VM than running on bare metal. It needs to be noted, however, that this was ad-hoc testing, and we feel we could easily make the VM more performant with a little tuning.
| SPECviewperf 12.1 | ||||
| Viewsets | NUC9VXQNX
64GB RAM UHD Graphics 630 |
NUC9VXQNX
32GB RAM NVIDIA Quadro P2200 |
VM NUC9VXQNX 4vCPU 32GB RAM NVIDIA Quadro P2200 (passthrough) |
|
| 3dsmax-06 | 15.41 | 115.24 | 99.99 | |
| catia-05 | 22.63 | 119.64 | 106.71 | |
| creo-02 | 13.35 | 110.72 | 106.03 | |
| energy-02 | 0.36 | 9.13 | 9.01 | |
| maya-05 | 16.76 | 99.23 | 90.76 | |
| medical-02 | 6.91 | 41.33 | 39.85 | |
| showcase-02 | 8.88 | 54.65 | 55.64 | |
| snx-03 | 7.11 | 106.68 | 101.41 | |
| sw-04 | 24.78 | 128.45 | 112.33 | |
Table 2SPECviewperf compared
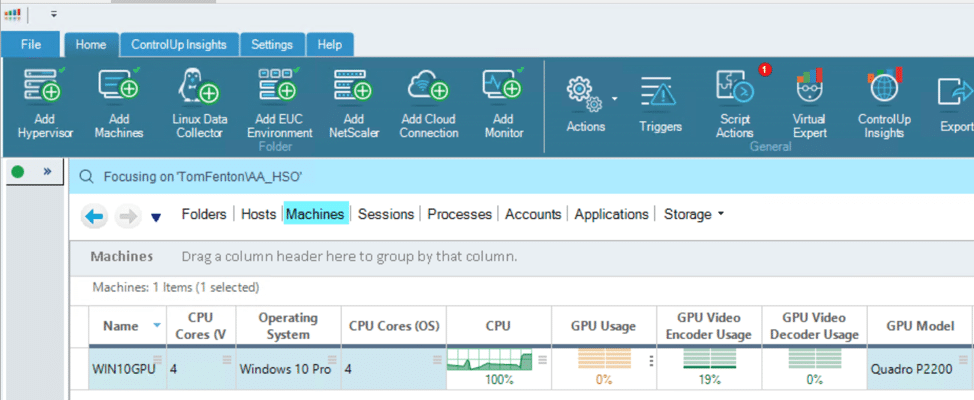
The ControlUp Console showed very high GPU (~97%) usage while the test was running.

PCMark 10
Next, we reran the PCMark 10 benchmark test and compared the VM to the NUC 9 without the graphics card. The VM was ~13% less performant than the bare metal system. As noted above, we feel we could easily make the VM more performant with a little tuning.
| PCMark 10 | |||
| NUC9VXQNX
64GB RAM UHD Graphics 630 |
NUC9VXQNX
32GB RAM NVIDIA Quadro P2200 |
VM NUC9VXQNX 4 vCPU 32GB RAM NVIDIA Quadro P2200 (passthrough) |
|
| Total Score | 4,620 | 6,187 | 5,445 |
| Essentials | 9,259 | 9,392 | 9,057 |
| Productivity | 7,251 | 9,052 | 8,032 |
| Digital Content Creation | 3,987 | 7,549 | 6,024 |
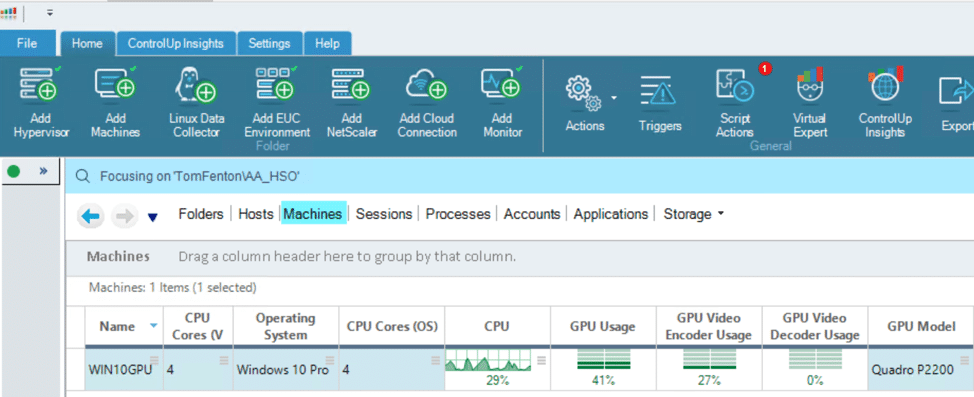
The ControlUp Console showed that the CPU, GPU, and GPU video encoder usage was high during different parts of the PCMark 10 testing.
Conclusion
In this article, we disassembled the NUC 9 and took a deeper look at its hardware components. We then installed ESXi, created a VM that used the GPU card, and performed some testing on it. Now we’ll provide some of our final thoughts on the device.
The NUC 9 Pro is considerably larger than the other NUCs that we have reviewed, but it packs a lot into that amount of space. It is based on a modular architecture and its Compute Element supports 64GB of RAM, has space for two M.2 devices, and contains two Ethernet ports, an HDMI connector, as well as other components. The computer itself has the Wi-Fi chip, two PCIe slots that can be used for expansion, but you would be hard-pressed to use both if you are using a graphics card with it. We found that to get to any of the M.2 storage devices, or to remove the graphics card, we needed to first remove the Compute Element; however, to be honest, unless you are using this as a device test bed, you will seldom need to access these devices. With its multiple USB 3.1 and Thunderbolt ports, the device’s external connectivity is excellent. Brokerages, engineering firms, and content creators would find it difficult to push the limits of this computer.
After juicing up the system up by installing 64GB of Crucial RAM, adding two KIOXIA (1TB XG6 (KXG60ZNV1T02) NVMe devices, installing ESXi, and creating a VM that took advantage of the graphics card, we found that we could use the VM as a powerful VDI connected graphics workstation. This solved our initial dilemma of whether to use the NUC 9 Pro as an ESXi server or graphics workstation.
More information on the NUC 9 Pro kit is located in the link. Intel’s Product Compatibility Tool for the NUC 9 Pro is located this link.


 Amazon