

Plenty of options exist these days for sharing media on a home or business network; from routers with USB-drive support to dedicated NAS-servers. When looking to purchase one of these models you generally don’t know where to look and once you actually do end up buying one, most are difficult or clunky to setup. Synology is a developer of friendly and easy to use NAS-servers ranging from models supporting 10-disk RAID arrays to small single-drive home servers. In this review we look at the Synology DiskStation DS410j, which is a 4-bay home and small business NAS-unit with a wide range of options running on latest DiskStation Manager (DSM) software.
Synology DiskStation DS410j Specifications:
- CPU Frequency: 800MHz
- Hardware Encryption Engine
- Memory Bus: 16bit@DDR800
- Memory: 128MB
- DiskStation Manager (DSM) Version: 2.3-1157
- Internal HDD: 3.5″ SATA(II) x4 or 2.5″ SATA/SSD x4
- Max Internal Capacity: 8TB (4x 2TB hard drives)
- External HDD Interface: USB 2.0 port X2
- LAN: Gigabit, Wireless: With Adapter
- Fan Size: Two 80mm, Noise Level (fan-only):23dB
- AC Input Power Voltage: 100V to 240V
- Power Consumption: 42.9W (Access); 16W (HDD Hibernation)
- Operating Temperature: 5°C to 35°C (40°F to 95°F)
- Storage Temperature: -10°C to 70°C (15°F to 155°F)
- Size (HxWxD): 168mm X 184mm X 230mm
- Weight: 2.23kg
Aesthetics
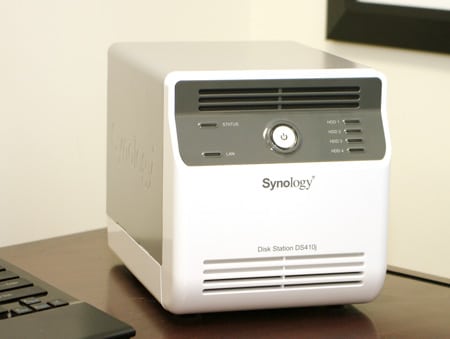
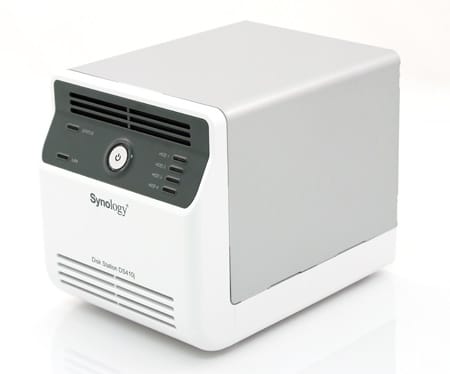
The Synology DiskStation DS410j has a clean appearance with a glossy white front and silver body. The front of the DiskStation is plastic with seven indicator lights and a power button. The rear of the unit has one LAN port and two USB ports for expansion. While it does have a rather humble appearance the body is very durable and constructed of very sturdy components.
The front plastic panel feels solid with no creaks or flexing when carrying the system. The main body panel that covers the drive assembly is a heavy-gauge steel panel that is held in place with four thumbscrews from the back side. The rear panel is also metal, with a built-in hinge that folds down to access the internal drives. As far as build quality goes you might even be able to go as far as standing on it without the thing being much worse for wear.
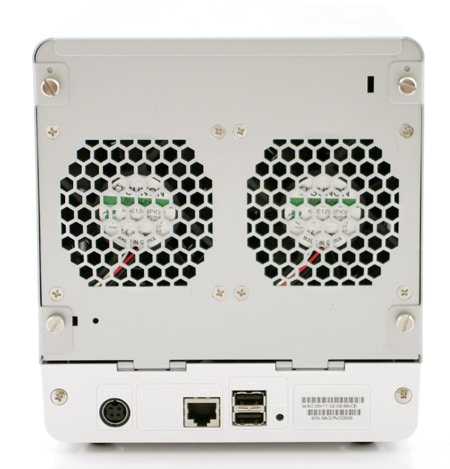
Noise is not a problem for the DS410j when it comes to vibration or fan noise. Synology included four soft rubber feet on the bottom of the unit to help isolate hard drive noise from surrounding objects. The two 80mm fans to an excellent job of keeping the hard drives cool (most drives stayed between 30-35C as indicated by internal sensors) and doing it without being noticed. The 80mm fans operated at a very slow and quiet speed, keeping a steady breeze flowing through the unit without being heard standing three feet away in a quiet room. At one point in the review we did manage to get a weird vibration in the body of the server but it turned out to be our fault with one of the fan power wires being caught near the hinge causing the unit to not close entirely.
Disassembly
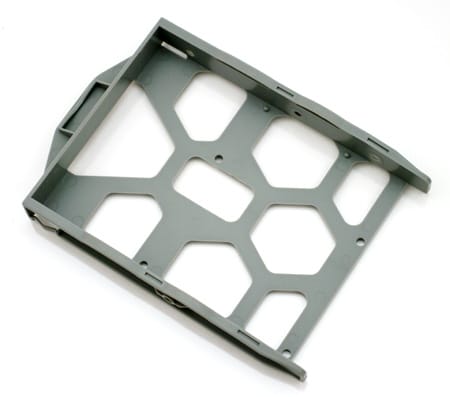
The Synology DiskStation DS410j is very easy to take apart for servicing and initial setup. To access the internals you simply remove the four thumbscrews on the rear of the chassis which hold on the cover. With the screws removed you can simply lift the cover off and pop down the rear panel which is on a hinge to access the drive bays. Synology includes a full supply of hardware with each DiskStation model allowing the end-user to install any configuration of drives that the unit supports. In our case the box included four drive-trays (which support 2.5-inch and 3.5-inch drives) with plenty of coarse and fine-pitch screws for different drive types.
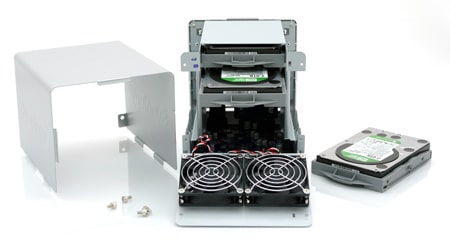
The included trays are dual-purpose with screw holes for 2.5-inch and 3.5-inch hard drives and SSDs. The backplane visible inside the DiskStation appears to have the extra notch for SAS drives, but Synology doesn’t include SAS-interface support on any model at this time.
While the design of the DS410j is easy to service it doesn’t appear to be setup to allow simple hot-swapping of drives while the unit is operating. Some NAS units support this with external drive-bays, including some more expensive Synology business models. For the intended user of this model we don’t feel that uptime is something on the user’s mind when replacing or upgrading drives in this model. That type of operation will be few and far between.
Setup
Out of the box the Synology is a server without any software. The DiskStation DS410j uses the storage drives for the operating system, with a RAID1 array spanning each drive in the unit regardless of individual volume setup. This is different from other systems, like Windows Home Server, which only use the primary drive for the operating system. One benefit is any drive except one can be removed and the system will still turn on with all settings retained.
To get the NAS running initially you simply install the drives you want to use and turn the system on. When you hear it beep, it’s ready for the next stage. Synology includes management software that you can install run from a system on the same network that allows you to see the status of available Synology servers and remotely install the operating system. In this review we used the latest DSM software, version 2.3-1157, which is loaded on a single drive in about 10 minutes start to finish.
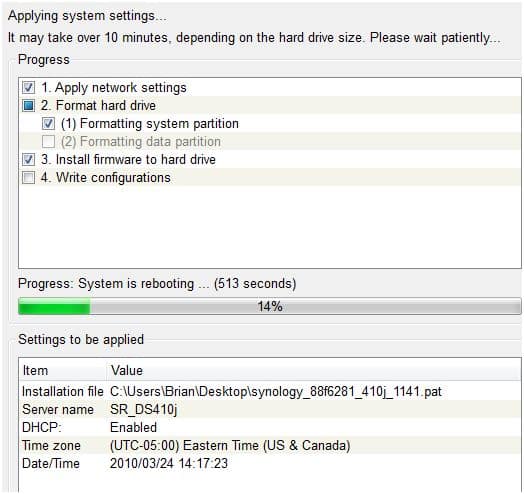
The first stage of the initial setup is primarily for naming the DiskStation, setting your admin password and loading on the operating system. After this stage is done you connect to the IP address to access the Synology’s webserver which is the primary means of configuring and operating your NAS.
Once the system is up and running the next step in the process is telling the Synology how you want your drives configured. The list below shows all the different modes it will support:
- Synology Hybrid RAID
- iSCSI Target (Max size: 16TB):10
- Volume Type: Basic, JBOD, RAID 0, RAID 1, RAID 5, RAID 5+Spare, RAID 6, RAID 10
- RAID Migration: from Basic to RAID 1, Basic to RAID 5, Basic to RAID 5+Spare, RAID 1 to RAID 5, RAID 1 to RAID 5+Spare, RAID 5 to RAID 5+Spare, RAID 5 to RAID 6
- Expand RAID 1, RAID 5, RAID 5+Spare or RAID 6 with Larger Hard Drives
- Expand RAID 5 by Adding a Hard Drive On The Fly
For the purposes of this review we tried out a number of these storage options, including single drive, RAID1, RAID5, and the Hybrid RAID. The drives used in this review include two 1TB Western Digital Caviar Blacks for the single and RAID1 tests and three 2TB Caviar Greens for the RAID5 tests. A single 2TB Western Digital RE4 was used for expanding the RAID5 but not as part of our benchmarks.
The main draw to the Synology DiskStation units is how incredibly easy they are to setup, manage, and just forget about in the background. Compared to Windows Home Server which might need countless updates out of the box to get up to speed, the Synology DiskStation is up and running the latest version of software since it doesn’t come pre-installed. Since the entire operating system is replaced in one fell swoop you only have to put up with one reboot and you are finished.
The software interface is also very modern, exploding with an AJAX interface and organized in a way that even the most basic of users will understand. Synology is kind enough to offer a live interactive demo of the DSM software here (username=admin/password=synology).
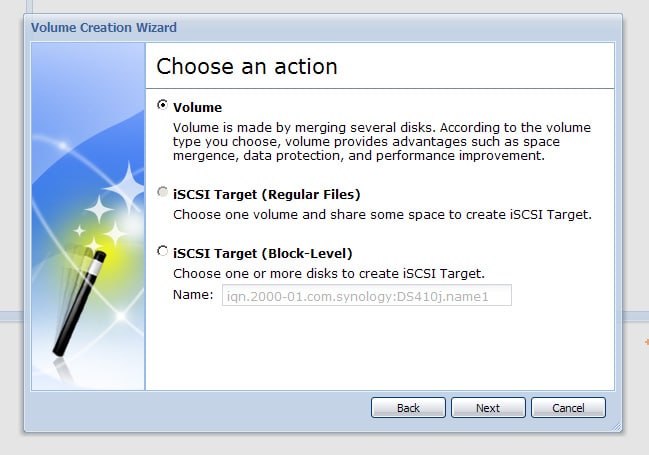
The following outlines the process of setting up a volume on the Synology DiskStation DS410j.
Under the storage section, select volume manager, and then click the “create” button. A volume Creation Wizard pops up that guides you through the automated process of making a volume.
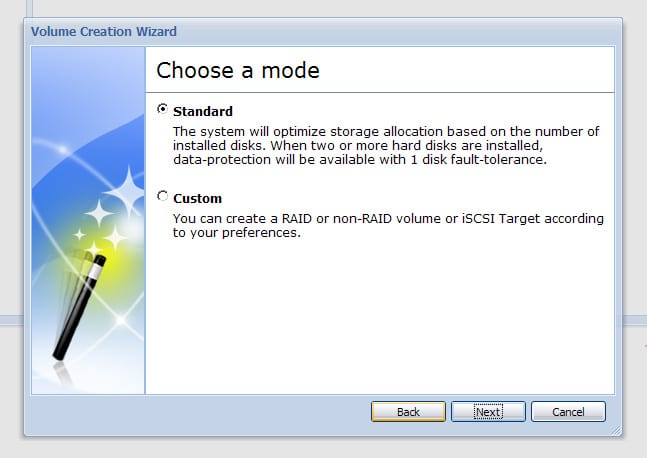
Standard is used for automatically generating the best array given the drives currently in the system. It puts a priority on parity so your information is safe in the event of a single drive failure. It is also the option you pick if you want to take advantage of the Synology Hybrid RAID which lets you use as much of your drives capacity as possible, even if the drives don’t match in size.
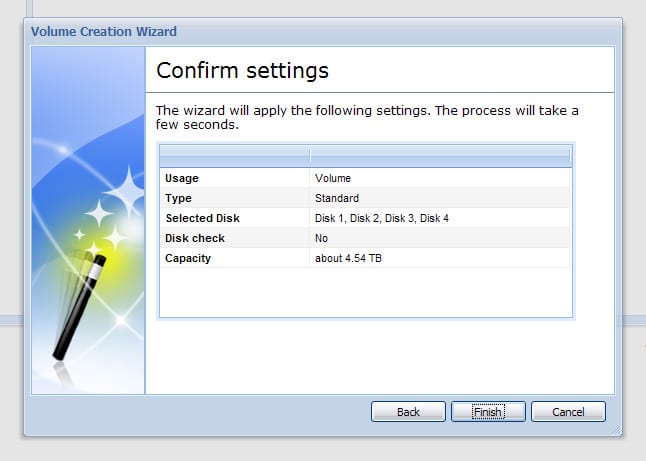
In this setup we have three 2TB drives and a single 1TB drive. Using the standard (easy) method the drives combine to make a volume with a 4.54TB capacity.
If you prefer to setup your own type of RAID, chose custom where you can create local volumes or iSCSI targets.
If we go the custom route and try to make a RAID5 array spanning all of the drives, we get a total capacity of 2.72TB, whereas with the Hybrid RAID it had a capacity of 4.54TB.
Once that is done you drop out of the wizard and watch the status screen to see when your volume is up and running. In this case to build a RAID5 volume spanning three 2TB drives it took a little over 30 minutes start to finish.

Benchmarks
For our performance benchmarks we connected to the Synology DiskStation using a standard Samba file sharing protocol as well as iSCSI to directly interface with the arrays on a block level. Our tests revolved around IOMeter and CrystalDiskMark to show average speeds and include latency for 4K transfers.
In the first 2MB sequential file transfer test we rank the speed of single drive performance, RAID1 and RAID5 using Samba and block-level iSCSI. As you can see in the chart outlined below, speed declined as more drives were added to the RAID array. Block-level iSCSI had slower read speeds than the matching Samba configuration, but offered greater write speeds. The fastest performance in both modes was rendered by using a single drive without any redundancy.
Note that this isn’t the case with high-end RAID setups running inside more powerful computers. We feel most of this is a result of the Synology’s consumer hardware (800MHz processor and 128MB of RAM). In all of our tests the processor was pegged with processes surrounding the file transfer, meaning the speeds were CPU-limited. As you move up the scale with the Synology servers the amount of RAM goes up considerably. The business oriented DS410 offers a faster 1.06GHz processor and 512MB of RAM.
In our 2MB random transfer test with IOMeter the same pattern emerged with the performance slowly declining as more drives were added to the mix. Just like the 2MB sequential transfer test the iSCSI connection offered the fastest write speeds while the Samba interface had the highest read speeds.
4K random transfers showed speeds that were roughly in line with what you might see from a drive attached directly to your system, but slightly higher thanks to the active caching on the server side.
Latency is probably the most important aspect to pay attention to if you plan on mounting volumes from the DiskStation as local drives on your computer. Quick transfer speeds might work fine for streaming media, but if you installed an application to that volume the load times and interaction times would go up significantly if average and max latency was a problem.
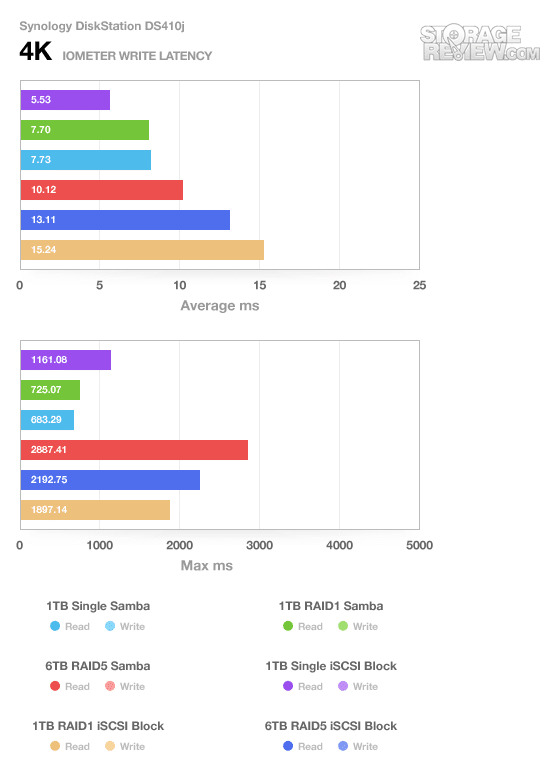
As the RAID Array size increased with more drives added to the mix, so did the average latency and max latency. The quickest setup tested was the 1TB single drive iSCSI interface with a 5.5ms access time, but it also had upward of 1 second of lag at times. The RAID5 arrays came up with the longest peak latency times, with the Samba share almost hitting 3 seconds.
CrystalDiskMark showed similar results to our IOMeter tests when comparing single drive access through both Samba and iSCSI. The one significant change to note is the increased 4K write speed. Some of this seems to be a result of CrystalDiskMark having shorter bursts and server-side cache being able to buffer more as a result.

We also timed basic tasks such as building volumes and expanding volumes. For a worst case scenario we created a 2TB x 3 RAID5 using Caviar Green drives and expanded the RAID5 with an additional 2TB drive. That process in itself took 30 hours with no outside activity, besides random progress checks through the webserver, to fully expand the RAID5 volume. We lost count when it finished expanding the RAID during the middle of the night on the second day. Needless to say, we recommend you pick all of your drives off the bat instead of looking to expand later on.
Power Consumption
Power usage these days can be a big concern as the cost of energy goes up. When you are dealing with devices that operate at all times of the day, knowing how much a device will cost to operate can be important. As an embedded platform the Synology DiskStation DS410j has a huge advantage, drawing very little power not counting the hard drives. Synology claims the unit needs as little as 16w to operate with the hard drives in hibernation and 43W while active (with four drives). Using the 43w claim, if you ran the server 24/7 with a KWH cost of $0.11, it would cost you about $41 a year to operate or 11 cents a day.
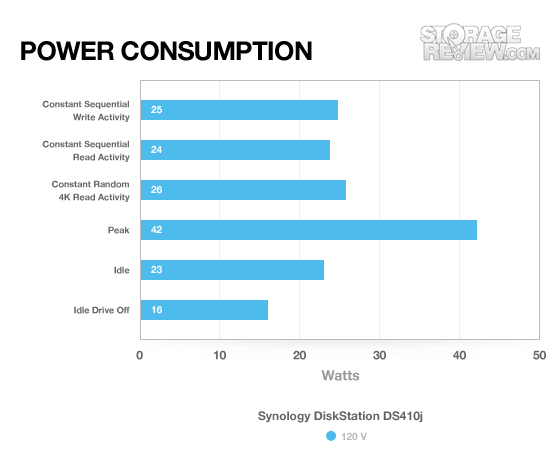
We tested the DS410j with a single 1TB Caviar Black so we could measure as close to the server’s power consumption instead of the drives themselves. Some drives will be more power friendly than others and vary greatly between models. For that level of detail we turn you to our individual hard drive reviews. The peak power consumption at startup was measured at 42 watts, but all normal operations happened between 23 and 26 watts with the drive active. When the drive spun down from idle activity the power dropped to 16 watts as indicated by a Kill-a-Watt.
Warranty
The Synology DiskStation DS410j has a two-year parts and labor warranty. They also offer extensive product support through a community driven forum. Software updates are readily available through the support section on the Synology website. Users can also run 3rd party software compiled manually.
Conclusion
The Synology DiskStation DS410j is an awesome consumer-grade NAS but it does have its limitations. The interface is a beauty, setup is a breeze, and power consumption is very low. The downside is the embedded hardware platform with a relatively low clockspeed and limited system RAM. Power users interested in the Synology interface should consider looking in the small business and above category that makes use of the faster processors and larger sums of system memory.
At its heart the 4-bay DS410j has the same hardware configuration as the single-bay DS110j. As we have shown in the benchmarks the speed of the server over a network is CPU limited, and as more drives are added to the equation speeds drop. For the average home user looking to store music, movies and backup computers the speed concerns we found wouldn’t be a problem. Even at its slowest speed it could still stream a 1080P HD movie with ease and have enough bandwidth left over for other tasks.
Synology has hands-down one of the slickest software interfaces I’ve seen in a long time. It is easy to use, has a very modern vibe with its AJAX-saturated webpages, and it doesn’t have as many possible security problems since you are guaranteed to be running the latest software off the bat since you install the operating system yourself. Overall the DiskStation DS410j might not be the fastest NAS around, but for $350 online (diskless) you will be hard pressed to find something easier to use.
Pros
- Best looking NAS interface
- Easy to setup
- Very low power
Cons
- Gigabit speeds are CPU limited
- Not hot-swap friendly
Bottom Line
With a great user interface and more options and settings than most users will need, the Synology DiskStation DS410j offers a load of features at a reasonable price. We find it to be a great alternative to Windows Home Server, especially for those who want to get more out of the NAS and enjoy tinkering with the advanced features of the Synology.


 Amazon