

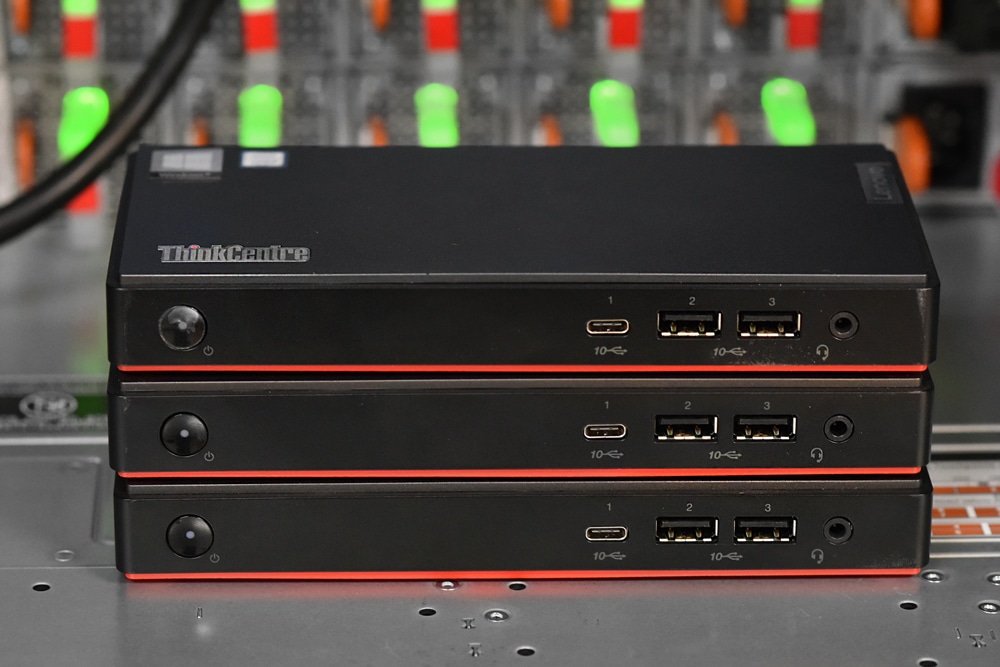
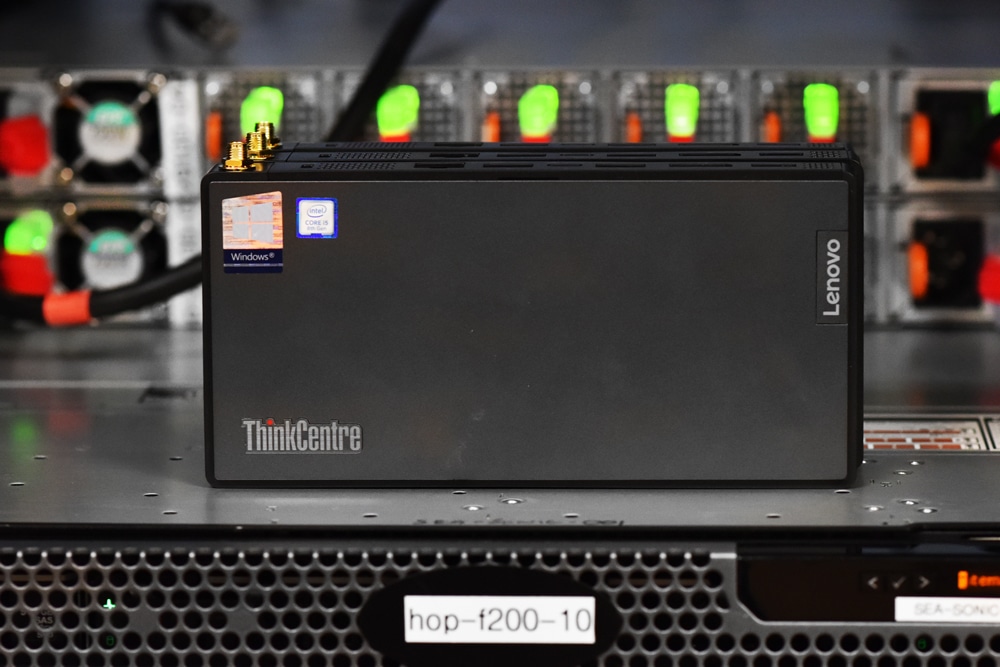
With this lab effort, we wanted to create a tiny but powerful 3-node Proxmox VE 6.3 cluster. We’ve been impressed by the Lenovo Nano line of PCs, so we snagged three more for this experiment. Using Lenovo ThinkCentre m90n’s, we can demonstrate the amount of computational power and storage performance, that can be fit in an area half the size of a shoebox. While creating tiny clusters comes with compromises, we think this solution is an excellent combination of performance and price, which makes this Proxmox solution excellent as a learning/dev cluster or even a serious contender for lightweight edge/retail computing.
Why Proxmox VE?
When setting up a hypervisor cluster VMware ESXi and vSphere are usually the first choices, however, when consumer hardware comes into play complications start to arise. ESXi requires a supported Ethernet adapter to be present to complete the install, the I219-LM Ethernet card built into the M90n is unsupported by ESXi, but can be made to work with a custom ESXi image with additional drivers for USB NICs. Unfortunately, the NIC drivers that are not officially supported are unreliable at best so we sought an alternative.
Proxmox VE is an ideal choice for homelabbers who want to run hypervisors on consumer-grade equipment. It is also the solution to the unsupported Ethernet drivers in ESXi. Unlike ESXi, Proxmox supports the I219-LM Ethernet card making setting up our 3-node M90n ThinkCentre cluster a breeze. Proxmox VE was recently updated to version 6.3 as well. We’ve been a bit slow to check out the updated platform; this tiny cluster was a perfect excuse.
Tiny Proxmox Cluster Hardware
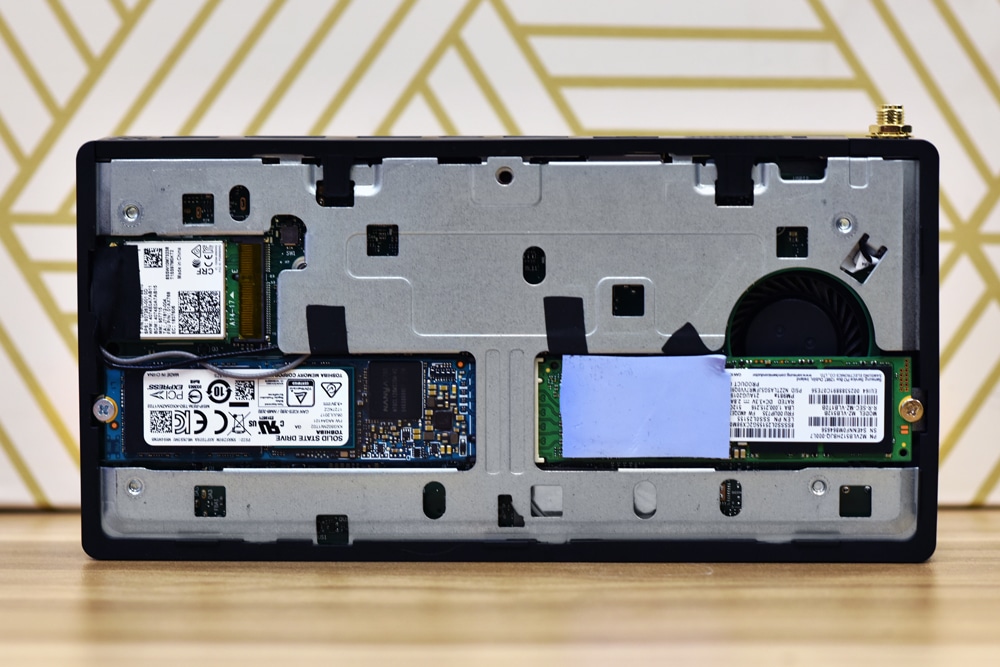
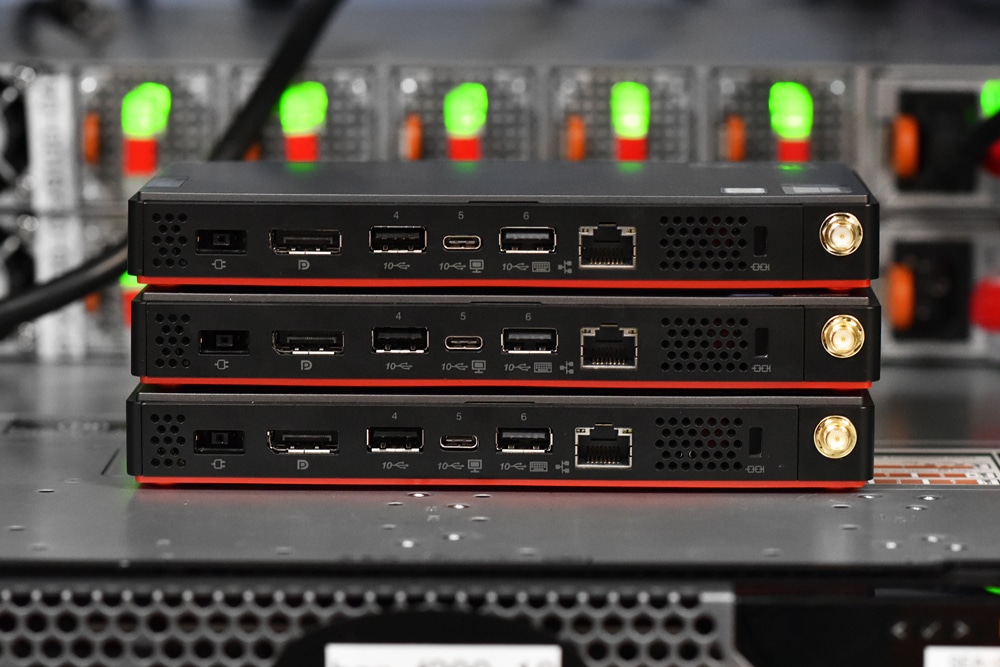
Our 3 Lenovo ThinkCentre M90n’s are kitted out with 8th gen Intel i5-8265U processors, 8GB of DDR4 RAM, and 2 NVMe drives each. When our cluster is complete it will have access to 24 cores, 24GB of RAM, and around 3.5TB of NVMe storage. The flexibility of these little systems to offer two SSD bays makes them really interesting for this type of lab work. While we’re using the standard M90n here, Lenovo does offer an IoT version that’s fanless and happens to offer a second NIC, but less onboard DRAM.
Thermal Activity
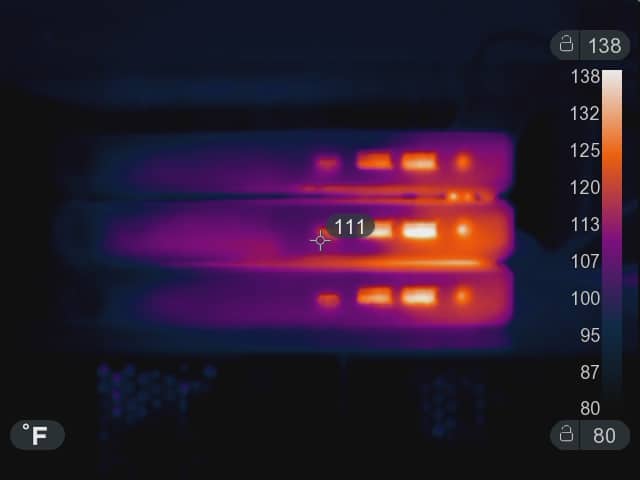
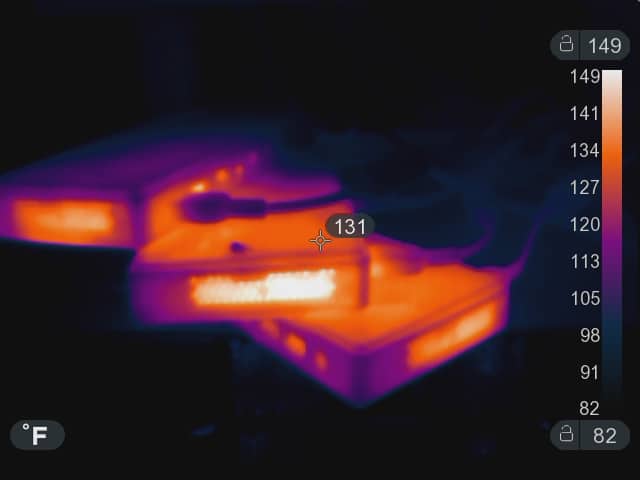
While skipping ahead slightly, it is important to note that when you start pushing little hardware such as the Lenovo M90n cluster to its peak, you need to make sure airflow and thermals are taken into consideration. This means running it on a nice flat surface, making sure air intakes and outlets are unblocked, and maybe considering not stacking them. Using our Seek ShotPRO camera we took a look at the Nanos under load.
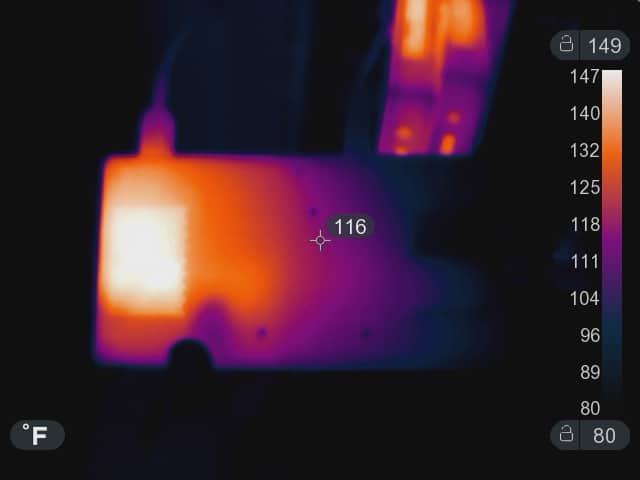
As we started pushing the limits of our M90n cluster, we noticed the hotspots on the case roughly aligned with the intake port when you start stacking these. A spacer or other type of insulating block if you want to stack them would probably address this. Again this was more of after we ran them at high storage and CPU loads we noticed things heating up.
 Overall though the M90n platform proved to be optimally suited for a low-cost, low-power, and small-footprint homelab platform. The two NVMe M.2 slots really won us over though, since it allowed us to pack each Nano full of flash and avoid the use of hard drives.
How to Install Proxmox
Installing Proxmox is quite simple, download the latest Proxmox iso from the Proxmox website and write it to a USB device. Booting the Lenovo Nano from the Proxmox installation device we just created will start the Proxmox install, just follow the instructions. When installing on multiple computers for use in a cluster be sure to give them different hostnames so you don’t have to go back later to change them. After the install is complete your screen should look something like this:
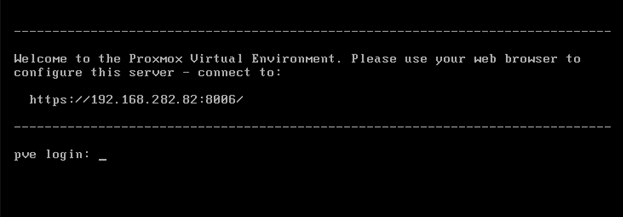
In your browser, on another computer within the same network, connect to the given address. If the web-GUI cannot be reached the IPv4 address can be changed manually by editing the /etc/network/interfaces and /etc/hosts files. If you have successfully reached the Proxmox web-GUI you will be prompted for the username and password, you created in the installation process.
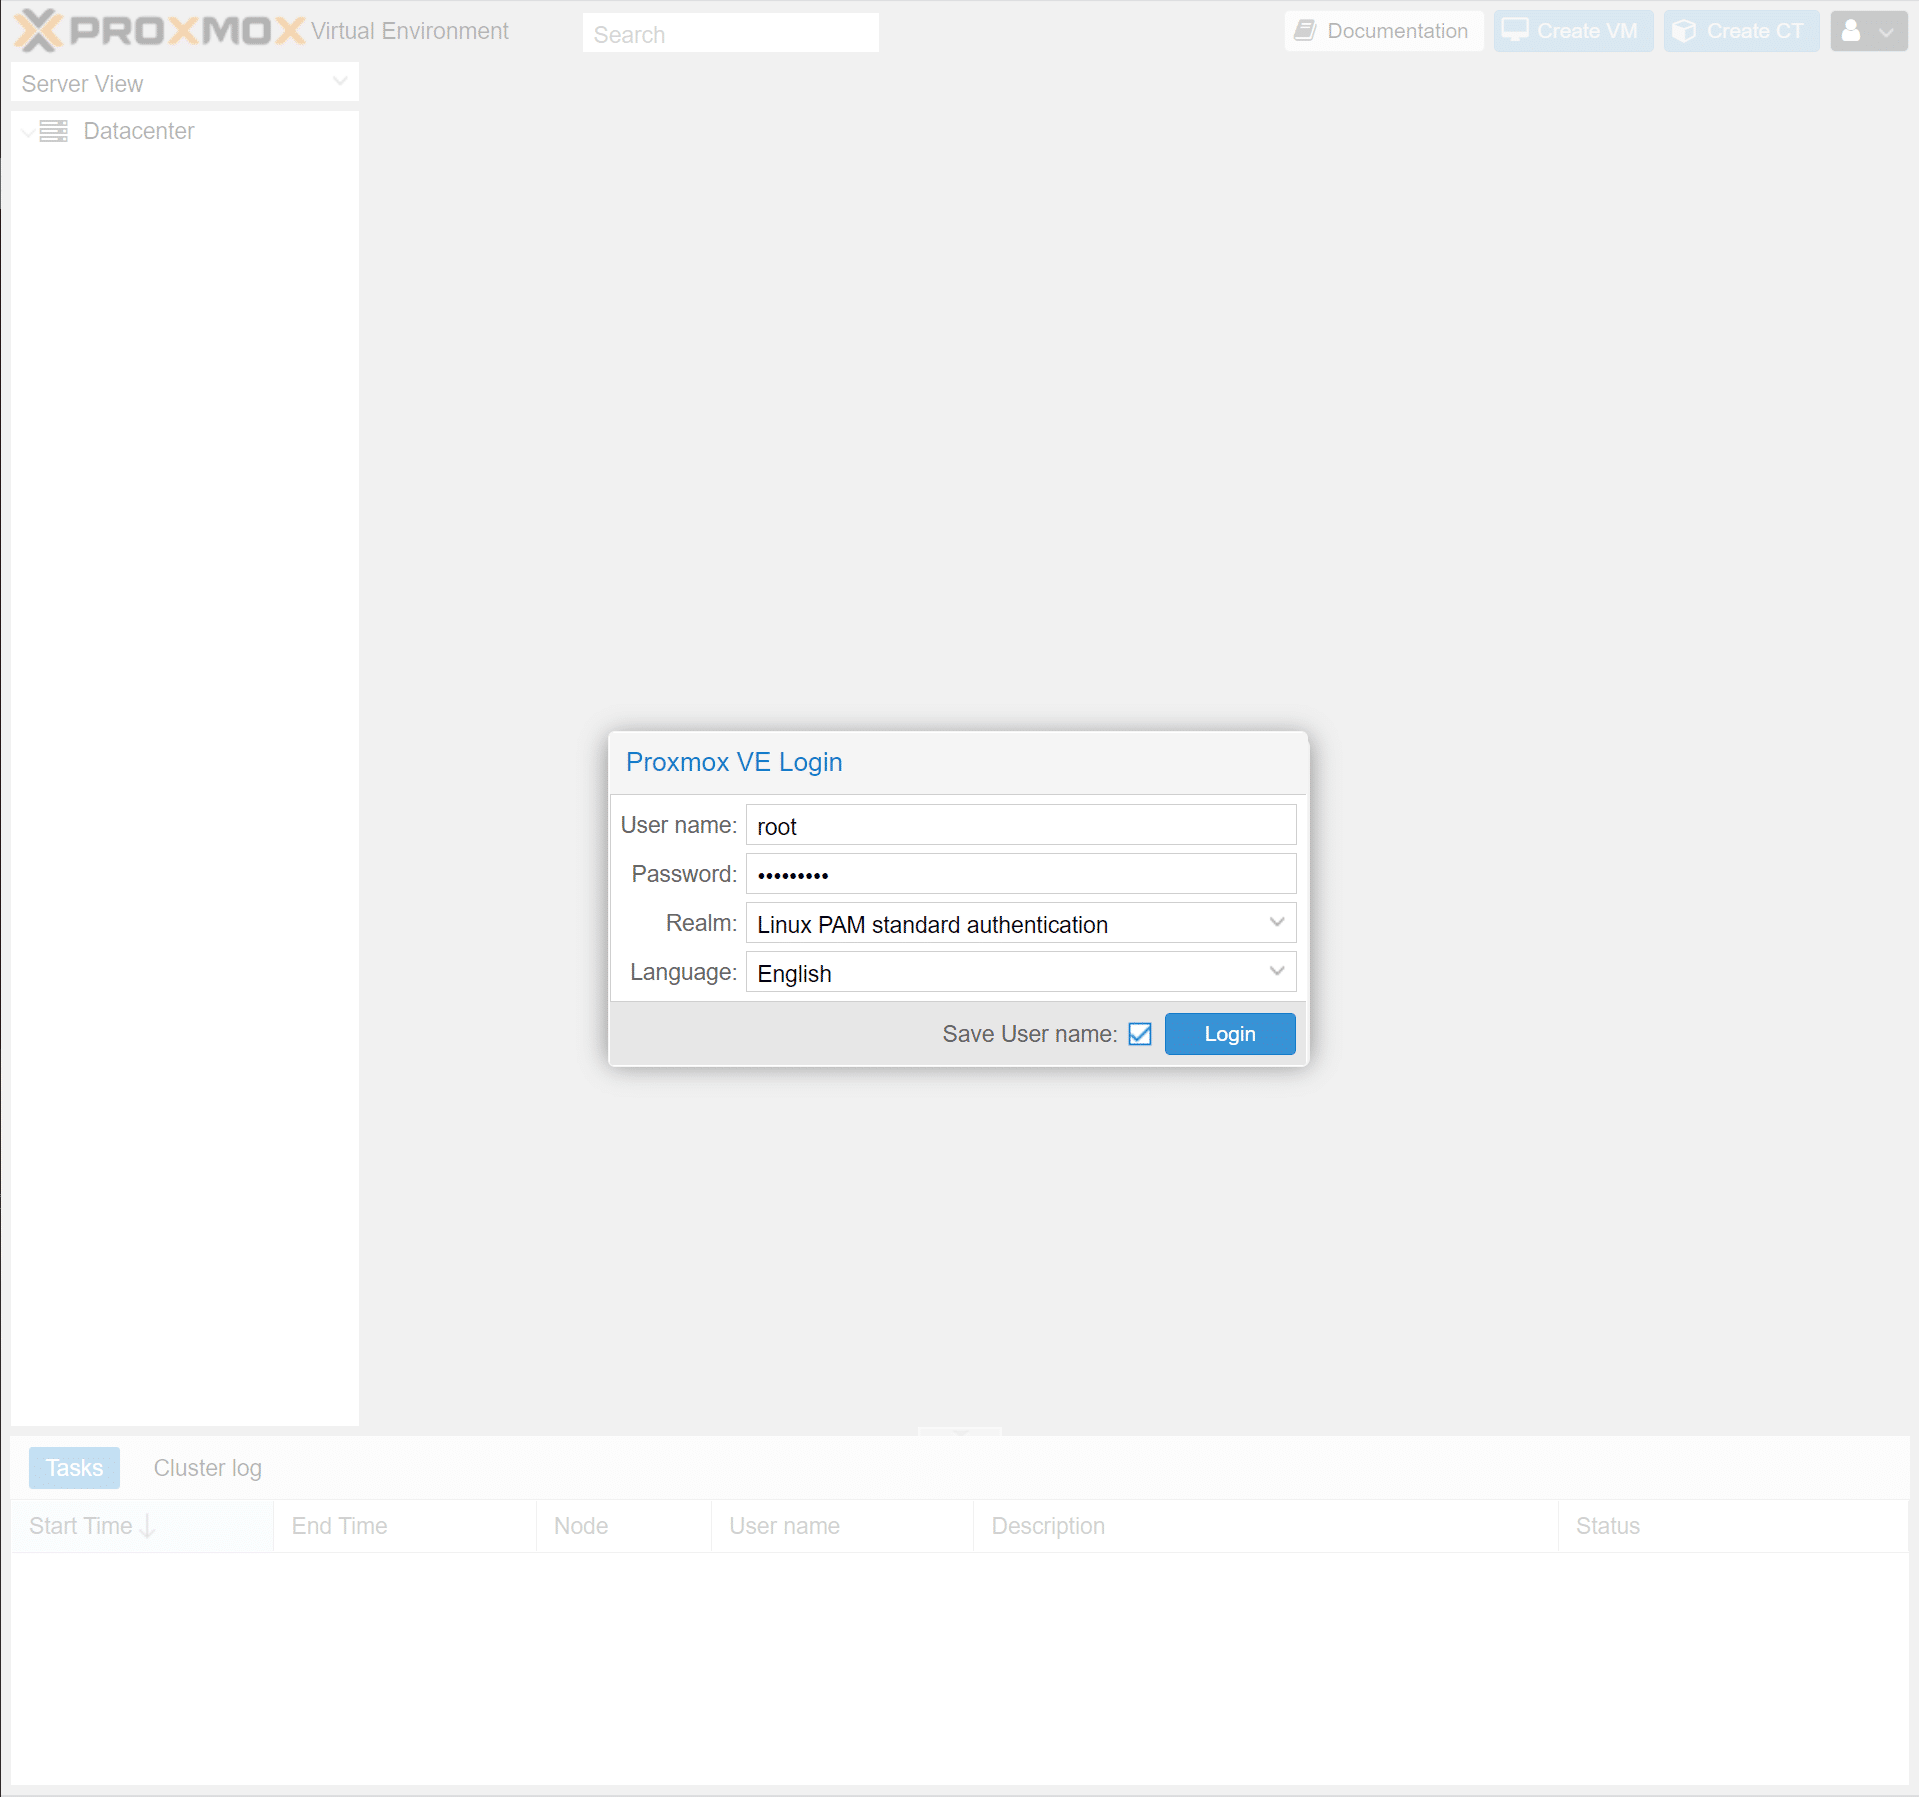
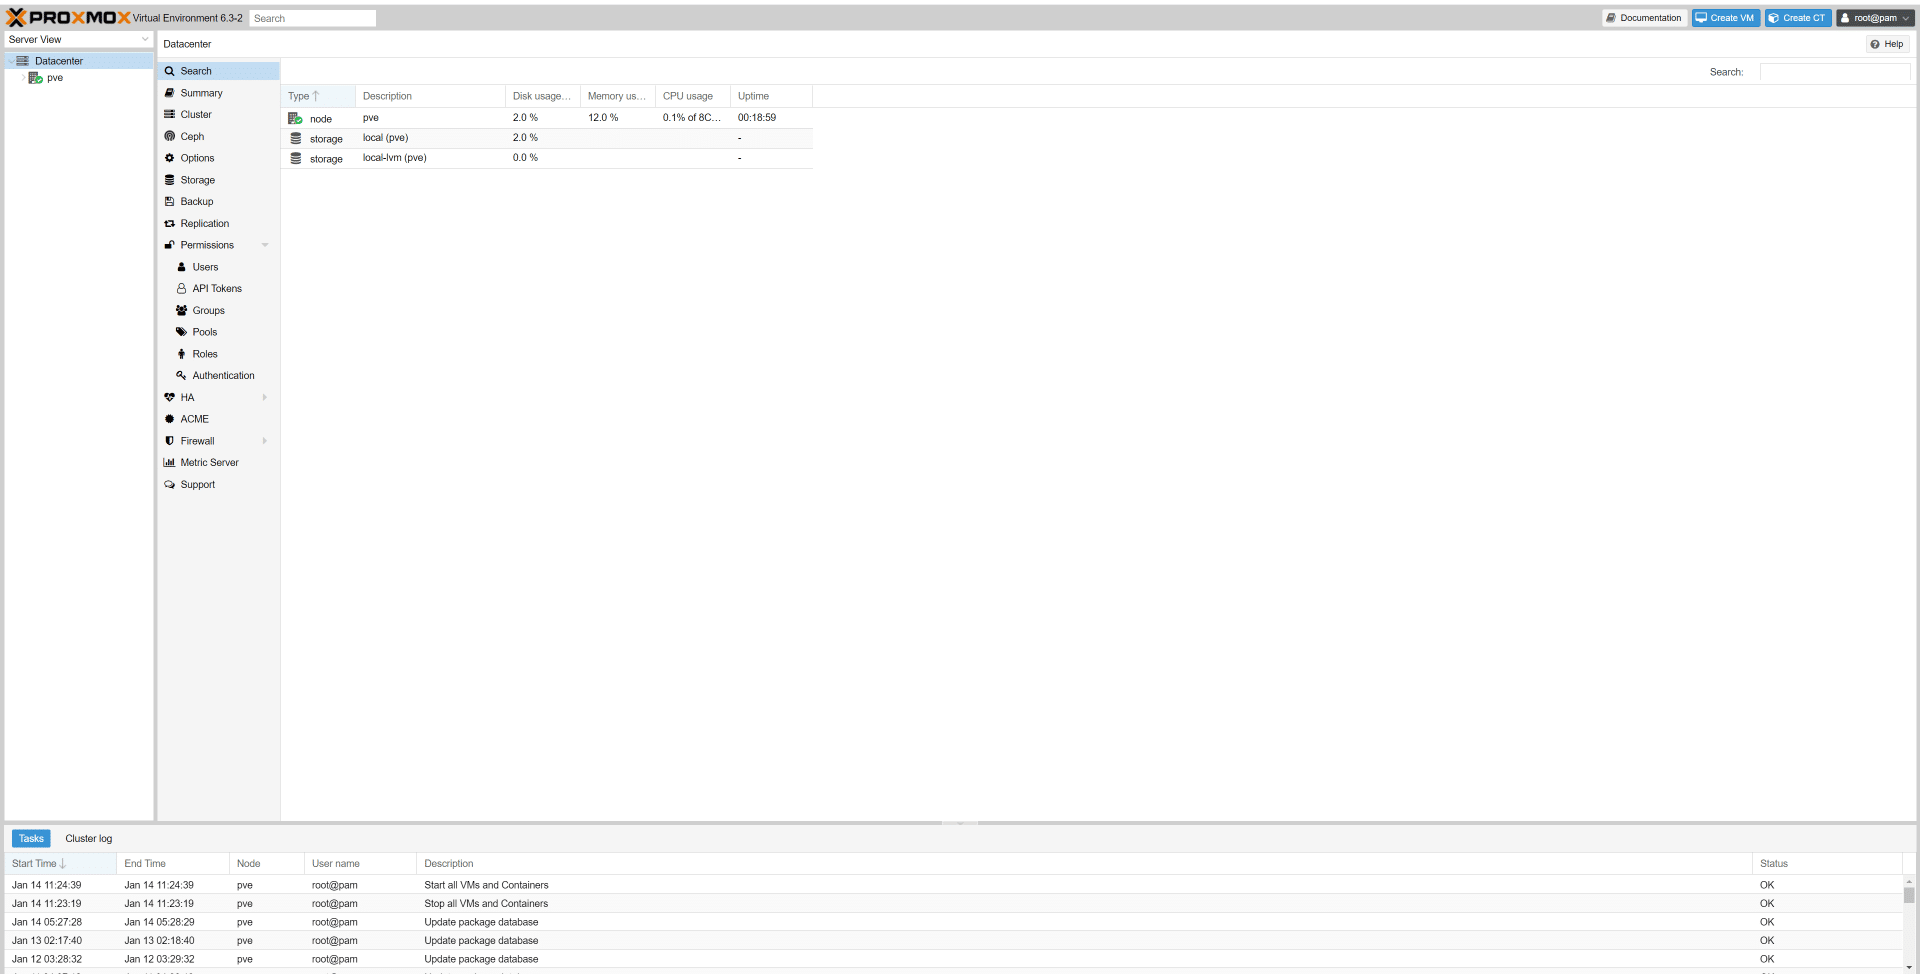
A successful login will greet you with the summary page of the datacenter, if your goal is to use a single computer as a hypervisor this is where you would stop. We are creating a Proxmox cluster, so our next step is to verify that our other 2 nodes have been set up correctly by accessing their respective web-GUI’s and logging in.
Configuring a Proxmox Cluster
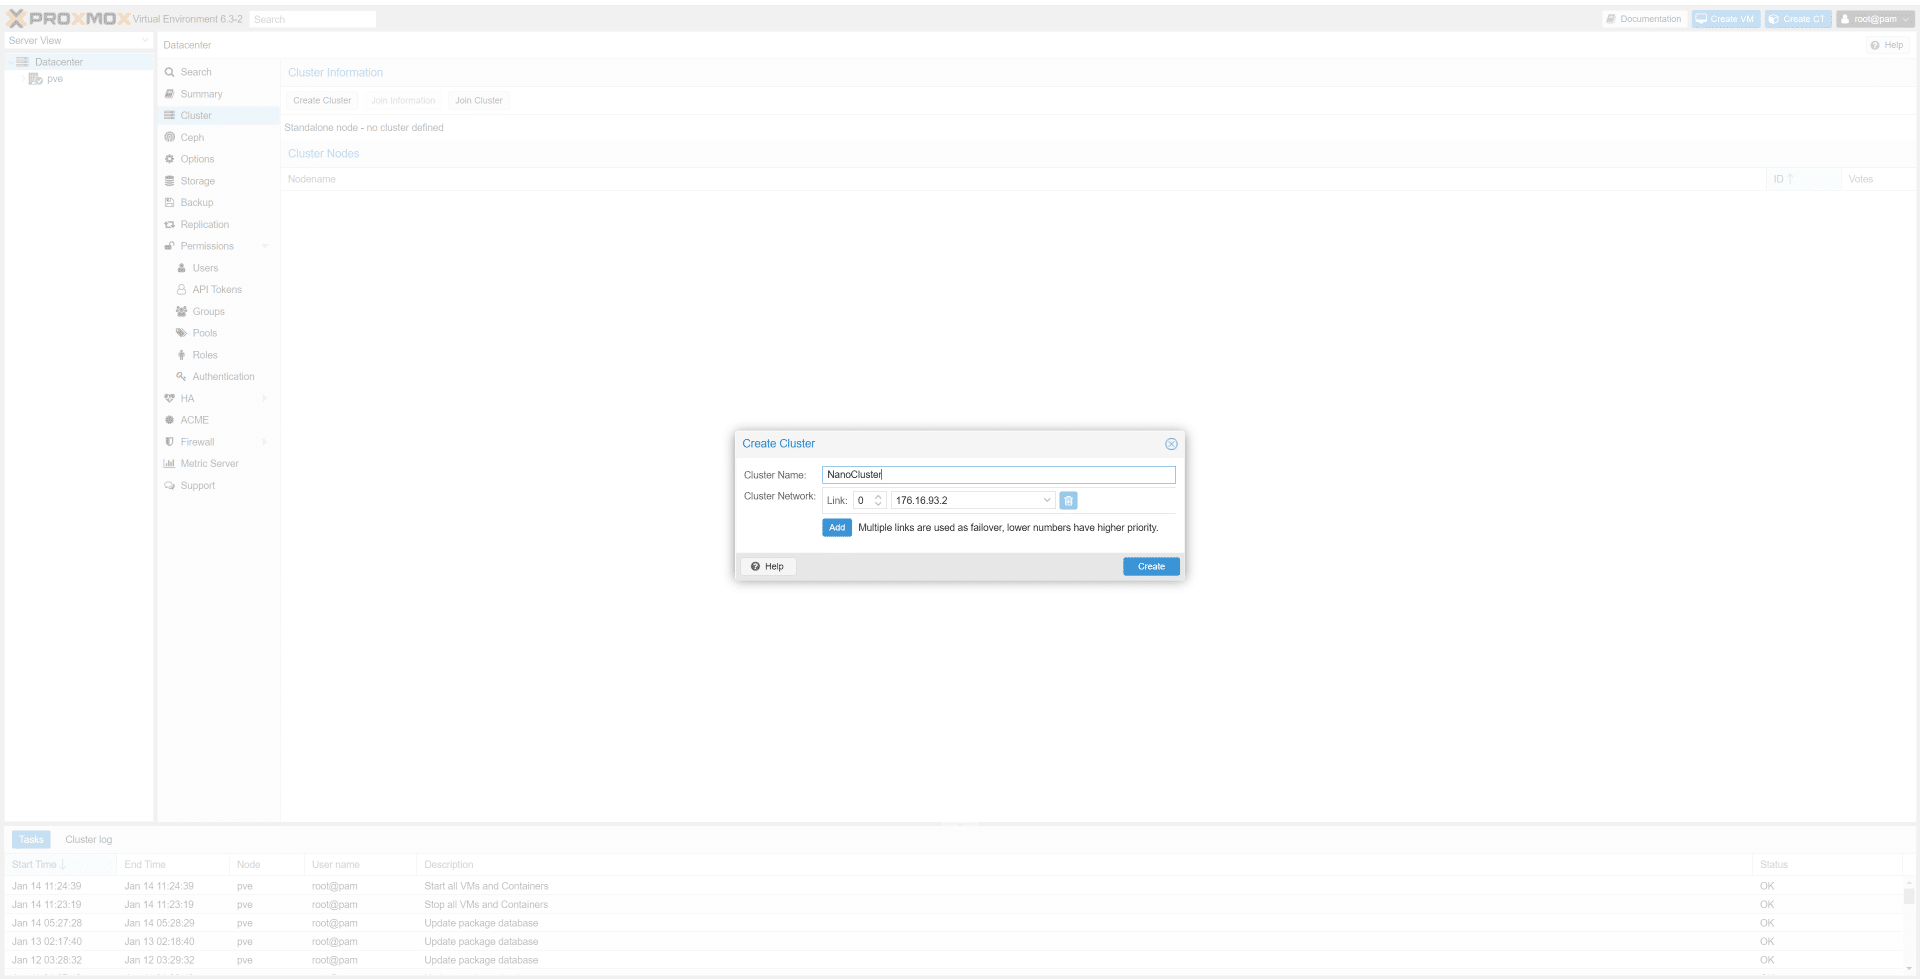
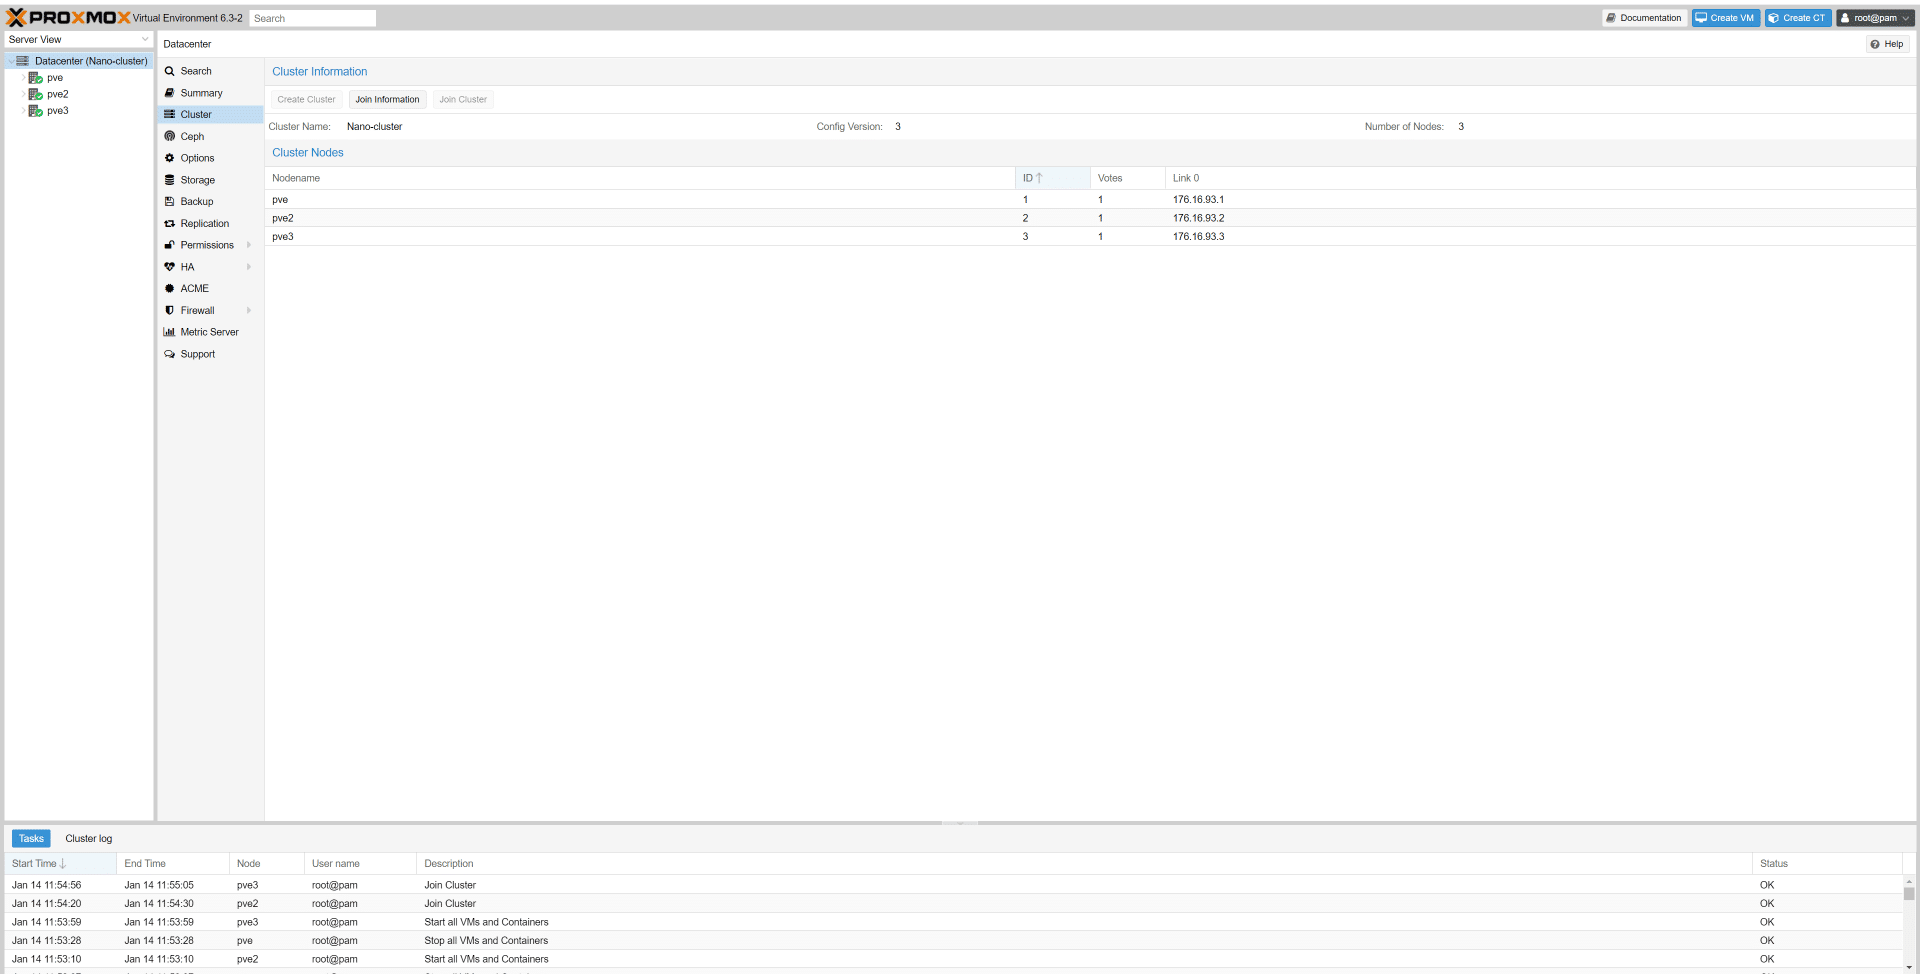
Once we have access to all three nodes, we will open the cluster tab on the first node. From the cluster tab, clicking create cluster will invoke a pop-up asking to assign a Cluster Name. After entering a cluster name click create. We now have a single node cluster running off our first node. The next step is to add a second node to our cluster.
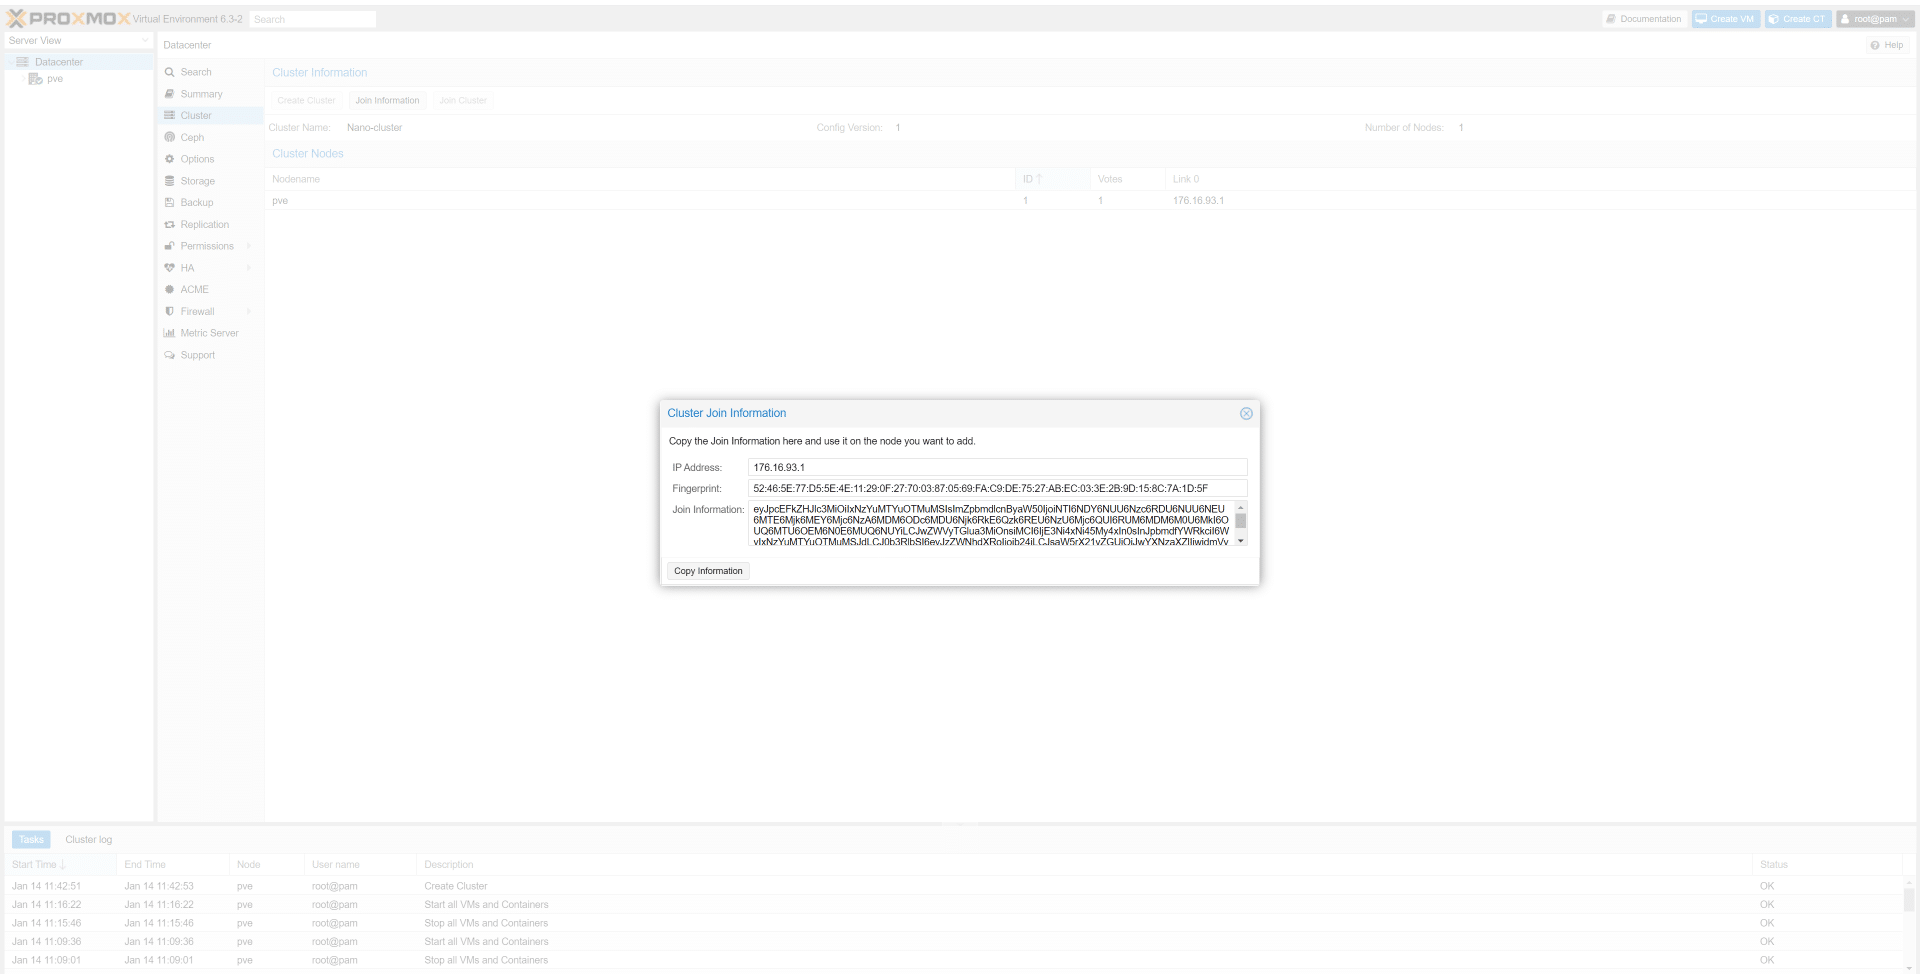
Proxmox streamlined adding more nodes to a cluster by creating a copy/paste join key. To retrieve the join information for the cluster, click the “Join Information” button at the top of the Cluster Information tab. A pop-up containing the IP address of the current node, Fingerprint, and Join Information, clicking the “Copy Information” button will grab the join information we need to add another node to the cluster.
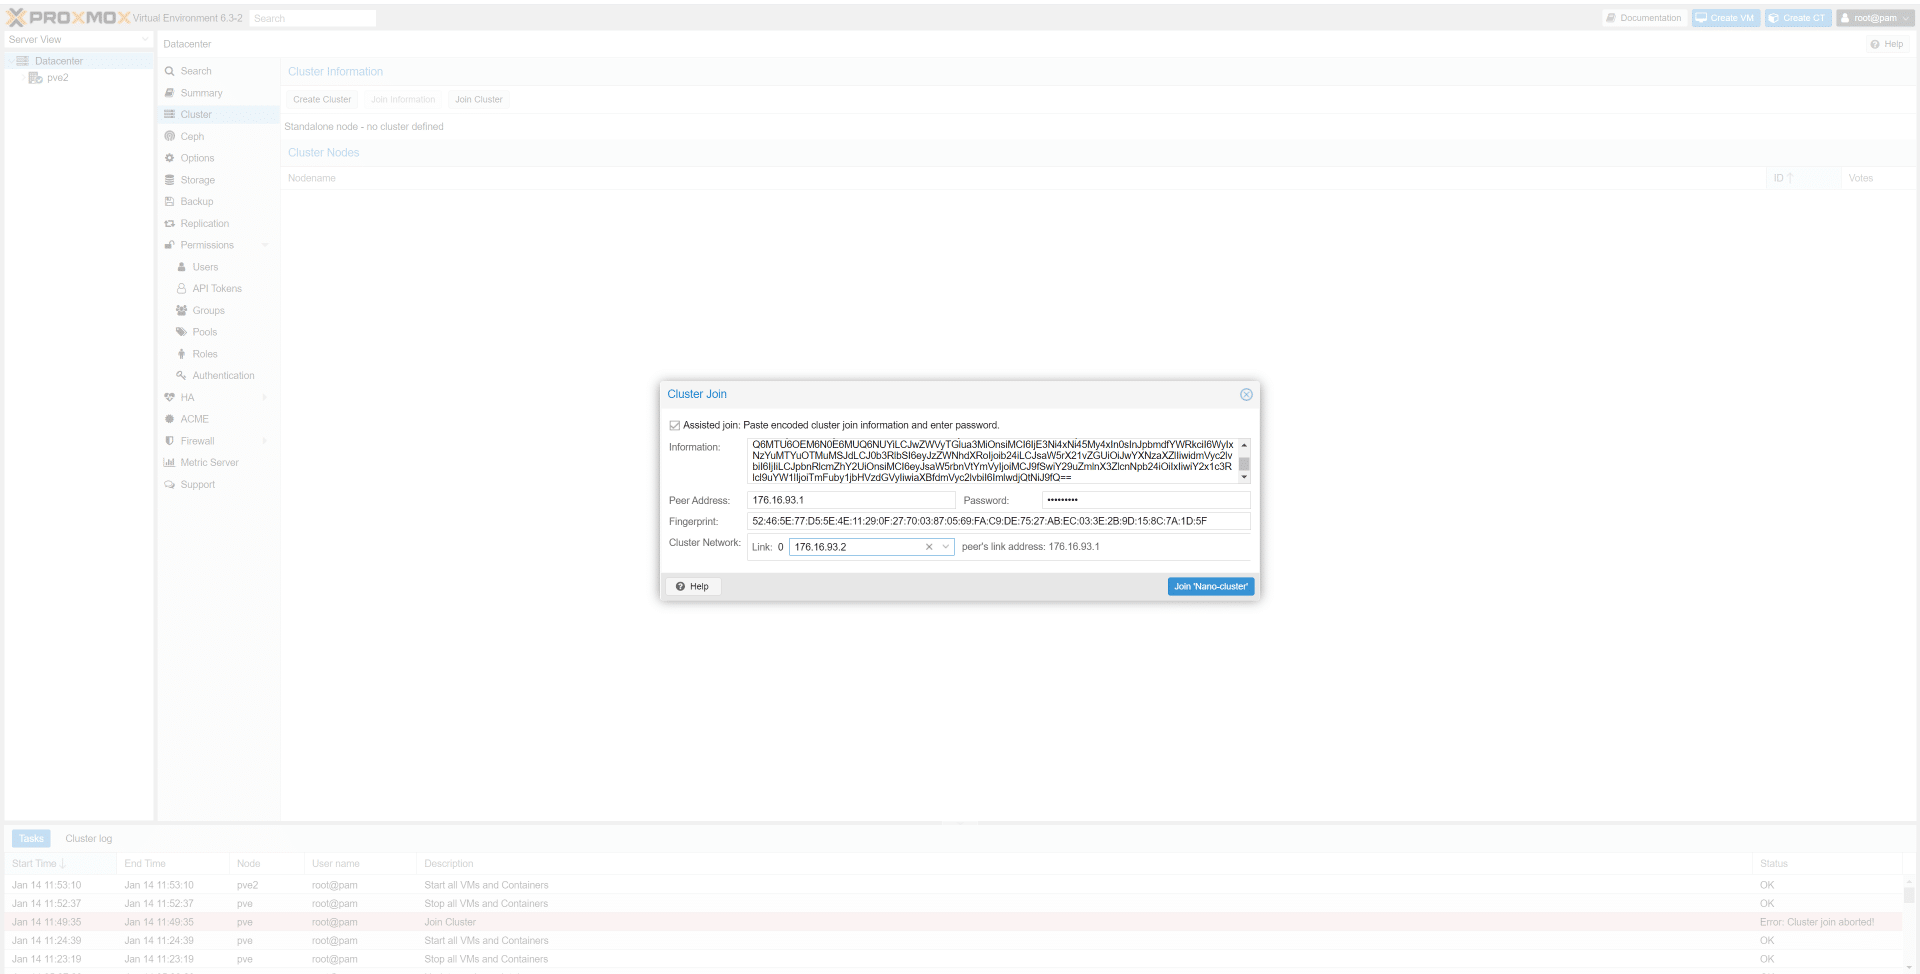
In a new tab, we will need to access the web interface for the second node. Once we have the web interface open to the cluster tab on the second node clicking the “Join Cluster” button at the top will create a pop-up asking for the join information of the cluster. Pasting the join information from our cluster will fill out all fields except for the password. Clicking the join button in the bottom right of the pop-up will add your node to the cluster.
If you did not assign different hostnames to your nodes the join task will run into an error at this point. To change the hostname through the shell edit the /etc/hosts and /etc/hostnames files respectively. Changing the hostname can also be done through the web interface by navigating to your node, then changing the hostname in the System>Network and System>Hosts tabs.
If everything is set up correctly the web interface should time out and once refreshed there should be 2 nodes listed on the left under the Datacenter dropdown. To add the third node, follow the same steps. If all nodes are added correctly Proxmox will allow access to the cluster from any of the 3 nodes’ web interfaces. Proxmox clusters can reach over 100 physical nodes, but we’re stopping at three for this project.
Configuring VMs for Proxmox
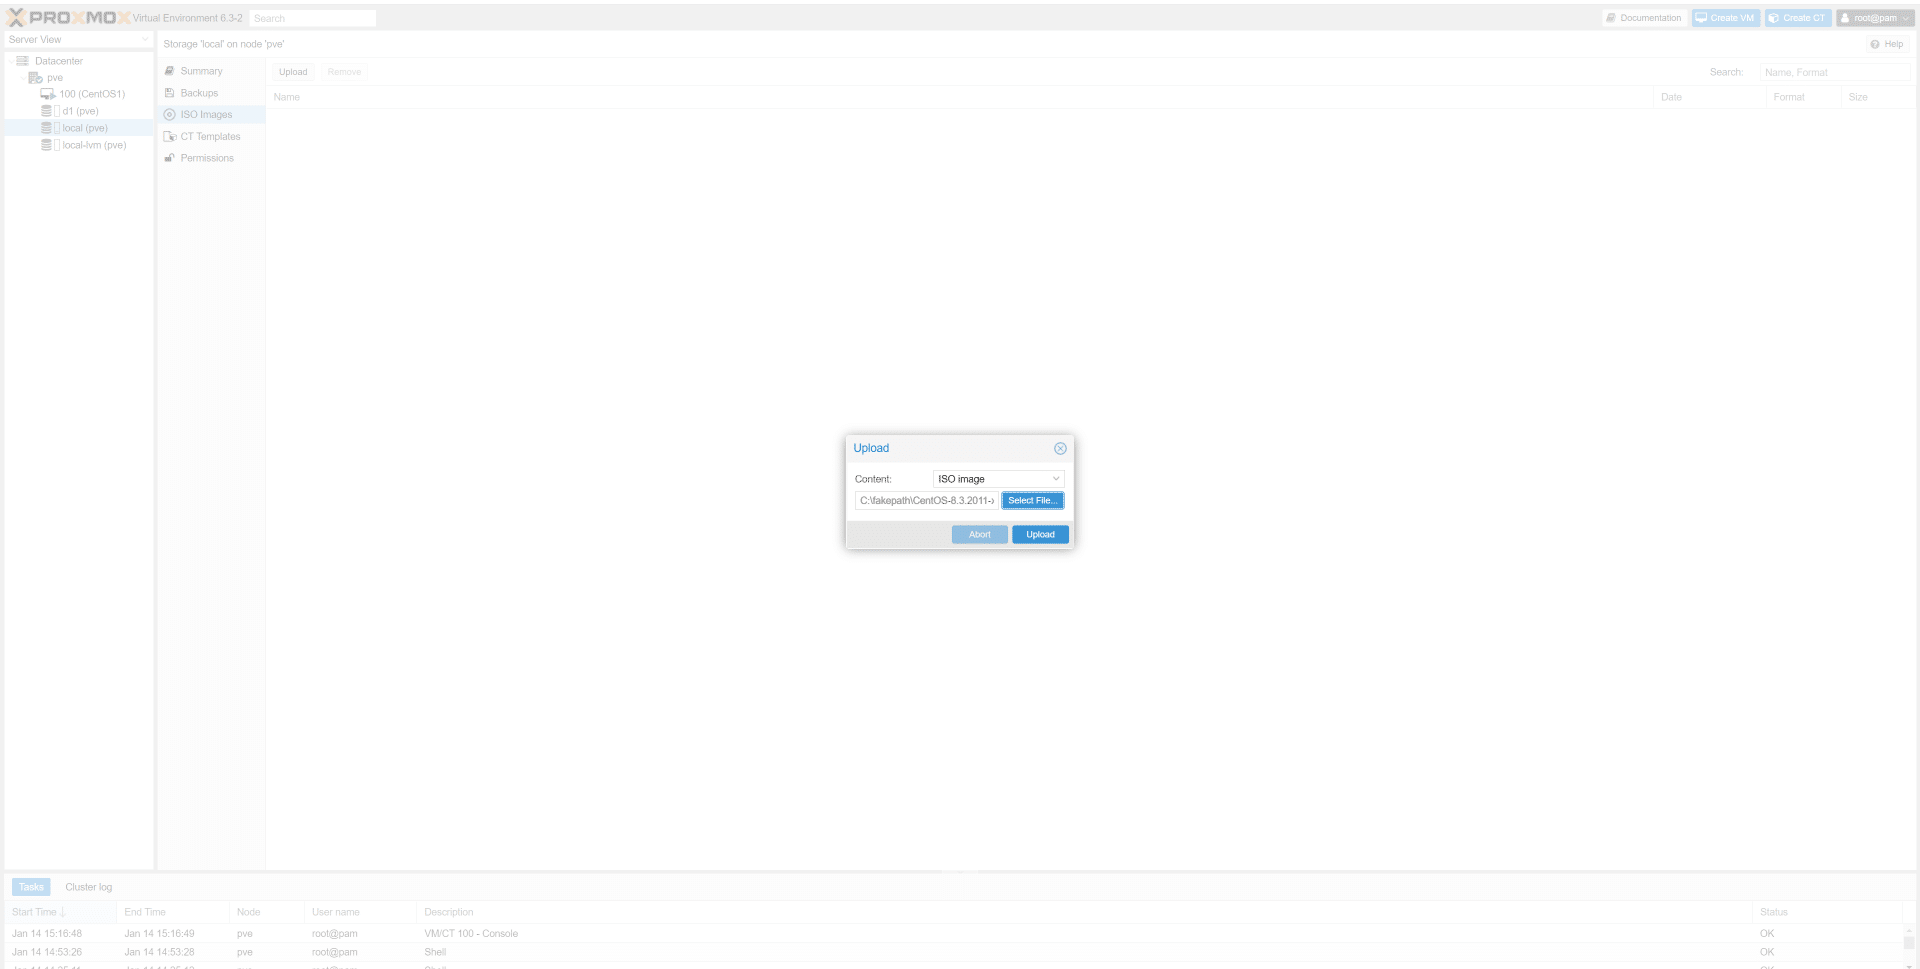
To add a VM to any one of the nodes, we will first need to upload the iso of the OS we want, this is done by selecting the node we want then a storage volume of the node. If there is only one storage device in your node select “local (yourhostname)”. Then select the “ISO images” tab and click the “Upload” button at the top. Select the iso file you want and upload it.
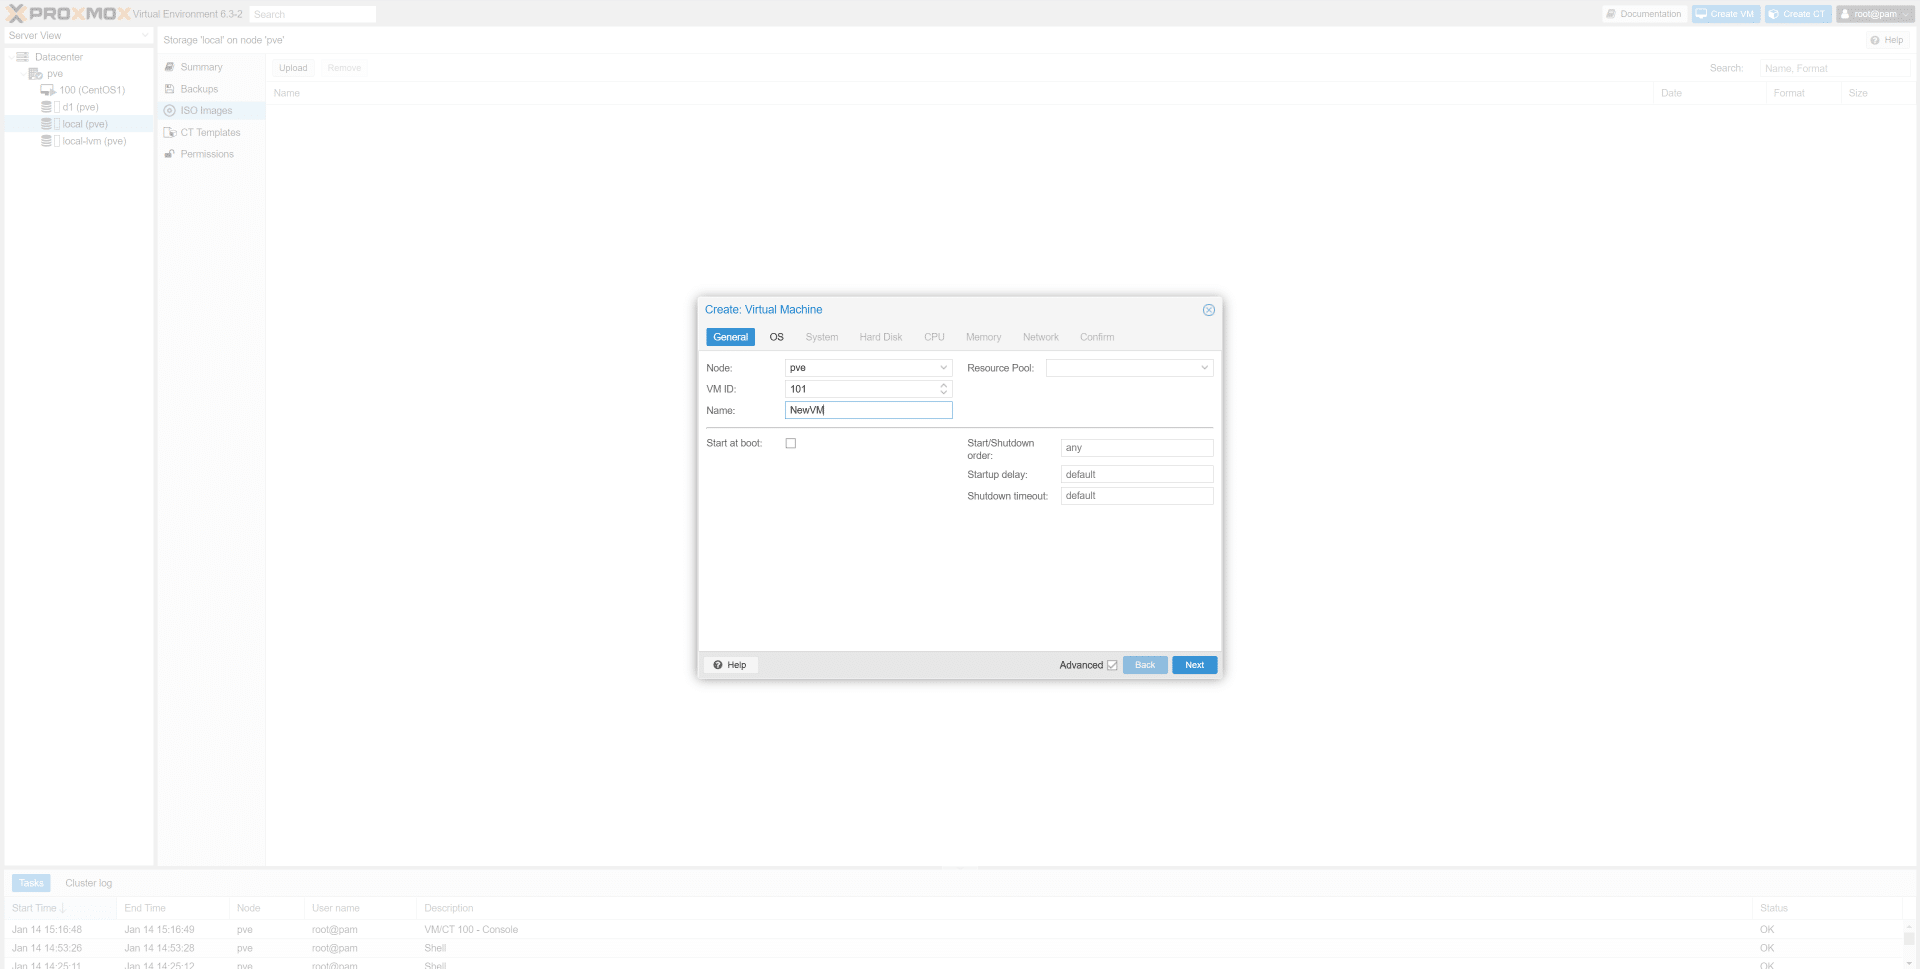
After the upload has completed clicking the “Create VM” will start the virtual machine setup. In the General tab, an ID number for the VM and a Name will need to be assigned. Clicking Next will bring you to the OS tab where you will need to give the path to the ISO.
For our demo, nothing in the System tab will be changed. In the Hard Disk tab, the storage device and Disk Size can be set. In the CPU tab, we can set how many cores will be allocated to the VM. The Memory tab allows us to change the amount of RAM dedicated to the VM. The network setting will be left default. The Confirm tab summarizes the resource allocation for the VM and asks the user to confirm the creation of the VM.
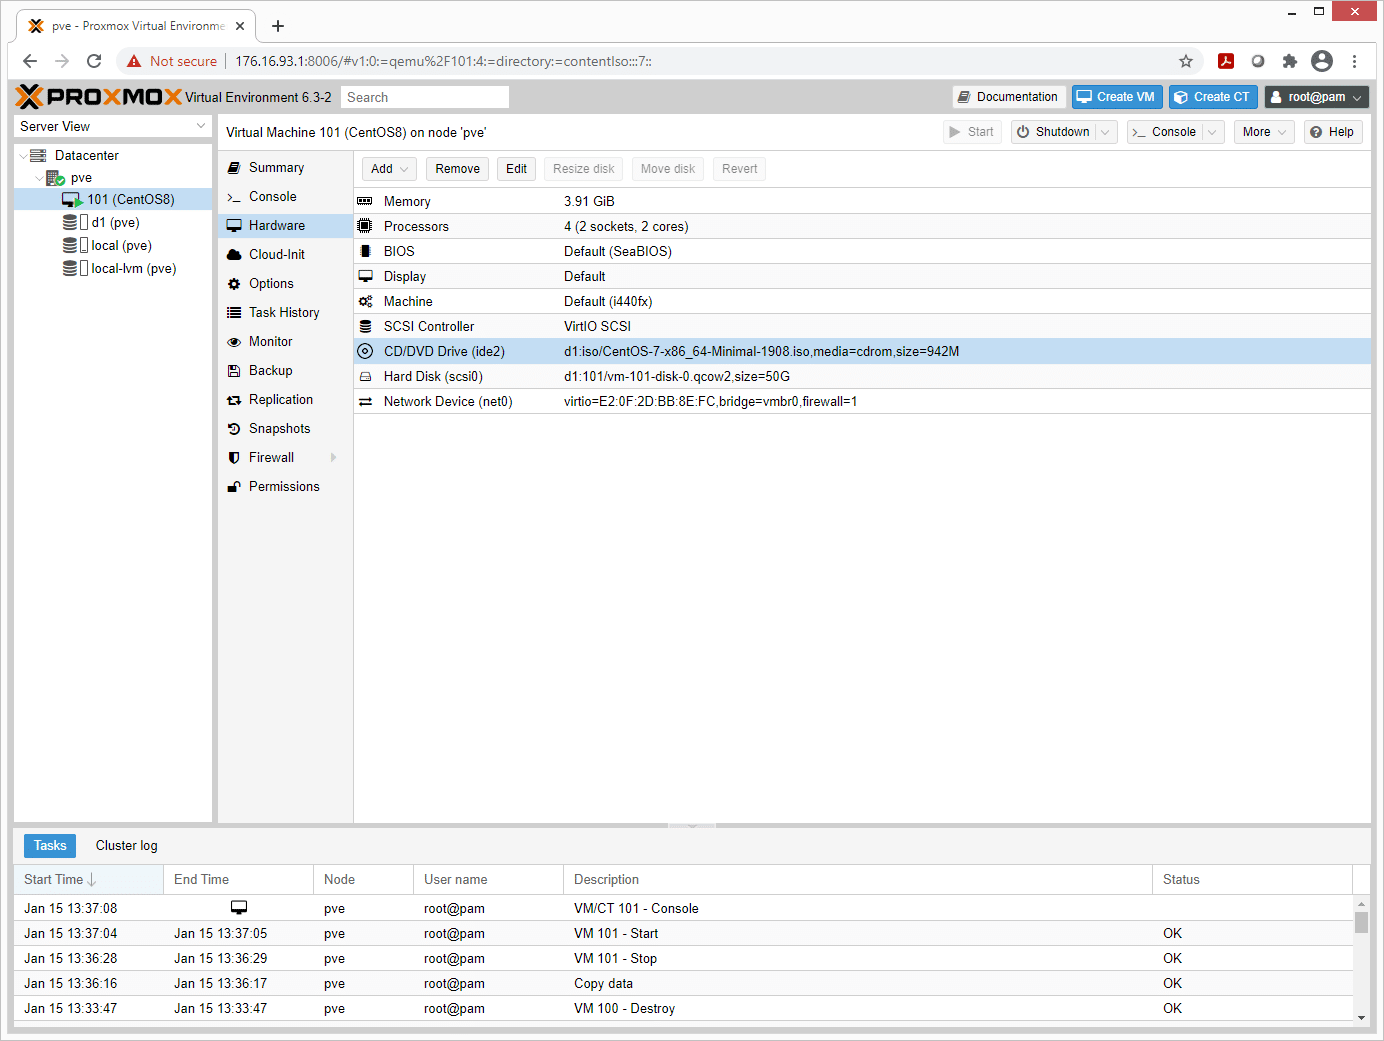
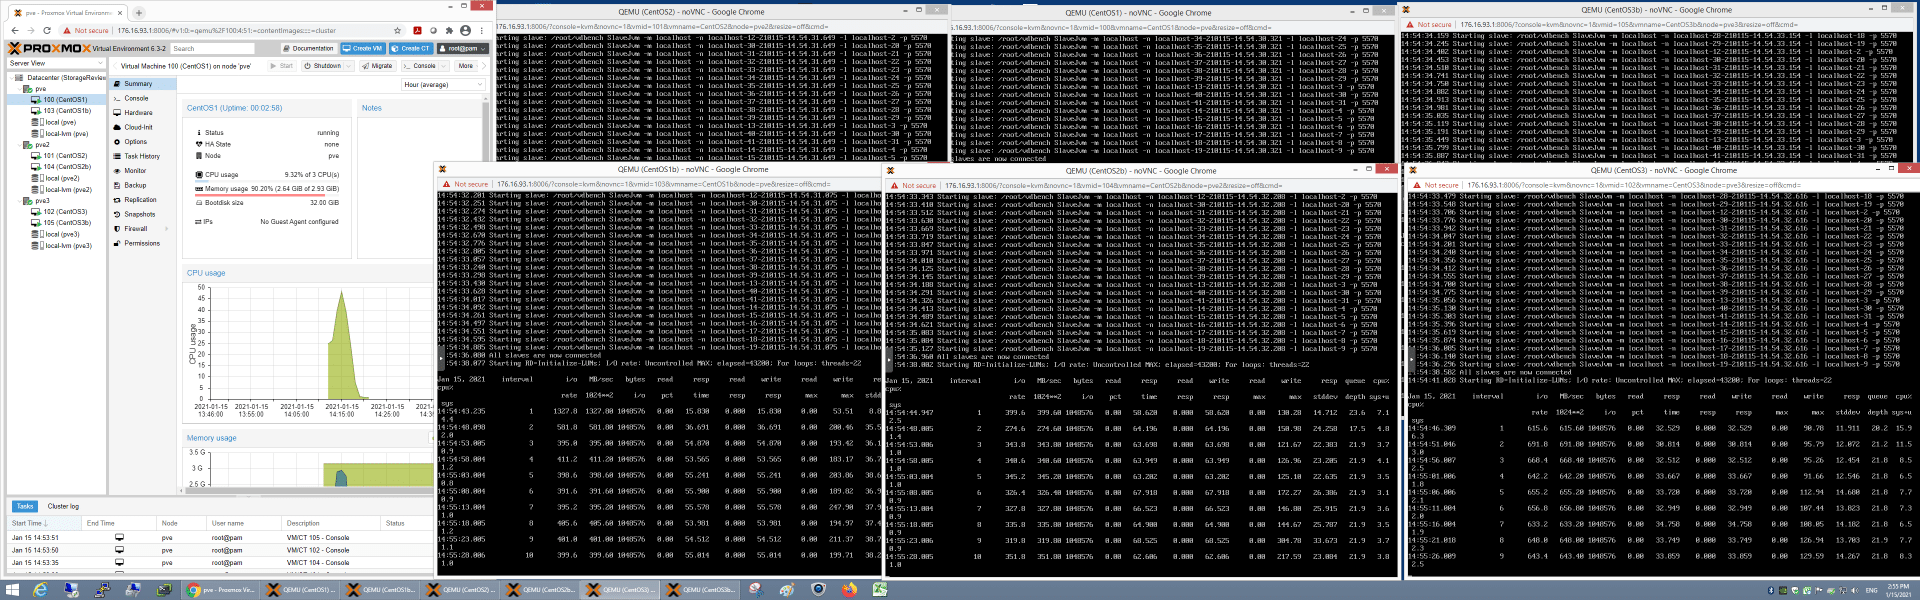
Once the VM creation wizard is completed the VM will be listed on the left under the name of the node. Proxmox uses NoVNC to allow control of the VM through the browser in the console tab. The VM can be started and stopped using the “Start” and “Shutdown” buttons at the top of the VM page. To remove a VM make sure it is off the click the more dropdown at the top and select remove.
Tiny Cluster Proxmox Performance
To kick the tires and start some fires on our test/dev 3-node cluster we did what comes best to us… we deployed 6 VMs and hammered the cluster for all the disk I/O it was worth. This was less of a complete benchmark and more to show just how capable a low-cost deployment can be with VMs sitting on low-cost NVMe storage.
Our VMs consisted of 3 CPUs each, 3GB of RAM each, and a 50GB raw disk assigned in addition to the OS drive to hammer with VDbench. We then hit it with 64K sequential read and write workloads as well as 4K random read and write tests. Surprisingly this 3-node platform is quite capable.
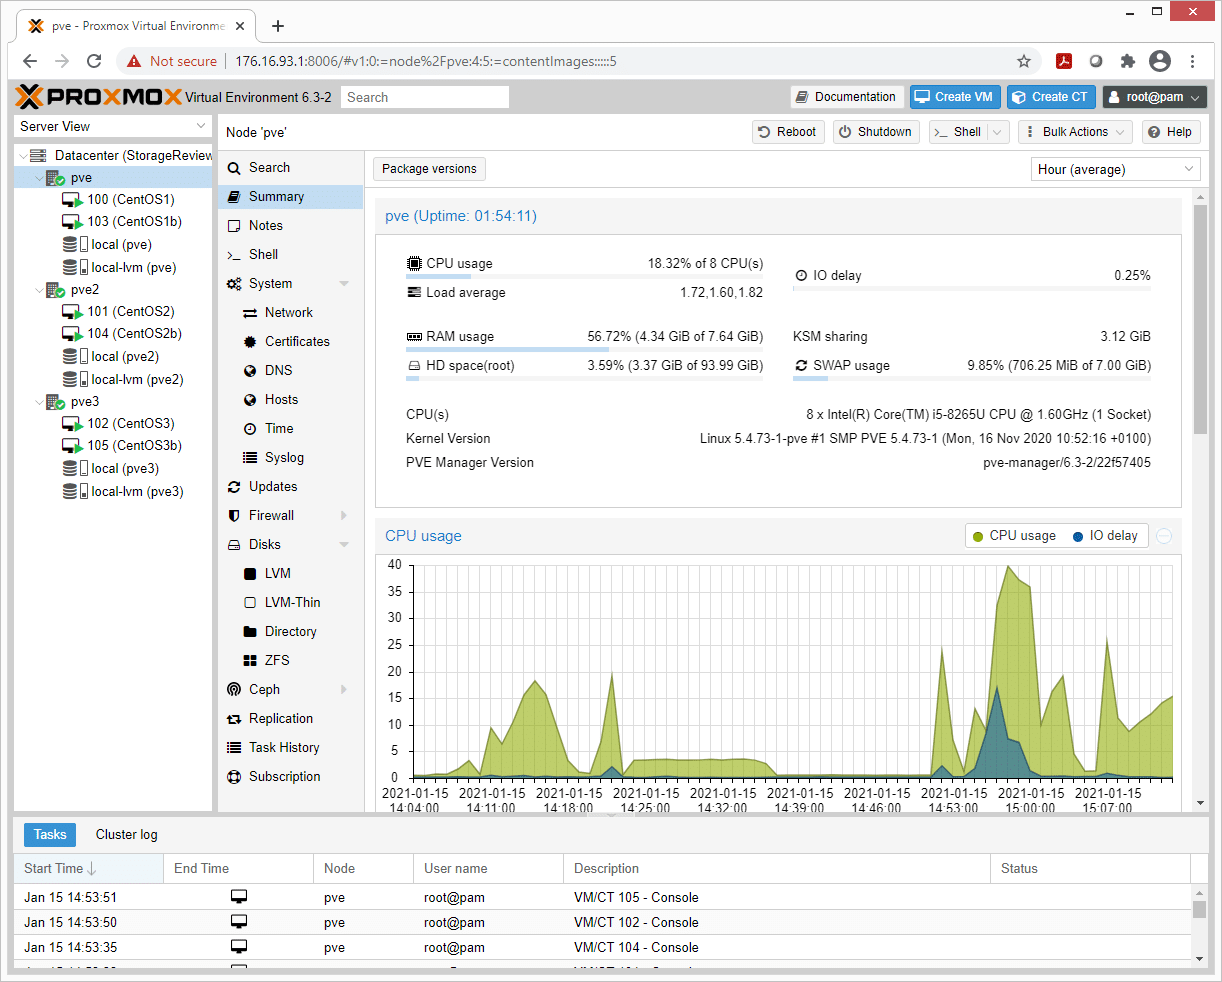
Across the three nodes (which were getting very toasty during our workload deployment) we saw impressive bandwidth and I/O performance. In aggregate, we were able to push 1.9GB/s write and 4.2GB/s read across the 6 VMs. From an I/O perspective, we saw 283k IOPS read and 203k IOPS write.
Final Thoughts
We already loved the Lenovo Nano family and this little lab project did nothing but reaffirm that this hardware, while not designed for it, is ideal for a tiny Proxmox cluster. Considering the performance we were able to drive from this relatively modest configuration, homelabbers could make a far worse hardware selection. Especially considering we’re in at under $2000 for the Nanos. And should you require less performance, Lenovo routinely has lower-end configs on sale for $300. They also offer a line of AMD-based Nano’s and the more rugged IoT version that picks up a second Ethernet port.
We intend to explore Proxmox on the Nano’s a bit further, sharing out Ceph storage is on the list, as well as a few other things. Is there something you’d like us to do? Hit us up on social or drop a note, we’d be happy to consider your requests!


 Amazon